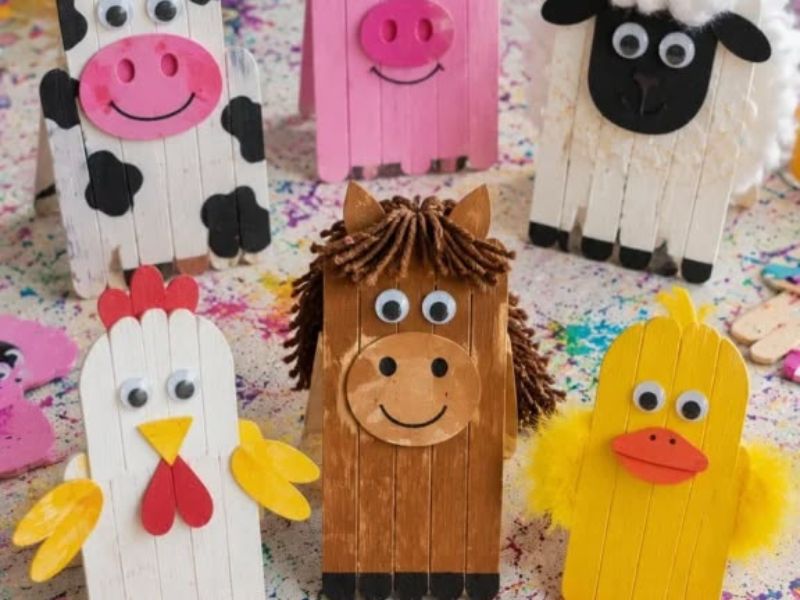
A quiet afternoon can become much more interesting when a few simple craft sticks land on the table. Kids can turn them into little houses, colorful animals, frames, signs, and decorations with very little preparation. That is why easy popsicle stick crafts for kids are such a useful activity for home, school, playdates, and family craft time. The materials are affordable, the projects are flexible, and children can make plenty of changes along the way.
You do not need a huge craft room either. A small collection of craft sticks, glue, paper, paint, markers, and decorations can create several projects. Older children can handle more detailed designs, while younger children can focus on painting, arranging, and decorating with adult guidance.
The best part is that these easy popsicle stick crafts for kids projects are not only about keeping children busy. They encourage creativity, patience, planning, hand control, and problem solving. A child who starts with a simple pile of sticks may soon be deciding how to build a roof, where to place a window, or which colors belong together.
Before choosing a project, gather the basic supplies and protect the work surface. If glue or paint needs extra care, let an adult handle that part. Then allow the child to take the creative lead.
If you love meaningful projects that children can keep for years, you can also explore How to Create a DIY Memory Box for Kids That Preserves Their Favourite Childhood Moments for another hands on idea.
Easy Popsicle Stick Crafts Kids Can Make at Home
Popsicle sticks are one of the easiest craft supplies to keep around when kids want something fun to make. They are inexpensive, lightweight, and simple enough for little hands to handle with some adult supervision. With a handful of sticks, glue, paint, markers, and a few basic decorations, children can turn a simple craft material into colorful toys, decorations, animals, picture frames, and useful little creations.
These crafts are also a great way to encourage creativity without making the activity feel like a lesson. Kids can choose their favorite colors, add their own decorations, and change the designs to match their personalities. Even when two children follow the same instructions, their finished projects can look completely different.
You can make popsicle stick crafts during a rainy afternoon, school break, playdate, or family craft session. Younger children may need help with gluing and cutting, while older kids can take more responsibility for measuring, arranging, painting, and decorating. The goal is not to make every project perfect. Instead, give kids the freedom to experiment and enjoy the process.
From colorful animals and tiny houses to photo frames and simple puppets, there are plenty of ways to turn ordinary popsicle sticks into something exciting. Start with easy designs that require only a few materials, then let children gradually try more detailed projects as their confidence grows.
Check out our Coil Clay Ideas: 13 Projects You Can Make Without a Pottery Wheel
15 Easy Popsicle Stick Crafts for Kids
These easy popsicle stick crafts for kids are designed to be simple enough for beginners while still leaving plenty of room for creativity. Each project includes a clear tutorial, useful tips, and a way to make the finished piece feel personal.
1. Popsicle Stick Photo Frame
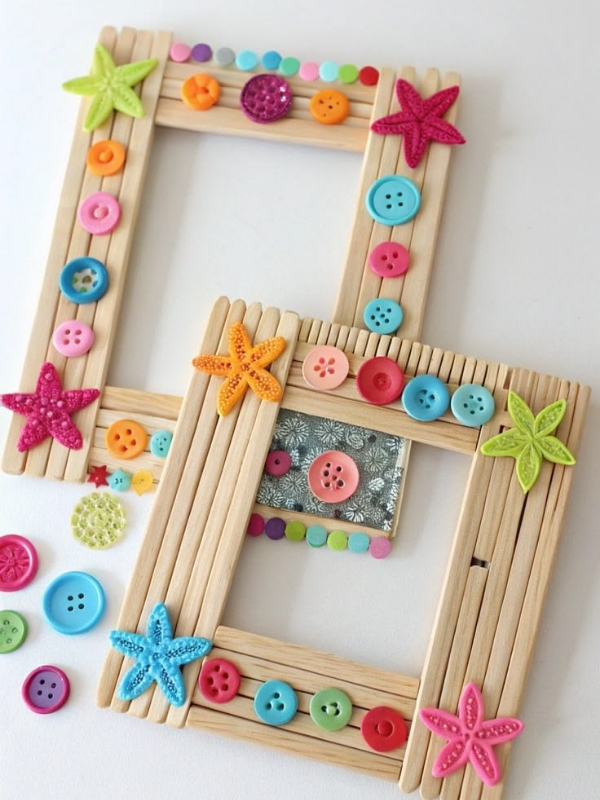
A handmade photo frame is one of the sweetest projects children can create with craft sticks. It gives them something useful to decorate, and the finished frame can hold a favorite family photo, school picture, or special memory. It also makes a lovely keepsake because the child can look back at their own artwork later.
The basic frame is simple, but the decorating possibilities are almost endless. Children can paint the sticks, add paper shapes, write their names, or create a theme around the photograph they plan to display. For example, a beach photo could have blue and yellow decorations, while a family picture could have hearts and stars.
How to make a popsicle stick photo frame
Start by choosing eight craft sticks that are similar in size. Paint them before assembling the frame if your child wants colorful edges. Allow the paint to dry completely.
Arrange four sticks into a square. Place one stick across each corner to create a firm frame shape. Add the remaining sticks around the outside if you want a thicker border.
Use craft glue to secure the pieces. Let the frame dry without moving it.
Once it feels firm, decorate the front. Add stickers, paper flowers, small drawings, or a name.
Finally, attach a photograph to the back with removable tape. You can also add a small stand made from cardboard.
For another thoughtful craft idea, explore Rhinestone and Bedazzle Crafts You Can Make at Home for Stylish DIY Decor and Gifts for projects inspired by simple materials around children.
2. Popsicle Stick Pencil Holder
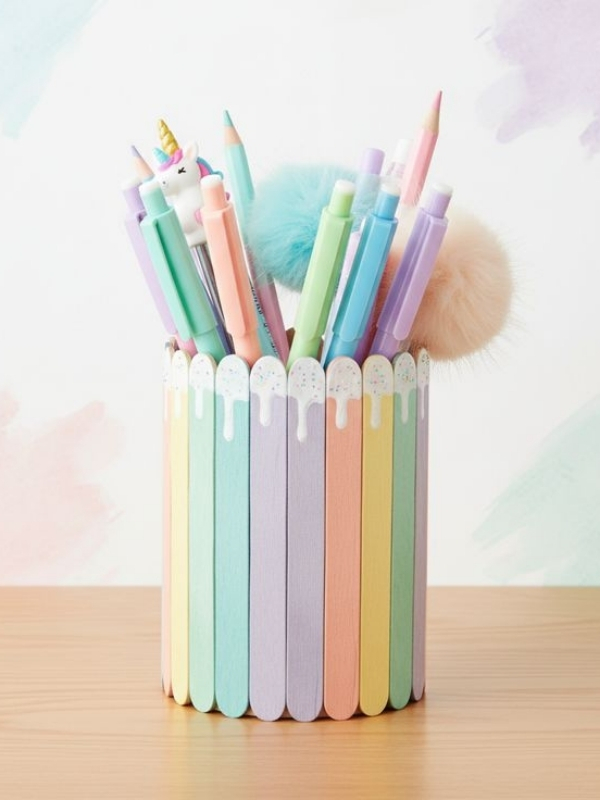
A pencil holder is a practical project that turns craft sticks into something children can actually use. It works especially well for a homework desk, art corner, or bedroom shelf. Since the finished holder can be decorated in countless ways, children can make it match their favorite colors or interests.
This is also a good project for teaching children about building around a base. They can see how repeated pieces can create a stronger structure. That makes the activity creative while also introducing simple construction ideas.
How to make a popsicle stick pencil holder
Begin with a clean empty container. A small cardboard tube or sturdy plastic cup can work as the hidden base.
Paint the container first if you want the inside to have color. Let it dry before adding the sticks.
Apply glue to one side of the container. Place craft sticks vertically beside each other until that side is covered.
Continue around the container. Keep the sticks close together so the finished holder looks neat.
If some sticks extend beyond the bottom, trim them only with adult help. You can also choose to leave the edges slightly uneven for a handmade appearance.
Let the glue dry completely.
Now decorate the holder with paint, stickers, paper shapes, or a simple name design. Children can even create different holders for pencils, crayons, and paintbrushes.
If your child enjoys making crafts that could become useful products, check out [How to Make Crafts: 20 Easy Crafts to Sell and Make Profits From Home If You Need Extra Income for more handmade project inspiration.
3. Popsicle Stick Mini House
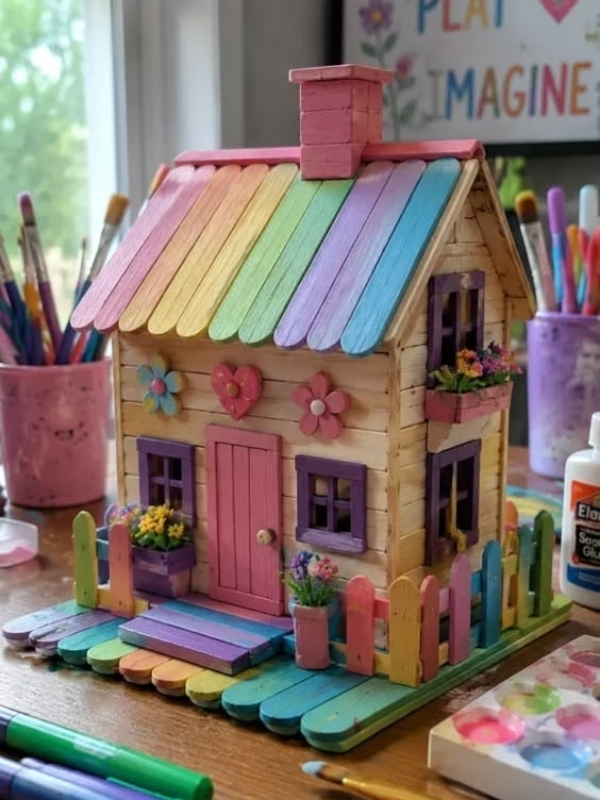
Building a miniature house is one of those easy popsicle stick crafts for kids that can keep children busy for quite a while. The project encourages imagination because the house does not need to look realistic. It can become a tiny cottage, a fairy home, a colorful family house, or even a pretend shop.
Children can also create furniture from leftover craft materials. Once the house is complete, it can become part of imaginative play.
How to make a popsicle stick mini house
Start by making two square wall panels. Lay craft sticks side by side until you have a small wall.
Place two sticks across the back to hold the pieces together. Allow the glue to dry before moving the panel.
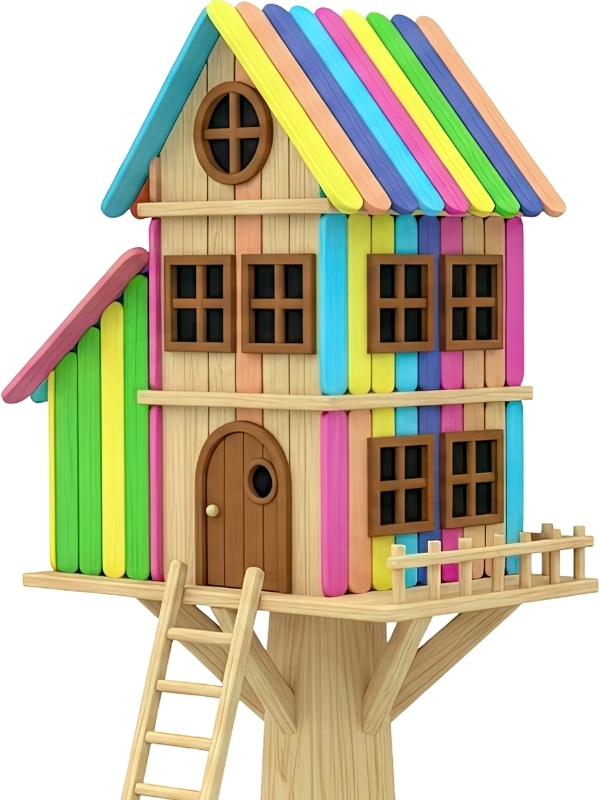
Create another wall using the same method.
For the front, leave a small opening for a door. You can also leave smaller spaces for windows.
Make a simple roof by creating two rectangular panels. Place them together at an angle to form the roof shape.
Attach the roof gently after the walls are stable.
For the door, cut a small piece of cardboard and decorate it with a tiny handle. Windows can be made from colored paper.
Paint the house once the structure is secure. Add flowers, a pathway, a mailbox, or a tiny garden using paper and leftover craft supplies.
For another project that combines simple materials with playful construction, try DIY Water Table for Kids That Creates the Cutest Backyard Playtime for more hands on inspiration.
4. Popsicle Stick Butterfly
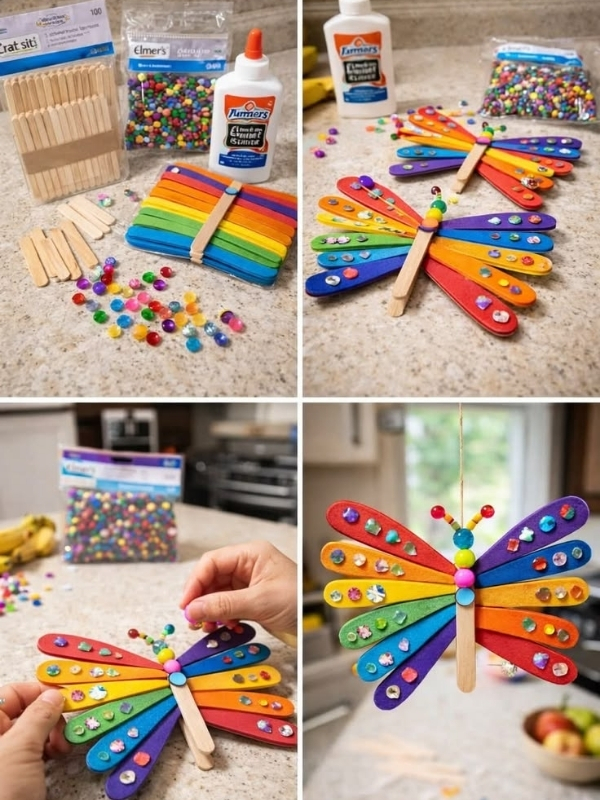
Butterflies are perfect for children who love bright colors and nature. This project does not require complicated shapes, yet it gives children plenty of room to experiment with patterns. Every butterfly can look completely different.
You can make one butterfly or create several. A group of colorful butterflies can become bedroom decorations, classroom artwork, or a cheerful display near a window.
How to make a popsicle stick butterfly
Begin by painting one craft stick. This will become the butterfly body. Choose any color your child likes.
Next, draw two large wing shapes on colored paper. The wings do not need to match perfectly. Natural differences can make the butterfly look more interesting.
Cut out the wings with adult assistance when needed.
Place the wings behind the craft stick and glue them in position.
Add two small paper circles or dots for the eyes. You can draw the eyes instead if that feels easier.
For antennae, use thin strips of paper. Curl the ends gently and glue them behind the top of the craft stick.
Now decorate the wings. Add dots, small hearts, lines, stars, or simple patterns using markers.
You can also add a little glitter if your craft area is prepared for it.
Let everything dry before handling the butterfly.
To turn the project into a nature themed afternoon, explore DIY Gardening Ideas for Small Spaces and Tiny Backyards and let children look for colors and shapes that inspire their butterfly designs.
5. Popsicle Stick Garden Sign
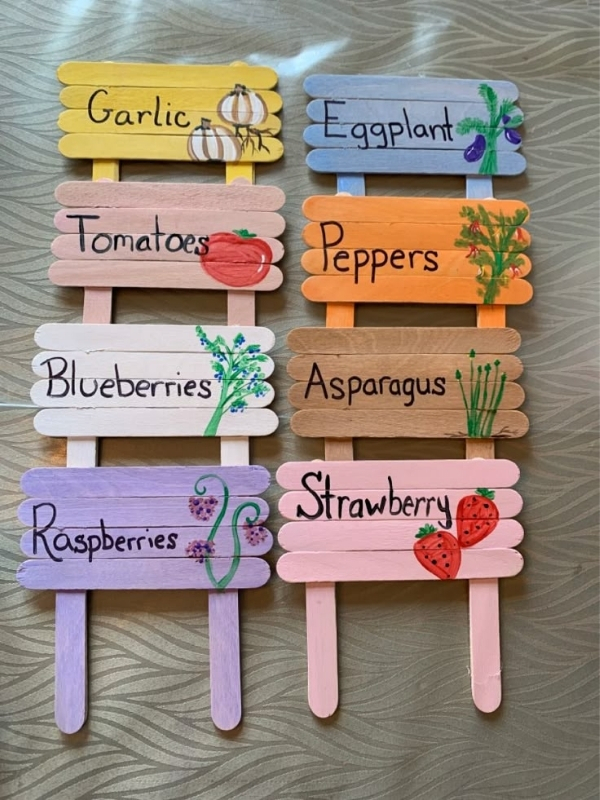
A garden sign gives children a chance to combine crafting with writing. They can create signs for flowers, herbs, pretend gardens, or even their own imaginary garden. The project is especially fun when children choose the words themselves.
You do not need a real garden either. The signs can decorate plant pots, a balcony garden, a classroom display, or a pretend play area.
How to make a popsicle stick garden sign
Choose three or four craft sticks for the sign. Paint them in one color or use several colors for a playful design.
Lay the sticks together in a row. Glue one additional stick across the back to hold them together.
Allow the base to dry.
Once it is firm, write a word across the front. Children could write “Flowers,” “Garden,” “Mint,” “Welcome,” or even create a funny name for their pretend garden.
For younger children, write the word lightly in pencil first. They can trace over it with a marker.
Add small drawings around the lettering. Flowers, leaves, butterflies, clouds, and ladybugs are easy choices.
If the sign will stay outdoors, protect it with an appropriate sealant handled by an adult.
You can also attach a craft stick to the back as a support. Push the lower part into soil once everything is dry.
For more ideas that connect creativity with outdoor spaces, take a look at [Garden Crafts for Preschool: Fun and Easy Nature Projects for Kids only if you have not already used that link.
6. Popsicle Stick Rainbow
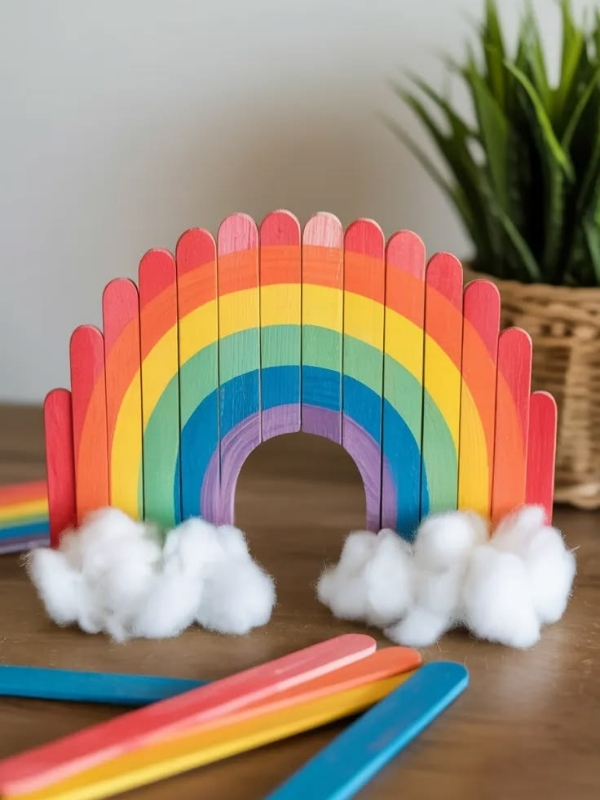
A rainbow craft is colorful, cheerful, and easy to personalize. Children can practice arranging colors while creating a decoration that works well for a bedroom wall, classroom board, or playroom.
This project is also useful when you want a craft that does not require a lot of complicated cutting. The sticks provide the structure, while paper creates the rainbow shape.
How to make a popsicle stick rainbow
Choose several craft sticks and paint each one a different rainbow color. You can use traditional colors or let your child invent a completely different palette.
Place the sticks beside each other once they are dry.
Cut a large cloud shape from white paper or cardboard. Make another cloud for the opposite side.
Glue the colored sticks behind the clouds. Arrange them so they create a curved rainbow effect.
If you want a more structured rainbow, place the sticks in a gentle arch. Keep the arrangement simple because the clouds will hide the ends.
Add cotton balls to the clouds for a soft texture. Children can gently pull the cotton apart before gluing it down.
You can also add small stars or paper raindrops.
Let the entire project dry flat.
For a more sensory focused activity that keeps little hands exploring, visit Sensory Activities for Nursery Children Using Everyday Items to Support Early Learning for another child friendly creative idea.
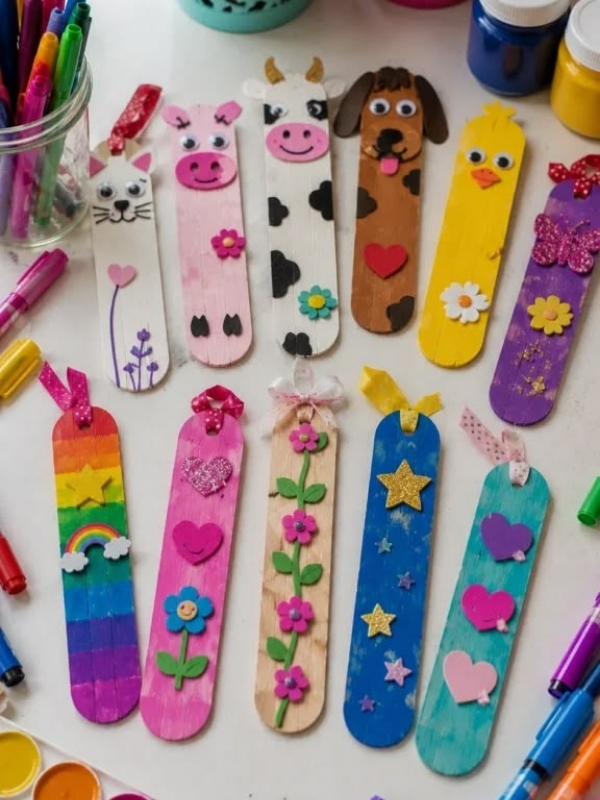
7. Popsicle Stick Bookmark
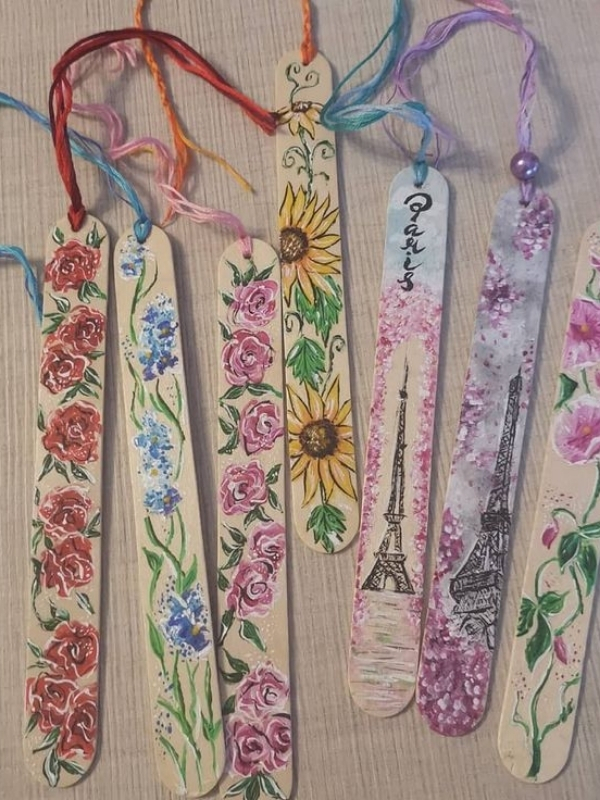
A bookmark is one of the most useful easy popsicle stick crafts for kids because the finished project can immediately become part of reading time. Children can design a bookmark around their favorite colors, characters, animals, or interests.
It is also small enough to make several in one sitting. That makes it a good project for siblings or friends who want to create something together.
How to make a popsicle stick bookmark
Choose one wide craft stick or two regular sticks. Paint the stick with a thin layer of acrylic or washable paint.
Let it dry completely before adding details.
Write the child’s name near the bottom. This makes it easy to identify if several children are crafting together.
Decorate the top with a small drawing. A heart, flower, star, animal, rainbow, or simple face can work beautifully.
You can also glue a small paper shape to the top. Avoid adding anything too bulky because the bookmark needs to slide comfortably between book pages.
For an extra personal touch, wrap a little ribbon around the top. Secure it firmly with glue.
Another option is to add a small tassel made from yarn.
Once everything is dry, place the bookmark inside a favorite book.
Children can make different bookmarks for different books. They might create a space design for a science book or a floral design for a storybook.
If your child enjoys handmade projects with texture and detail, you can explore [Textured Crochet Stitches to Give Your Projects More Depth and Dimension for more creative inspiration.
8. Popsicle Stick Animal Puppet
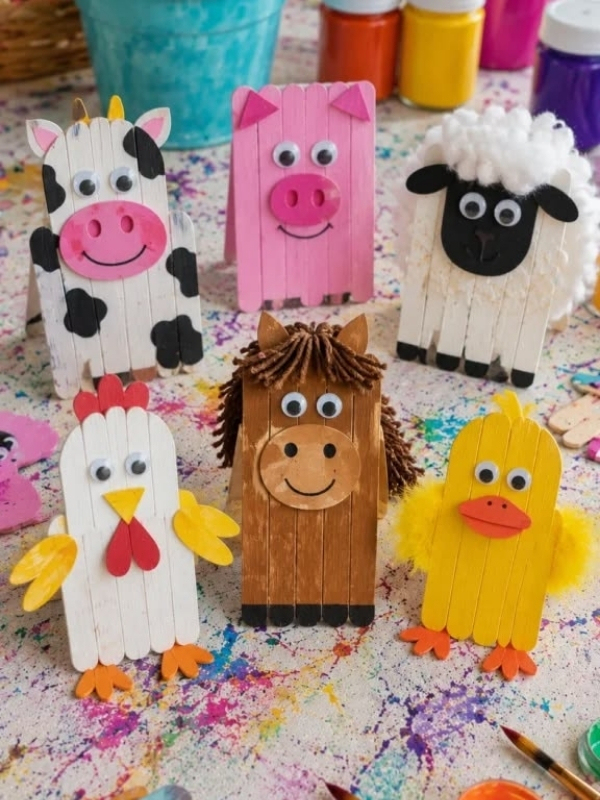
Animal puppets turn craft time into pretend play. Children can make dogs, cats, lions, rabbits, frogs, birds, or imaginary creatures. The project becomes even more enjoyable when they invent voices and stories for their finished puppets.
It is a great choice for siblings because everyone can make a different character before putting on a little puppet show.
How to make a popsicle stick animal puppet
Start by choosing the animal your child wants to create.
Draw the animal face on a piece of paper or lightweight cardboard. Keep the shape simple so it is easy to cut.
Color the face using markers or crayons.
Cut around the shape with adult assistance when necessary.
Add details such as ears, whiskers, spots, eyebrows, or a nose.
Apply glue to the back of the face. Place a craft stick underneath it so the stick becomes the puppet handle.
Press gently and allow the glue to dry.
For extra detail, add paper ears behind the head or small yarn pieces for hair.
Once the puppet is finished, encourage your child to create a short story. The animal could be going to school, visiting a friend, looking for food, or preparing for a party.
Making several characters can turn the craft into a full activity.
For another hands on project that connects creativity with storytelling and learning, try [Daniel and the Lion Den Craft: An Easy Bible Activity That Helps Kids .
9. Popsicle Stick Sun Decoration
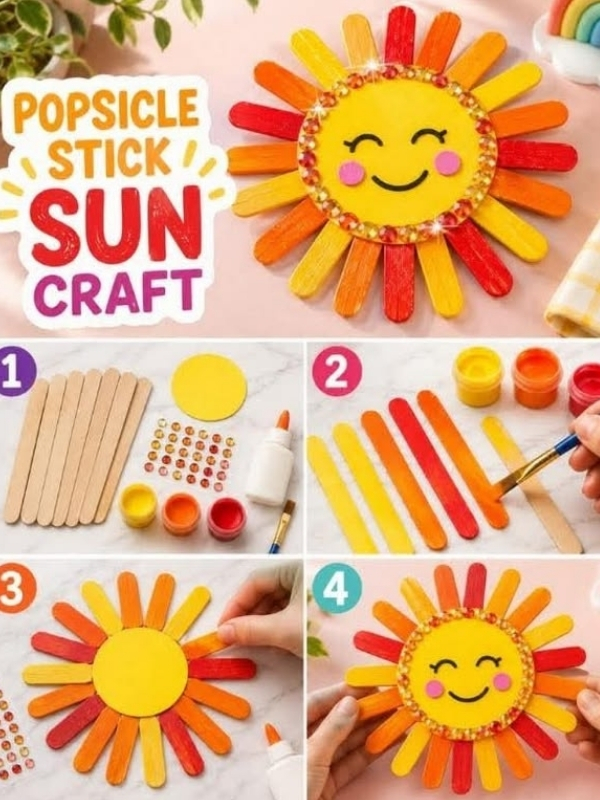
A bright sun decoration can instantly make a craft area feel happier. It is simple enough for younger children, yet older children can add patterns and details to make the design more interesting.
The project also gives children a chance to practice arranging repeated shapes around a center.
How to make a popsicle stick sun decoration
Begin with a small cardboard circle. This will become the center of the sun.
Paint the circle yellow or orange.
Next, paint several craft sticks in yellow, orange, or another warm color.
Once the paint is dry, place the sticks around the circle. They should extend outward like sun rays.
Glue each stick carefully to the back of the cardboard circle.
Try to space them evenly, but do not worry if they are not perfect. Handmade projects should still look handmade.
Add a face to the center if your child wants a cheerful character. Draw two eyes, a nose, and a smile.
You can also add patterns to the rays. Stripes, dots, tiny hearts, and stars all work well.
Let the sun dry completely before attaching string to the back.
Hang it on a bedroom wall, classroom display, or craft board.
If your child enjoys making creative pieces from simple materials, explore Creative DIY Crafts for Adults: 20 Fun Crafts to Try When You’re Bored at Home for more ideas to inspire your next craft session.
10. Popsicle Stick Fall Tree
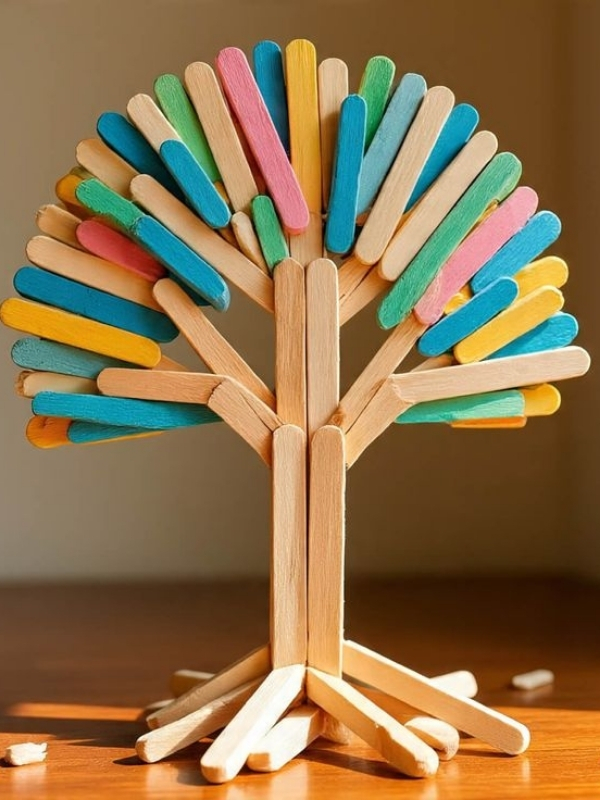
Once the nonseasonal projects are finished, it can be fun to introduce a seasonal craft on this easy popsicle stick crafts for kids. A fall tree made from craft sticks gives children a simple way to explore autumn colors while creating a piece of artwork they can display.
Children can choose traditional fall colors or create an imaginary tree with pink, purple, blue, or rainbow leaves.
How to make a popsicle stick fall tree
Start by painting one craft stick brown. This becomes the tree trunk.
For the branches, cut several thin pieces of brown paper.
Glue the branches near the top of the craft stick.
Next, create leaves using small pieces of colored paper. Red, orange, yellow, and brown work well for a classic fall appearance.
Children can tear the paper instead of cutting it. The uneven edges can make the leaves look more natural.
Add glue to the branch areas and place the leaves around them.
You can also add a few leaves falling toward the bottom of the page.
Mount the finished tree on a sheet of blue or cream cardstock.
For more seasonal inspiration, try DIY Fall Wreath Craft for a Bare Front Door: Easy Budget Friendly Autumn Decor That Looks Expensive for another creative fall project.
11. Popsicle Stick Fall Handprint Tree
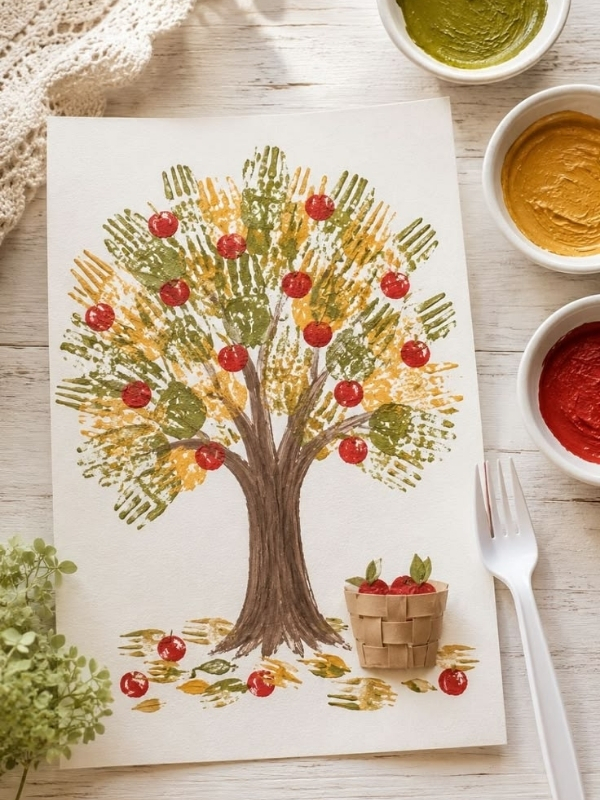
A handprint tree combines a personal keepsake with a simple craft structure. It works especially well when parents want to preserve a small moment from childhood. The handprint becomes the tree canopy, while craft sticks create the trunk.
The finished piece can be dated and saved with other childhood artwork.
How to make a popsicle stick fall handprint tree
Start by placing a child’s hand on a sheet of paper. Trace around it carefully.
Cut out the hand shape with adult help.
Paint or color the hand using fall shades such as orange, yellow, red, and brown.
Create the trunk from two or three craft sticks. Paint them brown and allow them to dry.
Glue the craft sticks vertically onto a piece of cardstock.
Place the hand shape above the sticks so the fingers look like branches.
Glue it into place.
Add small paper leaves around the tree if desired.
Write the child’s name and age near the bottom. You can also add the date.
Ask the child to name one thing they enjoyed during the season. Write their answer beneath the tree.
That small detail can make the craft more meaningful later.
For another keepsake project that captures childhood memories, explore [How to Make Easy Fall Handprint Crafts for Kids That Turn Into Meaningful Keepsakes for more seasonal ideas.
12. Popsicle Stick Pumpkin Decoration
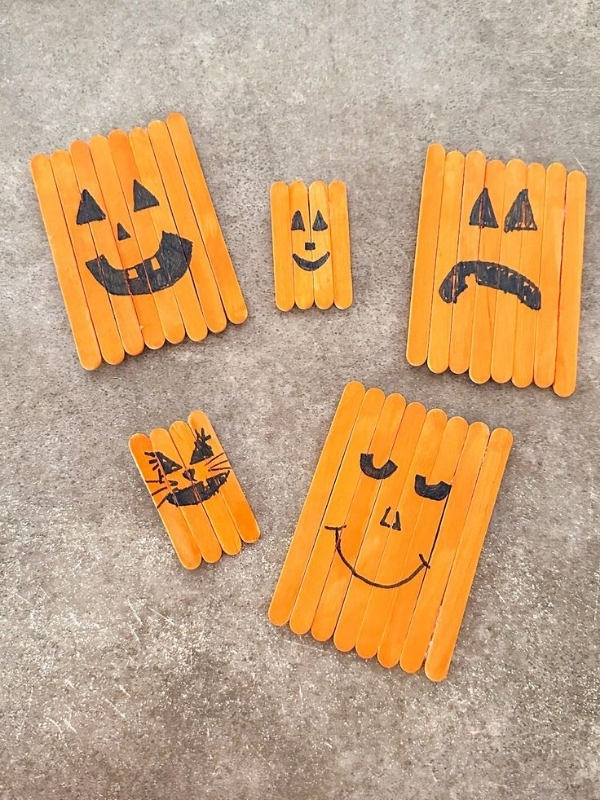
A pumpkin made from craft sticks is an easy seasonal project that children can decorate in many different ways. They can create a traditional orange pumpkin or turn the craft into something completely different.
It works well as a small autumn decoration for shelves, desks, or classroom displays.
How to make a popsicle stick pumpkin
Begin by painting several craft sticks orange. Let the paint dry fully.
Arrange the sticks side by side in a slightly rounded shape. You can make the middle sticks a little higher to create a pumpkin shape.
Glue one or two craft sticks across the back to hold the front pieces together.
Allow the base to dry before decorating.
Cut a small green paper stem and glue it near the top.
Add a green leaf if you like.
Children can draw a friendly pumpkin face with a black marker. They can also use paper shapes instead.
For a different look, paint the pumpkin white, pink, purple, or green.
Add a little paper bow, tiny stars, or simple patterns.
Once the decoration is dry, attach a piece of string to the back so it can hang on a wall.
You can also make several pumpkins in different sizes.
For another simple autumn keepsake, see How to Make Pumpkin Footprint Art with Kids for an Easy Fall Keepsake They’ll Treasure for an activity that captures a child’s growth in a creative way.
13. Popsicle Stick Halloween Character
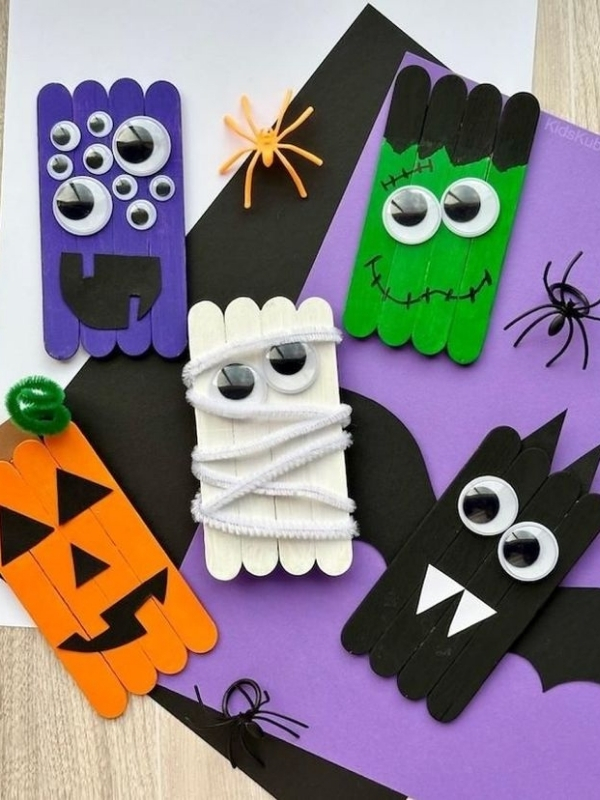
Halloween crafts can be playful without becoming complicated. A craft stick character can become a ghost, pumpkin, cat, bat, monster, or friendly spider. Children can decide how silly or spooky their character should look.
This project is especially useful when children want to decorate their rooms without making anything too difficult.
How to make a popsicle stick Halloween character
Choose three or four craft sticks and paint them black, white, orange, or another color.
Lay the sticks together vertically.
Glue one stick across the back to hold them in place.
- For a ghost, paint the front white and add two black eyes.
- For a pumpkin, use orange paint and add a simple face.
- For a monster, choose bright colors and add large paper eyes.
- For a bat, cut two wing shapes from black paper and glue them behind the sticks.
You can also make a small cat by adding triangular ears and whiskers.
Once the character is dry, add a ribbon or string to the back.
Make several characters and hang them together as a small Halloween display.
If older children want more seasonal projects that feel stylish and creative, explore Halloween Crafts for Teens: 15 Projects for Room Decor, Costumes, and Fun
14. Popsicle Stick Christmas Ornament
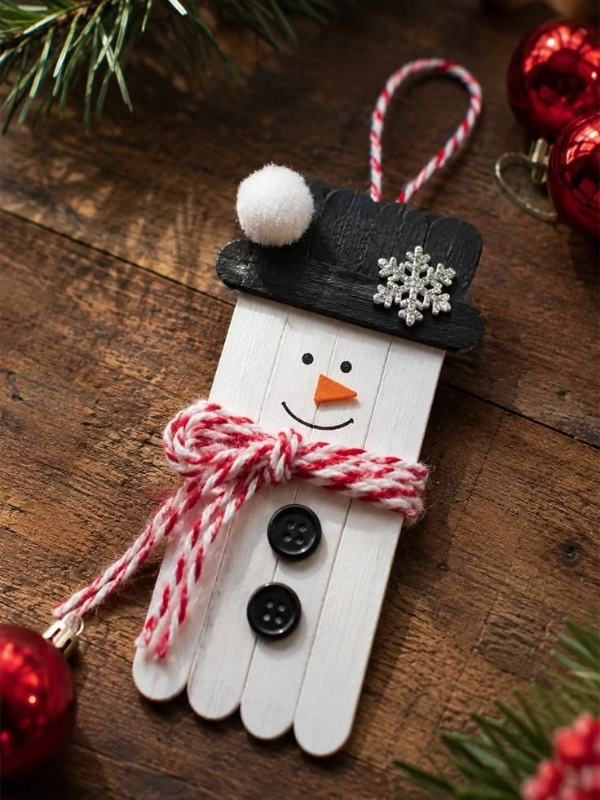
A Christmas ornament gives children something they can bring out every year. The basic craft can be shaped into a tree, star, gift, snowman, or simple decorative frame.
It is also a lovely project for siblings because everyone can create a personal ornament.
How to make a popsicle stick Christmas ornament
Choose the shape your child wants to make.
For a Christmas tree, arrange craft sticks in a triangle. Use shorter sticks near the top and longer ones toward the bottom.
Glue the sticks together carefully.
Paint the finished shape green.
Add small paper circles, stars, or dots as decorations.
For a star, arrange sticks into a simple star pattern and secure the points carefully.
For a snowman, paint several sticks white and arrange them together. Add a black hat, orange nose, and simple eyes.
Once the ornament is completely dry, attach a loop of ribbon or string to the back.
Write the child’s name and year on the back. This small detail makes the ornament more special when it comes out again in future years.
Store handmade ornaments carefully after the holidays.
For more festive handmade inspiration, visit Christmas Crochet Projects You Can Actually Finish Before the Holidays for Gifts, Decor, and More for another collection of creative holiday projects.
15. Popsicle Stick Flag Decoration
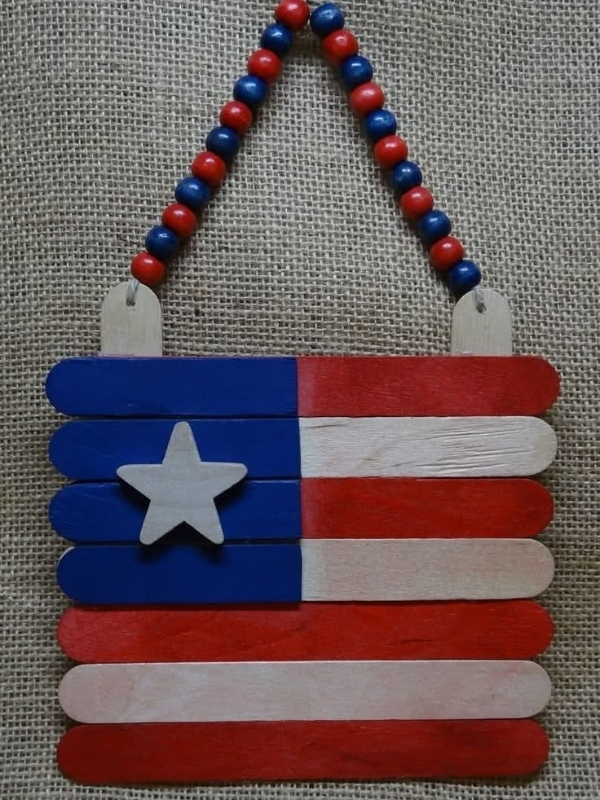
A simple flag decoration is a fun final project because children can create their own patterns instead of copying one design. They can make a country inspired flag, a family flag, a friendship flag, or an imaginary flag for a pretend kingdom.
This activity encourages children to think about colors, symbols, and meaning.
How to make a popsicle stick flag
Begin by choosing several craft sticks.
Paint them in the colors your child wants for the flag.
Lay the sticks beside each other to create a rectangle.
Glue one craft stick across the back to hold the pieces together.
Allow the structure to dry.
Now decorate the front. Children can add stars, hearts, circles, stripes, initials, or any symbol that represents something important to them.
For a family flag, each person can choose one color.
For a friendship flag, children can add symbols that represent things they enjoy doing together.
Attach a longer craft stick vertically behind the flag to create a handle.
The finished flag can be used for pretend play, a classroom display, or room decoration.
You can also make several flags and display them together as these easy popsicle stick crafts for kids.
For another decorative project that uses creativity to bring a space to life, check out 4th of July Wallpaper Designs to Get You in the Patriotic Spirit
Tips for Making Popsicle Stick Crafts With Kids
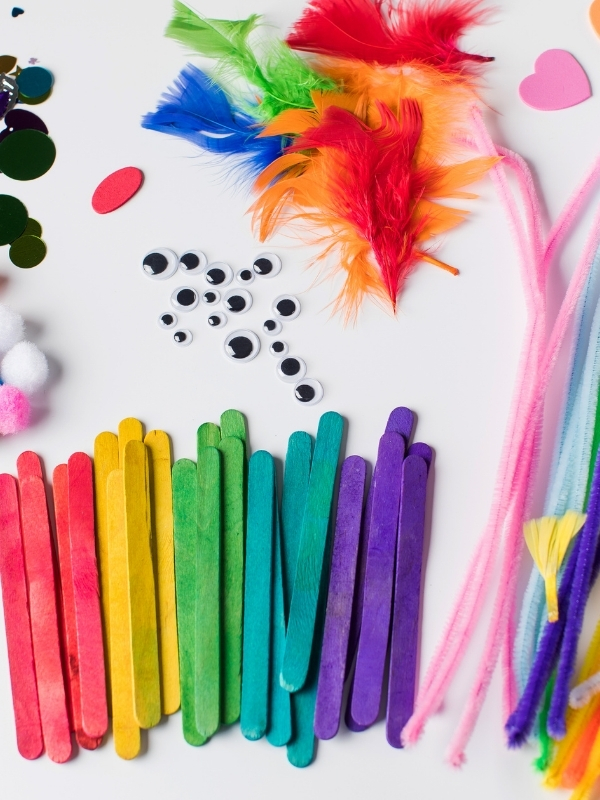
Making popsicle stick crafts with kids can be simple and enjoyable when you prepare everything before the activity begins. Start by placing the supplies within easy reach, including popsicle sticks, child-friendly glue, washable paint, paintbrushes, markers, crayons, paper, and decorations. Having everything ready means children can spend more time creating instead of waiting for materials.
Choose crafts that match the child’s age and ability. Younger children may enjoy simple projects where they arrange and decorate sticks, while older kids can try designs that involve more planning and several construction steps. Avoid expecting a perfect result. A slightly uneven frame or colorful animal can still be a successful craft if the child enjoyed making it.
Safety should also be part of the preparation. Children should have adult supervision when using scissors, hot glue, or any small decorative pieces. If a craft requires cutting cardboard or other materials, an adult can handle the cutting while the child focuses on decorating and assembling. Keep small pieces away from very young children who may put objects in their mouths.
It also helps to protect the work surface with newspaper or an old tablecloth, especially when using paint or glue. Encourage kids to let each layer dry before adding another decoration. Most importantly, allow them to make creative choices. They might want a purple popsicle-stick house, a funny-looking animal, or a frame covered in unusual decorations. Those personal touches are what make each craft special.
Frequently Asked Questions About Easy Popsicle Stick Crafts for Kids
What are the easiest popsicle stick crafts for kids?
Some of the easiest projects include bookmarks, photo frames, butterflies, sun decorations, and simple animal puppets. These projects use basic shapes and do not require complicated construction.
A bookmark is especially simple because it can be made from one decorated craft stick. A butterfly only needs a stick, paper wings, glue, and decorations. A photo frame takes a little longer but is still straightforward.
For younger children, focus on painting and decorating. Adults can handle any cutting or stronger adhesive that needs extra care.
The goal is not to create a perfect finished product. Children benefit more when they have space to make choices and experiment.
What materials do I need for these crafts?
You can make many easy popsicle stick crafts for kids with a small supply collection. Craft sticks are the main material, but you will also want glue, paper, paint, crayons, markers, and scissors.
Other useful supplies include yarn, ribbon, stickers, cotton balls, cardboard, buttons, and washable decorations.
You do not need to buy everything at once. Start with the basics and collect leftover materials from other projects.
Old cardboard packaging can become a craft base. Paper bags can become backgrounds. Small scraps of colored paper can become leaves, wings, windows, or decorations.
That approach keeps crafting affordable while also teaching children that useful materials do not always need to be brand new.
Are popsicle stick crafts suitable for young children?
Yes, many projects can be adapted for younger children. The important part is choosing activities that match their abilities.
Younger children can paint sticks, arrange pieces, choose colors, and add stickers. Older children can work on more detailed designs and simple construction.
Adults should handle any part of the project that requires extra care. This may include cutting certain materials or using adhesives that are not suitable for children.
It also helps to prepare the craft area before starting. Cover the table, place supplies within reach, and keep the project simple.
When the activity feels relaxed, children are more likely to enjoy the process instead of worrying about making mistakes.
How long do these crafts take?
The time depends on the project and the child. A bookmark may take only a few minutes, while a mini house can take much longer because several pieces need to dry.
Painting can also add extra time.
It is usually better to allow enough time for drying rather than rushing the next stage. Children can use the waiting period to plan decorations or start another small project.
You can also divide larger crafts into short sessions. Build the base during one session, decorate it later, and finish it once everything is dry.
That approach works particularly well for younger children who may lose interest if the project becomes too long.
Can children make these crafts as gifts?
Absolutely. Handmade gifts can be especially meaningful because the child has created them personally.
A photo frame can hold a family picture. A bookmark can be made for a teacher or reader. A garden sign can become a sweet gift for someone who enjoys plants.
The child can also add a name or short message to make the project feel personal.
The important thing is not how perfect the finished craft looks. A slightly uneven frame can actually make the gift feel more genuine because it shows that a child made it.
How can I keep crafting less messy?
Prepare the workspace before the activity begins. Cover the table with old paper or a washable cloth.
Use small amounts of paint instead of filling large containers. Keep glue nearby but avoid giving children more than they need.
It also helps to place each material in a small container. This keeps the table organized and makes cleanup easier.
If several children are crafting, give each child a small working area. That reduces accidental spills and makes it easier for everyone to find their supplies.
Most importantly, do not worry about making the craft area perfectly clean while children are creating. A little mess is normal.
What can I do with leftover popsicle sticks?
Leftover sticks can be stored in a clean container and used for future projects. Keep them somewhere dry so they remain clean and ready.
You can sort them by size or simply keep them together.
Small leftover pieces can become branches, handles, borders, roof supports, puppet sticks, or decorative details.
Keeping a craft box also makes spontaneous activities easier. When a child says they want to make something, you already have basic materials available.
That can turn an ordinary afternoon into a creative one without requiring another shopping trip.
Conclusion
Crafting with simple materials does not need to be complicated to be memorable. A handful of sticks can become a tiny house, a colorful butterfly, a useful bookmark, a cheerful puppet, or a decoration that stays on the bedroom wall for years.
The beauty of easy popsicle stick crafts for kids is the freedom they offer. There is no single correct way to paint a butterfly or build a tiny house. Children can change the colors, add their own details, and turn a basic idea into something that feels completely theirs.
That freedom matters. It gives children room to make decisions, solve little problems, and enjoy the satisfaction of finishing something with their own hands.
So gather a few craft sticks, bring out the paint, clear a small space on the table, and choose one project to start. You do not need a perfect setup. You simply need a little time, a few materials, and a willingness to let creativity take over.
The finished craft may be small, but the memory of making it together can be much bigger.