
Making crafts with children does not always require a trip to the craft store. A few sheets of paper, empty boxes, cardboard tubes, bottle caps, old magazines, and scraps of fabric can become colourful birds with a little creativity. That is why bird crafts for kids are such a fun way to turn everyday materials into something children can enjoy.
Bird projects can also introduce children to the birds they see around them. While they cut, fold, glue, paint, and decorate, they can talk about feathers, wings, beaks, nests, and different bird species. The activity becomes more than a simple craft. It becomes a chance to explore nature while making something with their hands.
The best part is that you do not need expensive supplies. Many bird crafts for kids can start with materials that are already sitting around the house. An empty cereal box can become a cardboard bird. A paper plate can turn into a colourful parrot. Even a toilet paper roll can become a tiny owl.
Before you begin, gather the materials you already have. Then choose a project that matches the child’s age and ability. Younger children may enjoy tearing paper and adding decorations. Older children can handle more cutting, folding, and detailed designs.
Here are simple bird crafts for kids that use everyday materials and encourage plenty of creativity.
When familiar activities start feeling repetitive, offers fresh ideas that can make craft time feel more meaningful.
How To Make Bird Crafts With Kids: Simple Projects Using Everyday Materials
1. Paper Plate Bird
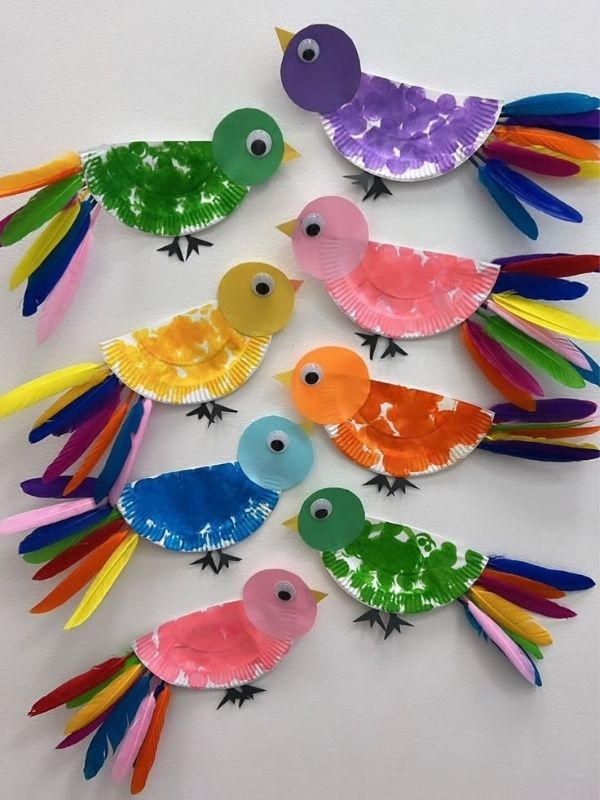
A paper plate makes an excellent starting point for a simple bird craft. Its round shape can become the bird’s body, while paper scraps can create the wings, beak, eyes, and tail.
This project works well because children can choose almost any bird they want. They might make a bright parrot, a yellow canary, a bluebird, or even an imaginary bird with rainbow feathers.
Materials You Need
You will need a paper plate, coloured paper, glue, child-safe scissors, crayons or washable paint, and a black marker.
You can also add feathers, yarn, stickers, buttons, or small scraps of fabric if you already have them.
There is no need to buy every decoration. The goal of these bird crafts for kids is to make creative use of simple materials.
How To Make The Paper Plate Bird
Start by colouring or painting the paper plate. Let the child choose the colour instead of trying to make every bird look realistic.
While the plate dries, cut out two wings from coloured paper. You can make the wings large and rounded or small and pointed.
Next, cut a small triangle for the beak. Cut another shape for the tail. The child can also draw the eyes with a marker.
Glue the wings onto the sides of the plate. Add the beak near the top and place the eyes above it. Finally, attach the tail to the back.
For an extra creative touch, add paper feathers around the body. Children can overlap different colours to make the bird look lively.
When familiar activities start feeling repetitive, What Are Easy Crafts For Seniors To Do At Home? Simple And Enjoyable Ideas offers fresh ideas that can make craft time feel more meaningful.
2. Cardboard Tube Owl
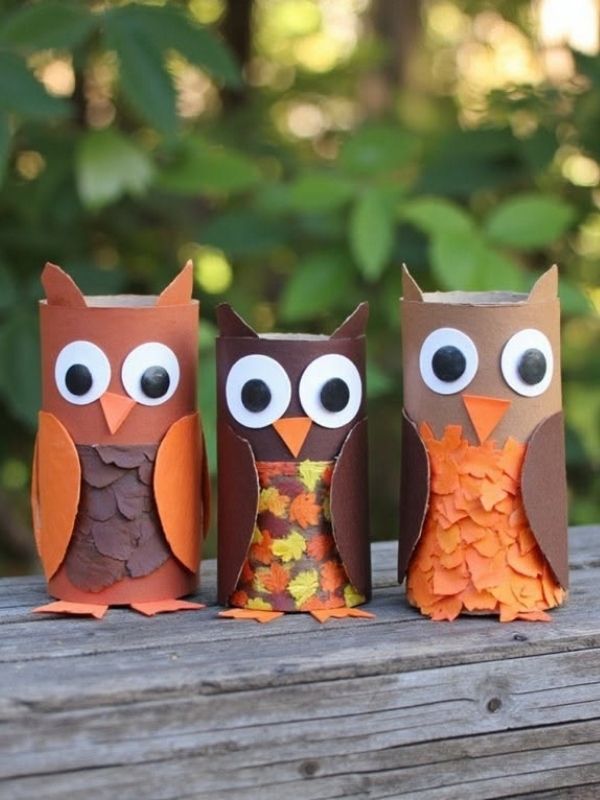
An empty cardboard toilet paper tube can become a cute owl with only a few extra materials. This is one of the easiest bird crafts for kids because the main body already has the right shape.
The craft also gives children a chance to reuse something that might otherwise go into the bin.
Prepare The Cardboard Tube
Start with a clean, dry cardboard tube. Press the top edge inward from both sides to create two small points.
These points can look like an owl’s ears.
Paint the tube brown, grey, black, white, or any colour the child prefers. An imaginary owl can have almost any colour combination.
Allow the paint to dry before adding the details.
Add The Owl Features
Cut two large circles from white paper. Add smaller black circles inside them for the eyes.
Glue the eyes near the top of the tube. Then cut a small triangle from yellow or orange paper for the beak.
For the belly, cut a lighter piece of paper and glue it to the front. Children can draw small feather patterns across it.
You can also add paper wings to both sides.
This simple design is especially useful when you want bird crafts for kids that do not require complicated shapes.
Leaf crafts for adding details to your home DIY Paper Leaf Crafts For Beautiful Home Decor You Can Make With Simple Materials
3. Handprint Bird
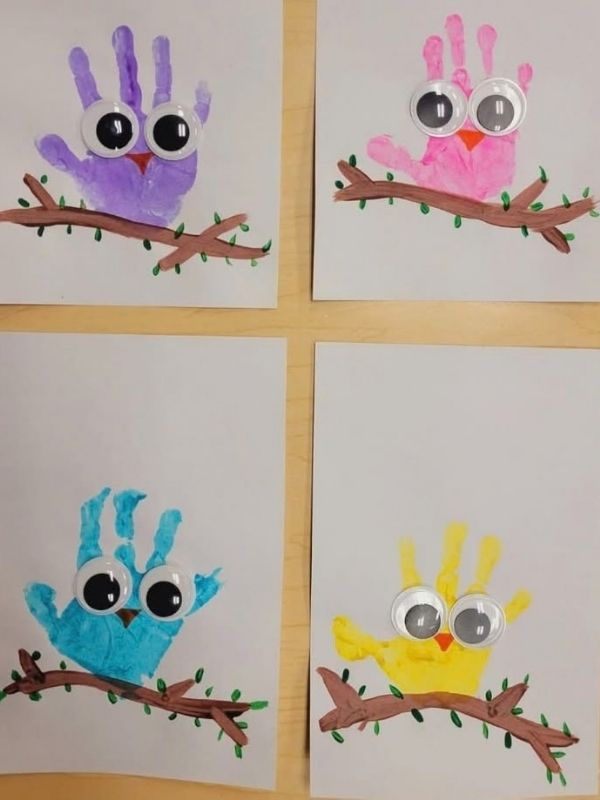
Handprint crafts are memorable because children can see their own hands become part of the finished artwork. A handprint can form a bird’s feathers or wings.
This idea also works well for younger children who enjoy painting.
Create The Handprint
Place washable paint on a shallow plate. Let the child gently press one hand into the paint.
Help the child place the painted hand onto a sheet of paper.
The fingers can become feathers, while the palm forms part of the bird’s body.
Let the print dry completely.
Turn The Print Into A Bird
Once the handprint dries, add a paper or drawn eye.
Attach a small triangle for the beak. Draw legs beneath the body if you want the bird to look as though it is standing.
The child can also add a branch, leaves, flowers, clouds, or a nest around the bird.
This is one of the most personal bird crafts for kids because every handprint has a slightly different shape.
Bookmatk What Can I Make With an Egg Carton? Easy Ideas for Kids
4. Newspaper Bird Collage
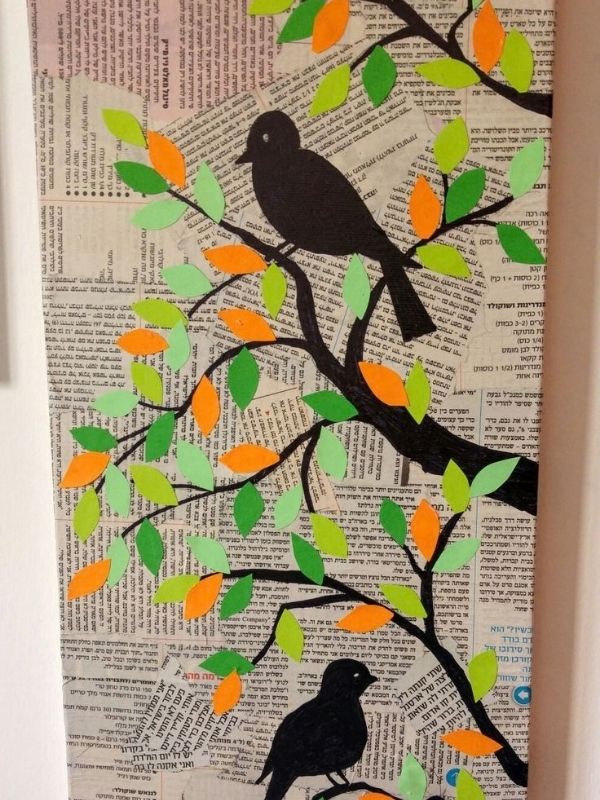
Old newspapers and magazines can provide plenty of colours and textures for a bird collage. This project is useful when you want a craft that involves cutting, sorting, and arranging.
Children can search through old pages for interesting colours and patterns.
Choose The Materials
Look for old magazines, newspapers, flyers, or unused pieces of wrapping paper.
Choose one sheet of plain paper as the background.
Draw a simple bird outline on the paper. You do not need to make the drawing perfect.
The outline only gives the child a guide.
Build The Bird
Tear or cut small pieces of paper. Sort them by colour if you want the bird to have a planned pattern.
Cover the bird shape with glue in small sections. Place the paper pieces over the glue.
Children can create stripes, spots, blocks of colour, or random patterns.
Once the bird is covered, add an eye and a beak.
This type of collage makes bird crafts for kids more interesting because children get to make design choices rather than simply copying a finished example.
Ready to experiment with another craft making? Wood Burning Craft Ideas: How to Make Beginner Friendly Projects You Can Display or Sell offers projects you can display or turn into products to sell.
5. Egg Carton Bird

An empty cardboard egg carton can become the body of a small bird. This craft is a good choice when you want to introduce children to simple recycling projects.
Prepare The Egg Carton
Cut one cup from the carton. An adult should handle the cutting if the carton is difficult to separate.
Trim any rough edges.
Paint the cup in the colour of your choice. Bright colours can create playful birds, while softer colours can make a more natural-looking design.
Let it dry fully.
Add The Bird Details
Cut two wings from paper or thin cardboard.
Glue them onto the sides of the egg carton cup.
Add paper eyes, a triangular beak, and a tail.
You can also glue a small piece of yarn to the top if you want to hang the bird.
Because egg cartons come in different shapes, each finished craft can look slightly different. That variety is part of the fun of bird crafts for kids.
When clay is not quite what you feel like making, Creative DIY Crafts for Adults: 20 Fun Crafts for Adults to Try When You’re Bored at Home gives you plenty of alternatives.
6. Paper Bag Bird Puppet
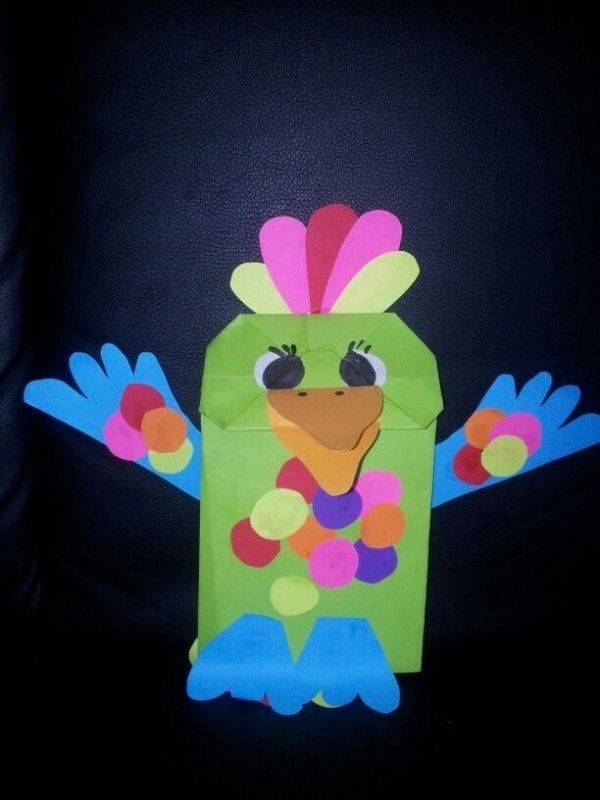
A paper lunch bag can become a bird puppet that children can use after finishing the craft.
This idea adds pretend play to the activity. After making the bird, children can create voices, names, and stories for their puppets.
Prepare The Paper Bag
Place the paper bag flat with the opening facing away from you.
The folded bottom section can become the bird’s face.
Cover the bag with coloured paper or paint it directly.
Choose one main colour for the body.
Add The Puppet Features
Cut two eyes and glue them near the top.
Create a large beak from folded paper. Attach it to the folded flap so the puppet’s mouth can move when the child opens and closes the bag.
Add wings to both sides.
You can also add feathers made from paper strips.
Once the puppet dries, children can use it for a short bird-themed story.
Among bird crafts for kids, puppets are particularly useful because the finished craft becomes part of another activity.
7. Popsicle Stick Bird
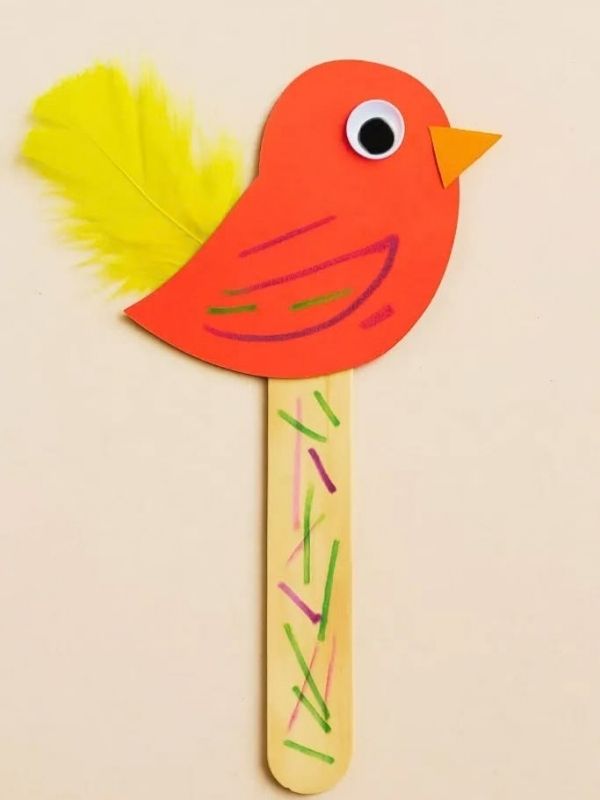
Popsicle sticks can create a simple bird shape when arranged together. Clean craft sticks work best, but you can also reuse sticks from ice pops if they have been washed and dried thoroughly.
Build The Body
Arrange several sticks side by side.
Place one or two sticks across the back to hold them together. An adult can help with this part if stronger glue is needed.
Let the structure dry.
Paint the sticks in a colour that matches the bird the child wants to create.
Add Wings And Details
Cut two wings from paper or cardboard.
Glue one wing to each side.
Add eyes, a beak, and a tail.
For extra detail, children can draw feather lines across the body.
This project is a good option for bird crafts for kids when you have leftover craft sticks from another activity.
Polymer crafts for beginners with no knowledge of it How to Start with Polymer Clay As a Beginner: A Simple Guide
8. Cardboard Bird From A Cereal Box
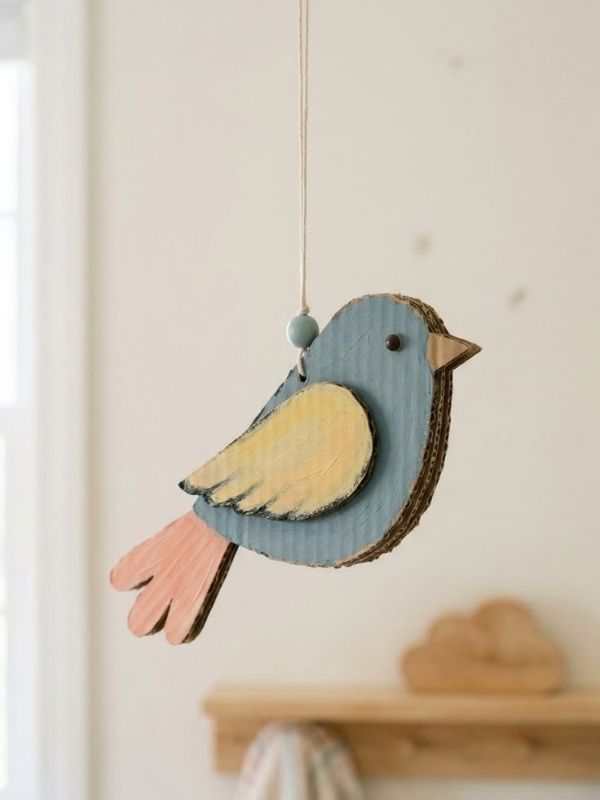
An empty cereal box provides strong cardboard that can be reused for crafts. You can cut the cardboard into a simple bird shape and let children decorate it.
Draw The Bird Shape
Flatten the cereal box carefully.
Draw a simple bird outline on the plain side of the cardboard.
Include the body, head, beak, and tail in one connected shape.
An adult can cut out the shape for younger children.
Older children who can safely use scissors may cut the shape themselves with supervision.
Decorate The Cardboard Bird
Paint the cardboard or cover it with coloured paper.
Add wings separately so they stand out from the body.
Draw or glue on the eyes.
You can also use fabric scraps, yarn, buttons, or paper pieces to create texture.
This is one of the most flexible bird crafts for kids because the cardboard can be cut into many different bird shapes.
Craft Activities preschoolers can do 20 Easy Flower Activities for Preschoolers to Make and Learn
9. Coffee Filter Bird
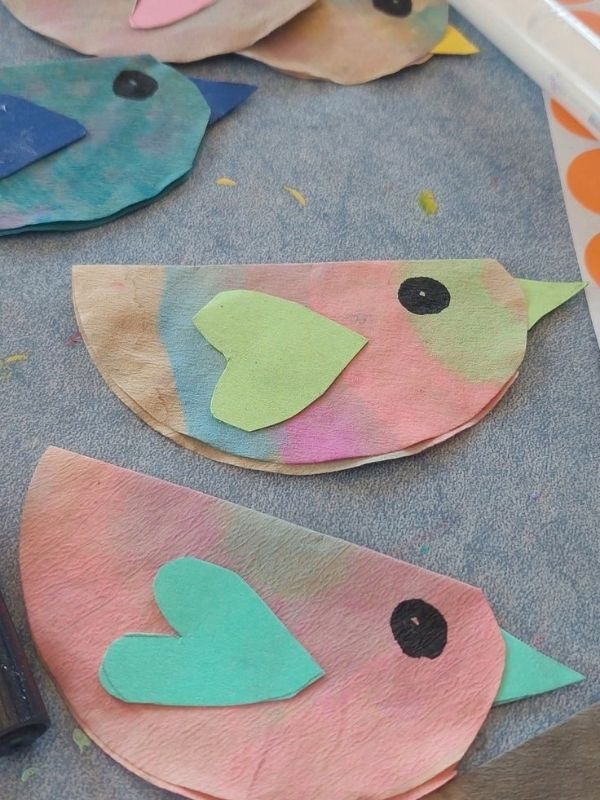
A coffee filter can create soft, colourful wings. If you have unused coffee filters at home, they can become a fun art material.
Colour The Filter
Place the coffee filter on a protected surface.
Use washable markers to add different colours. You can draw dots, lines, or patches.
Lightly spray the filter with water.
Watch the colours spread into one another.
Allow the filter to dry before continuing.
Turn It Into A Bird
Fold or gather the coffee filter to create wings.
Use a small piece of paper or cardboard for the bird’s body.
Attach the colourful filter behind the body.
Add eyes, a beak, and a tail.
The soft colour patterns make these bird crafts for kids look bright without requiring complicated painting skills.
Crafs for kids that are simple How to Make Easy Popsicle Stick Crafts for Kids: 15 Fun DIY Ideas
10. Egg Carton Chick

An egg carton can also become a tiny chick. This version is especially suitable for spring crafts or lessons about baby birds.
Create The Chick Body
Cut out one egg carton cup.
Paint it yellow and allow it to dry.
If you do not have yellow paint, use yellow paper instead.
Add two eyes near the top.
Add The Beak And Feet
Cut a small orange triangle for the beak.
Glue it below the eyes.
Cut two small strips of orange paper for the feet.
Glue the feet underneath the cup.
You can also add small paper wings.
For a fun display, place the chick inside a homemade paper nest.
This simple activity adds variety to your collection of bird crafts for kids.
How To Make Bird Crafts With Kids In 10 Simple Steps
Making crafts with children becomes easier when you follow a simple process. You do not need to complete every project in exactly the same way. Instead, use these steps as a flexible guide for different bird crafts for kids.
Step 1: Choose A Bird Craft That Matches The Child’s Age
Start by thinking about the child’s age and skill level.
A very young child may enjoy painting, sticking paper, or adding large decorations. An older child may enjoy cutting shapes, folding paper, and designing more detailed birds.
Choose a project that feels achievable.
If the craft is too difficult, the child may become frustrated. On the other hand, a very simple project may not hold the attention of an older child.
The best bird crafts for kids allow children to complete some parts independently while still giving them room to ask for help.
Keep The First Project Simple
For a first attempt, choose a paper plate bird, handprint bird, or cardboard tube owl.
These projects have simple shapes and do not require many materials.
Once the child becomes comfortable, move to more detailed designs.
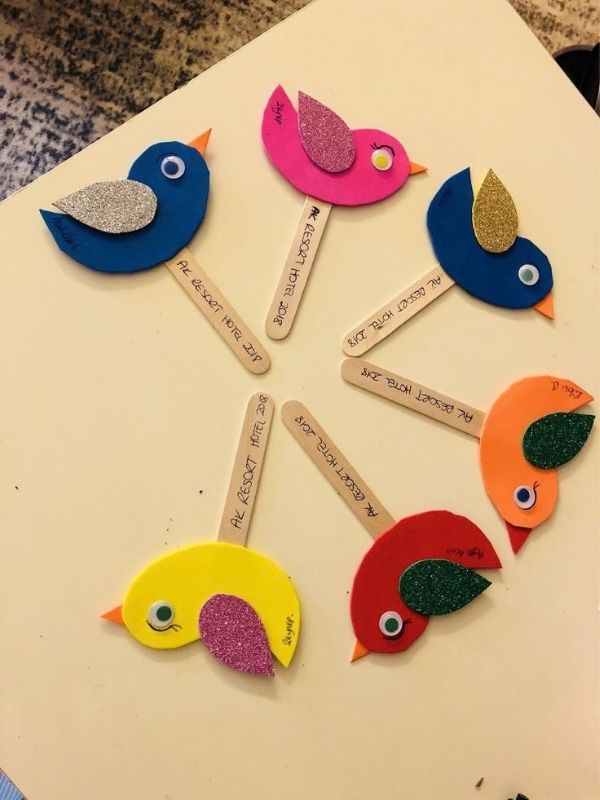
Step 2: Gather Everyday Materials
Look around the house before buying anything.
Collect paper, cardboard, paper bags, cereal boxes, magazines, paper plates, empty tubes, yarn, fabric scraps, and washable paint.
Place everything in one area.
This makes the activity easier to manage.
Create A Simple Craft Box
Keep reusable materials in a small box or bag.
You can add clean cardboard, paper scraps, ribbons, and other safe materials over time.
Then, whenever you want to make bird crafts for kids, you already have supplies available.
Step 3: Protect The Work Area
Crafting can become messy quickly, especially when paint and glue are involved.
Cover the table with old newspaper or a washable cloth.
Keep water and paper towels nearby.
If children are painting, make sure their clothing can handle a few accidental marks.
Make Cleanup Easier
Give each child a small workspace.
Place the materials they need within reach.
At the end, ask them to return unused items to the craft box.
This turns cleanup into part of the activity instead of making it feel like a separate chore.
Step 4: Introduce The Bird Before Crafting
Take a minute to talk about the bird.
Ask the child what birds they have seen.
You can discuss the bird’s colour, wings, beak, feathers, and habitat.
This small conversation can make the craft more meaningful.
Encourage Observation
Ask questions such as:
What colour is the bird?
What does it eat?
Where might it build a nest?
What shape are its wings?
These questions can turn bird crafts for kids into a simple nature-learning activity.
Step 5: Prepare The Main Body
Every bird needs a basic body shape.
Depending on the project, the body might be a paper plate, cardboard tube, paper bag, egg carton cup, or cardboard cutout.
Help the child prepare this part first.
Let Children Choose Their Colours
Do not insist that every bird looks realistic.
A child may want a purple bird with orange wings and green feathers.
That is perfectly fine.
Creative freedom is one of the main benefits of bird crafts for kids.
Step 6: Add The Wings
Wings can come from paper, cardboard, fabric, coffee filters, or even folded magazine pages.
Cut two matching shapes when possible.
However, they do not have to look exactly alike.
Try Different Wing Shapes
Rounded wings can create a soft appearance.
Pointed wings can make the bird look as though it is flying.
Large wings can create a dramatic craft.
Small wings can make the bird look cute.
Let the child experiment.
Step 7: Add The Face
The face gives the bird its personality.
Add two eyes, a beak, and any other details the child wants.
Paper circles work well for eyes.
A marker can also create simple eyes.
Make The Beak
Cut a small triangle from paper.
Fold it slightly if you want a raised beak.
For a puppet, make the beak larger and attach it to the opening area.
Small details can make simple bird crafts for kids look completely different from one another.
Step 8: Decorate The Feathers
Now comes the most creative part.
Children can add paper feathers, drawn patterns, yarn, stickers, fabric scraps, or paint.
They can create spots, stripes, circles, or zigzags.
Avoid Correcting Every Design Choice
If the child chooses unusual colours, let the design remain theirs.
The goal is not to create a perfect bird.
The goal is to encourage creativity, concentration, and enjoyment.
That is why bird crafts for kids should leave space for personal choices.
Step 9: Let The Craft Dry
If the project uses paint or plenty of glue, place it somewhere safe while it dries.
Do not rush this part.
Moving the craft too early can cause wings, eyes, or decorations to fall off.
Use Drying Time For Another Activity
While waiting, children can draw a bird nest.
They can also make paper leaves or write a short story about the bird.
You can even ask them to give the bird a name.
This keeps the activity going without adding unnecessary supplies.
Step 10: Display And Play With The Finished Bird
Once the craft dries, find a special place for it.
You could hang it from a wall, place it on a shelf, or create a small bird display.
If the craft is a puppet, encourage the child to use it in a story.
Turn One Craft Into A Bigger Activity
Several bird crafts for kids can become a complete bird-themed display.
Make different birds together.
Add paper trees.
Create nests from shredded paper.
Draw clouds and flowers on a large background sheet.
You can even make a pretend garden where all the birds can “live.”
How To Make Bird Crafts More Educational
Crafting can teach more than cutting and gluing.
Bird projects provide a simple way to introduce children to nature, colours, shapes, recycling, and storytelling.
Teach Children About Bird Parts
As you work, point out the basic parts of a bird.
Talk about the head, body, wings, beak, feet, tail, and feathers.
Children can learn the names while creating something they can see and touch.
Connect Each Part To Its Function
Explain that birds use their wings for movement through the air.
Their beaks help them eat different foods.
Their feet help them stand, walk, perch, or move through different environments.
This makes bird crafts for kids useful for early science lessons.
Talk About Bird Habitats
Different birds live in different places.
Some live around trees.
Others live near rivers, lakes, farms, gardens, or open grasslands.
Ask children where they think their handmade bird would live.
Create A Habitat Background
After finishing the bird, make a paper habitat.
Use green paper for grass.
Blue paper can represent water.
Brown cardboard can become tree trunks.
Paper leaves can complete the scene.
This simple extension gives bird crafts for kids a stronger connection to nature.
Encourage Storytelling
Every handmade bird can have a story.
Ask children to choose a name.
Then ask where the bird lives and what it likes to do.
Build A Short Story
The child can decide what happens next.
Perhaps the bird is looking for its nest.
Maybe it meets another bird.
Perhaps it flies to a new garden.
There are no strict rules.
Storytelling makes bird crafts for kids even more engaging because children use both their hands and imagination.
Looking for gift you can create for your loved ones on a budget How to Make Handmade Gifts on a Budget: Simple Ideas Anyone Can Make
Tips For Making Bird Crafts With Younger Children
Younger children can enjoy crafts just as much as older children. However, the activity should match their developing motor skills.
Use Larger Pieces
Large paper shapes are easier for small hands to hold.
They are also easier to glue.
Avoid giving very young children tiny decorative pieces that could create a choking risk.
Choose Simple Shapes
Circles, triangles, rectangles, and basic wing shapes work well.
You can prepare the shapes before the activity and let the child arrange them.
This allows younger children to enjoy bird crafts for kids without struggling with difficult cutting.
Let Children Explore Texture
Young children often enjoy touching different materials.
Offer paper, fabric, yarn, cardboard, and other safe craft materials.
Let them compare how each material feels.
Use Texture As Part Of The Design
Soft fabric can become feathers.
Yarn can create hair-like feather details.
Corrugated cardboard can create a textured wing.
This makes bird crafts for kids a sensory experience as well as a creative one.
For seasonal projects check out this How to Make Christmas DIY Decorations on a Budget: Easy Ideas for a Festive Home and Christmas Activities for Nursery Kids: Fun and Simple Ideas for the Holiday Season
Safety Tips For Bird Crafts With Kids
Craft time should remain fun and safe.
Adults should supervise children throughout the activity.
Choose Child-Friendly Materials
Use washable paint when possible.
Choose non-toxic glue.
Use child-safe scissors that match the child’s age and ability.
Supervise Small Decorations
Buttons, beads, tiny paper pieces, and other small objects can pose a choking risk for young children.
Keep them away from children who may put objects in their mouths.
Adults should also handle hot glue, craft knives, and other tools that are not suitable for children.
Keep The Workspace Organized
Too many materials can make the table difficult to manage.
Start with only the supplies needed for the project.
Clean As You Go
Put scraps into a waste container.
Return unused materials to the craft box.
Wipe up spills quickly.
A tidy workspace makes bird crafts for kids easier and more enjoyable for everyone.
Frequently Asked Questions
What Materials Can I Use For Bird Crafts For Kids?
You can use many everyday materials.
Paper, cardboard, cereal boxes, paper plates, empty toilet paper tubes, magazines, paper bags, coffee filters, yarn, fabric scraps, and egg cartons can all become useful craft supplies.
Paint, crayons, markers, glue, and child-safe scissors can help you complete the designs.
The exact materials depend on the project.
How Can I Make Bird Crafts For Kids Without Buying Supplies?
Start by checking what you already have at home.
An empty cereal box can provide cardboard.
Old magazines can provide colourful paper.
Paper bags can become puppets.
Cardboard tubes can become bird bodies.
Scrap fabric can become wings or feathers.
Even leftover wrapping paper can add colour.
The main idea behind these bird crafts for kids is to use creativity instead of relying on expensive supplies.
Can I Use Recycled Materials For Bird Crafts?
Yes.
Recycled materials work especially well for bird projects.
Cereal boxes, cardboard tubes, egg cartons, newspapers, magazines, paper bags, and clean packaging can all become craft materials.
Before using recycled items, make sure they are clean and safe.
Remove sharp edges or parts that could hurt children.
Using recycled materials also gives children a simple introduction to reusing everyday objects.
How Do I Make Bird Crafts For Kids Less Messy?
Prepare the workspace before starting.
Cover the table with old newspaper or a washable cloth.
Use small amounts of glue and paint.
Give each child only the materials they need.
Keep paper towels nearby.
You can also choose crafts that use crayons, paper, and stickers instead of wet paint.
With a little preparation, bird crafts for kids can stay enjoyable without turning the entire room into a cleanup project.
How Long Do Bird Crafts For Kids Take?
The time depends on the project.
A simple paper bird may take only 15 to 20 minutes.
A detailed cardboard bird can take longer, especially when paint needs to dry.
If children are making several birds, the activity may last an hour or more.
Do not rush the process.
Give children time to make choices and experiment with their designs.
How Can I Encourage Children To Be More Creative With Bird Crafts?
Give them choices instead of showing them only one finished example.
Let them select the colours.
Allow different wing shapes.
Offer several materials for decoration.
Ask open-ended questions.
For example, you could ask, “What kind of bird would you like to make?” or “Where does your bird live?”
When children have room to make decisions, bird crafts for kids become more personal and imaginative.
What Can Children Do With Their Finished Bird Crafts?
Finished birds can become decorations, puppets, story characters, classroom displays, or gifts.
You can hang paper birds from a string.
Place cardboard birds on a shelf.
Create a bird habitat on a large piece of paper.
Use paper bag birds for storytelling.
If children make several designs, you can create a small homemade bird collection.
Conclusion
Making birds with children does not have to involve expensive supplies or complicated instructions. Everyday materials can provide everything you need for a fun creative session.
A paper plate can become a colourful bird. A cardboard tube can turn into an owl. An egg carton can become a tiny chick. Old magazines can create bright feathers, while a paper bag can become a puppet.
The most important part is to give children enough freedom to make their own choices. Let them choose colours, arrange shapes, experiment with textures, and create unusual designs. Their finished birds do not need to look perfect. What matters is the creativity and learning that happen during the process.
With these bird crafts for kids, you can also introduce simple lessons about nature, recycling, bird body parts, habitats, storytelling, and observation. That makes craft time more meaningful while keeping it enjoyable.
So, before buying new craft supplies, look around your home. You may already have cardboard, paper, packaging, fabric scraps, and other useful materials waiting for a second life.
Gather a few safe supplies, choose a simple project, and let the children create. With a little imagination, ordinary household materials can become a whole flock of colourful handmade birds.