
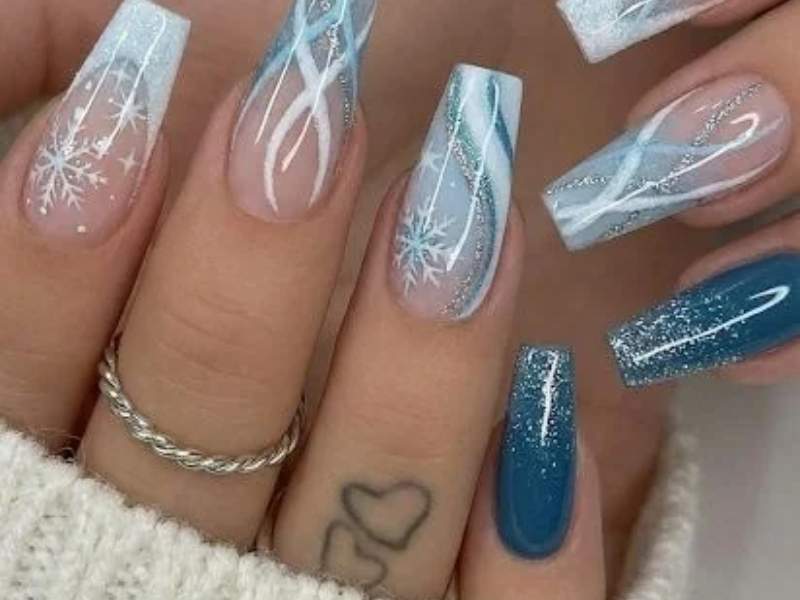
How to Get Beautiful Snowflake Nail Designs for a Perfect Winter Look
Winter is one of those seasons that makes experimenting with nail art even more exciting. From soft seasonal colours to sparkling finishes, there are so many beautiful ways to make your nails look stylish during the colder months. One design that never loses its charm is snowflake nail art. Whether you prefer something simple and minimal or detailed and glamorous, snowflake nail designs offer plenty of inspiration for creating a beautiful winter manicure.
Snowflakes are a lovely way to bring a little seasonal magic to your fingertips. Their delicate patterns, tiny details, and icy appearance make them perfect for winter celebrations, Christmas parties, family gatherings, and everyday wear. You can combine them with different colours, glitter, rhinestones, French tips, or soft nude shades to create a look that matches your personal style.
The best part about snowflake nails is that you do not need extremely long nails to enjoy them. They look equally beautiful on short natural nails, medium-length nails, and long acrylic extensions. With the right colours and nail art techniques, you can create a manicure that feels elegant, festive, and effortlessly beautiful.
If you are looking for inspiration for your next seasonal manicure, these 10 beautiful snowflake nail designs will help you find a style worth trying. From classic white snowflakes to sparkling blue winter nails, there is something here for everyone.
Why Snowflake Nail Designs Are Perfect for Winter
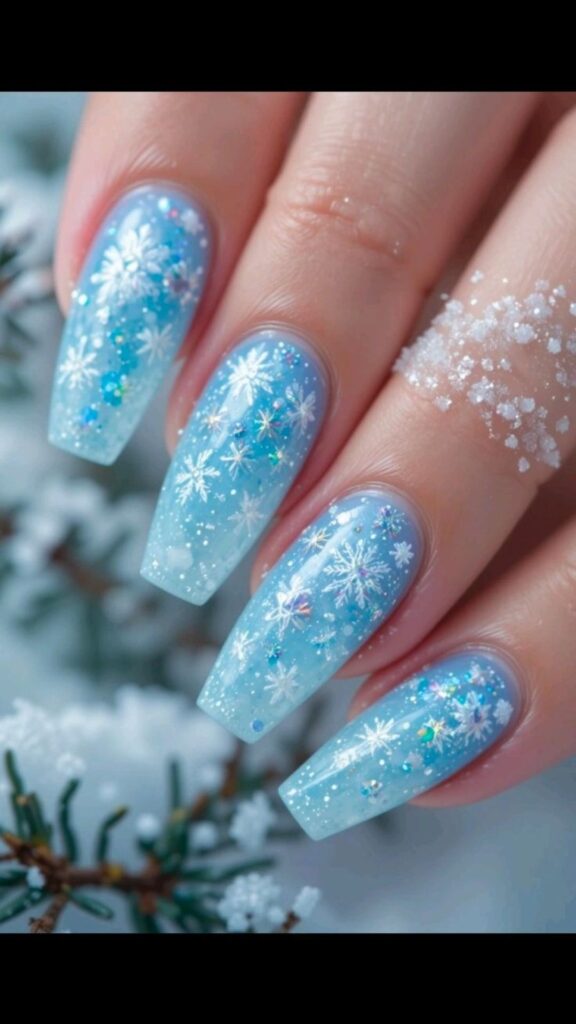
Snowflake nail designs are popular because they capture the beauty and atmosphere of winter without making your manicure look overly complicated. Their delicate patterns can transform even the simplest nail colour into something special.
Unlike some seasonal nail trends that only work for particular occasions, snowflake nail art can be styled in several ways. You can choose a subtle design for everyday activities or add glitter and decorative details for a more noticeable holiday manicure.
Another reason to love winter snowflake nails is their versatility. White snowflakes look beautiful against dark blue, nude, silver, and even black nail polish. You can also experiment with different finishes, including glossy, matte, metallic, and glitter.
Here are a few reasons to consider snowflake nail art for your next manicure:
- It creates a beautiful winter-inspired appearance.
- It works on short, medium, and long nails.
- It can be combined with different seasonal colours.
- It looks elegant without requiring complicated decorations.
- It is suitable for Christmas, winter parties, and everyday occasions.
- It can be customised to match different personal styles.
Whether you are visiting a nail technician or creating your manicure at home, snowflake nail designs provide endless opportunities to express your creativity.
10 Beautiful Snowflake Nail Designs for a Perfect Winter Look
If you want your nails to look beautiful this winter, these snowflake nail ideas are worth considering. Each design offers a different combination of colours, patterns, and finishes, making it easier to find something that suits your taste.
1. Classic White Snowflake Nails
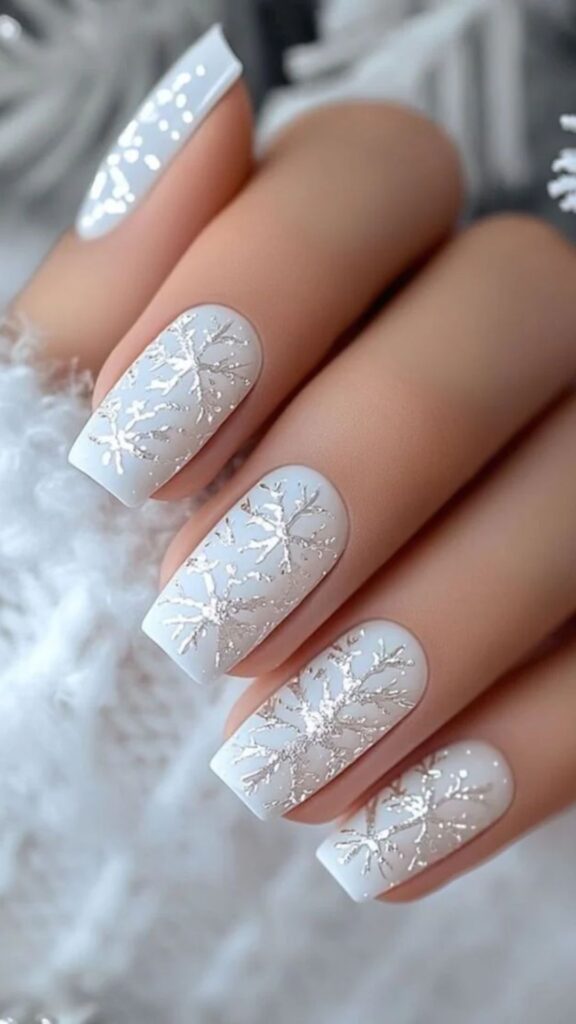
You can never go wrong with classic white snowflake nails. This design is perfect for anyone who loves a clean, simple, and elegant winter manicure.
The beauty of this style comes from its simplicity. White snowflakes placed against a clear, nude, pale pink, or soft blue background create a delicate appearance that looks beautiful without being too distracting.
For a more traditional winter look, consider using a light blue base colour with small white snowflake patterns. You can place one large snowflake on an accent nail and add smaller snowflakes to the remaining nails.
Another beautiful option is to use a transparent or milky white base with delicate snowflake details. This creates a soft, frosty appearance that looks especially lovely on almond-shaped and square nails.
If you prefer something more noticeable, add a little silver glitter around the snowflake patterns. The glitter catches the light and gives your manicure a beautiful icy finish.
How to achieve this look:
Start by preparing your nails and applying a base coat. Choose a pale blue, nude, or transparent polish as your background colour. Once it dries, use a fine nail art brush or snowflake nail stamping plate to create delicate white snowflake patterns.
Finish with a glossy top coat to protect the artwork and give your nails a smooth appearance.
Classic white snowflake nail designs are particularly suitable for people who want a winter manicure that looks sophisticated and easy to wear.
2. Blue and White Snowflake Nail Designs
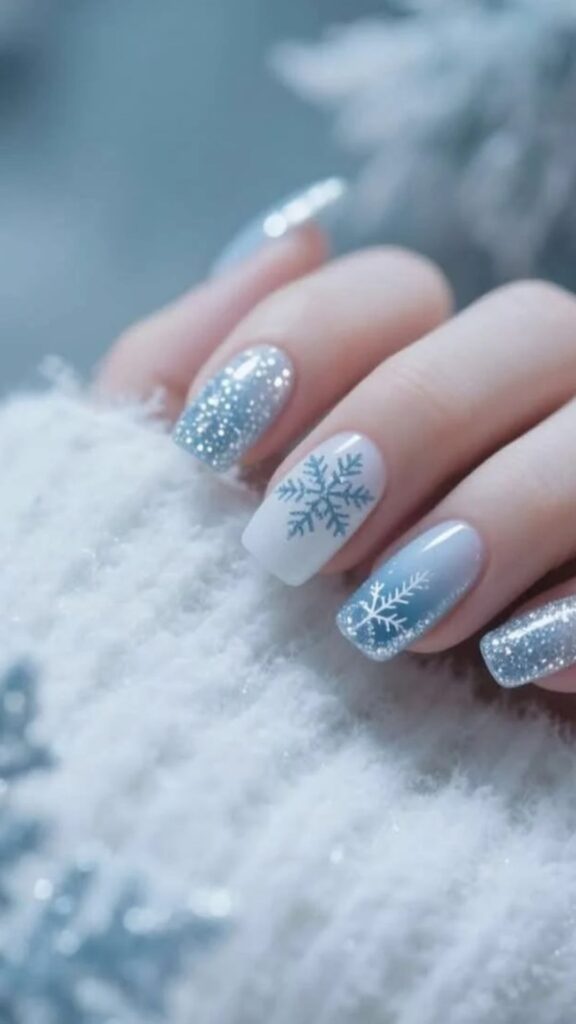
Blue and white are two colours that naturally complement each other when creating winter-inspired nail art. Together, they create the appearance of a beautiful snowy landscape.
Blue and white snowflake nails are perfect if you want something that clearly reflects the winter season. You can experiment with different shades of blue, including baby blue, icy blue, navy blue, and royal blue.
For a soft and feminine appearance, choose a baby blue base and decorate it with tiny white snowflakes. This combination looks fresh, delicate, and beautiful.
If you prefer a bolder manicure, consider using navy blue polish with larger white snowflake patterns. The contrast makes the artwork stand out and gives your nails a more dramatic winter appearance.
You can also create a mixed design by painting some nails completely blue, leaving others white, and adding snowflake patterns to selected accent nails.
For extra sparkle, apply a thin layer of silver glitter over one or two nails. This adds a frosty effect without making the entire manicure look too busy.
Tips for making blue and white snowflake nails look beautiful:
- Choose colours that complement your skin tone.
- Use white nail art polish for clear snowflake details.
- Combine different shades of blue for variety.
- Add small silver accents for a sparkling finish.
- Keep the snowflake patterns balanced across your nails.
This design works beautifully for winter vacations, Christmas celebrations, and anyone who enjoys cool-toned nail colours.
3. Glitter Snowflake Nails
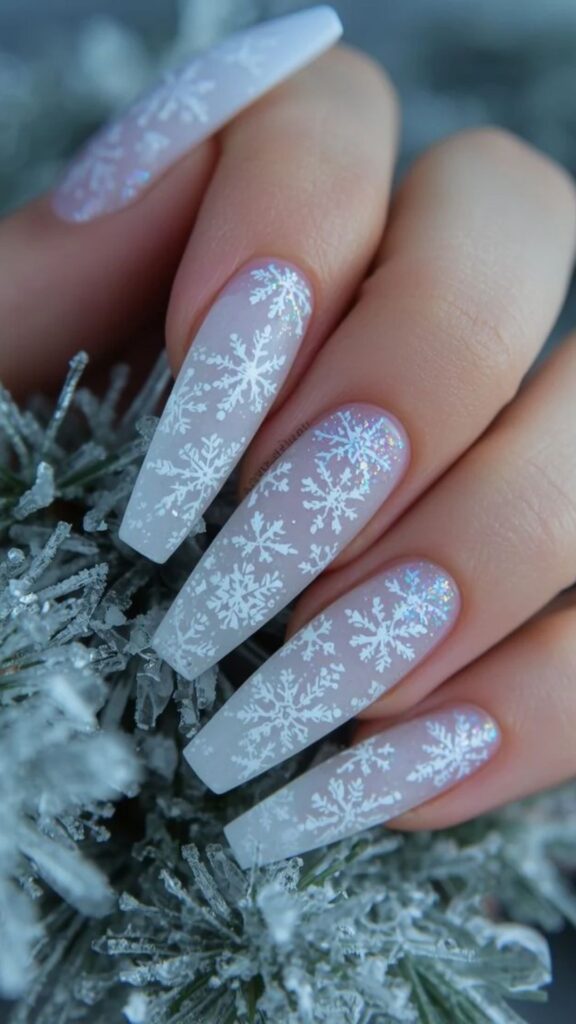
If you love glamorous manicures, glitter snowflake nails are an excellent choice. This design combines delicate snowflake patterns with sparkling finishes to create nails that stand out.
Glitter is one of the easiest ways to make a simple winter manicure look more festive. You can use silver, white, champagne, or icy blue glitter depending on the appearance you want.
For an elegant result, start with a nude or pale pink base. Add white snowflake patterns to two or three nails, then apply silver glitter to the remaining nails.
You can also create a glitter gradient by concentrating the glitter near the tips and allowing it to fade toward the middle of each nail. This gives your manicure a beautiful frosty appearance.
Another option is to use a full glitter base on one accent nail and decorate the other nails with small snowflake designs.
The secret to achieving a beautiful glitter snowflake manicure is balance. You want enough sparkle to make the nails attractive without hiding the delicate snowflake artwork.
How to create glitter snowflake nails:
- Prepare your nails and apply a suitable base coat.
- Apply your chosen background colour.
- Add glitter polish to selected nails.
- Paint small snowflake patterns using white nail polish.
- Allow the artwork to dry completely.
- Seal everything with a quality top coat.
Glitter snowflake nail designs are especially lovely for Christmas parties, winter weddings, holiday dinners, and special occasions.
4. Nude Snowflake Nail Designs
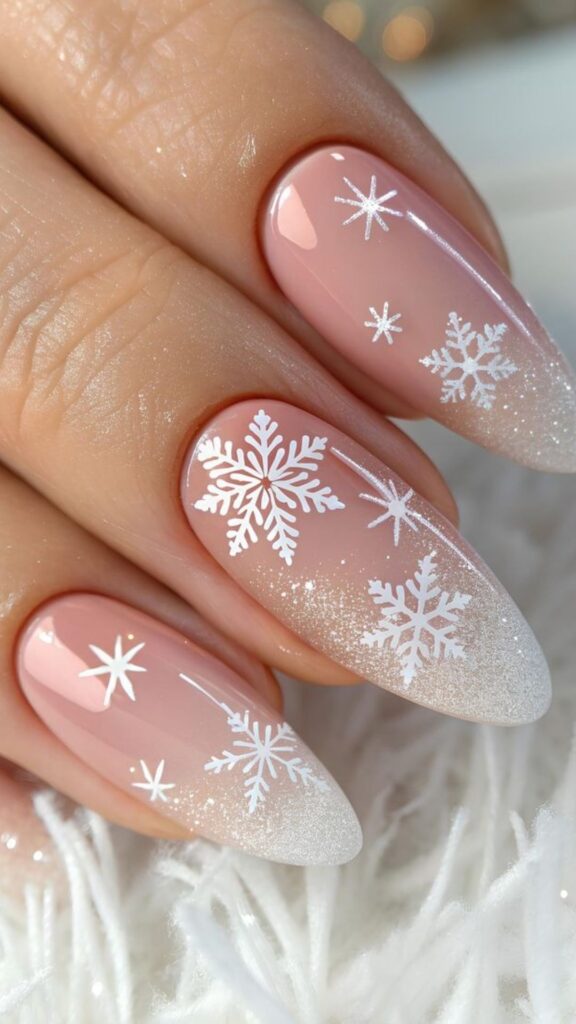
Not everyone enjoys bright or colourful nail designs. If you prefer something subtle, nude snowflake nails offer a beautiful alternative.
Nude nail polish creates a soft and natural-looking background that allows delicate snowflake patterns to stand out without overwhelming the manicure.
You can choose from several nude shades, including beige, caramel, light brown, milky pink, and warm neutral tones.
For a simple look, apply a nude base colour and add one or two small white snowflakes to your accent nails. This creates a clean and sophisticated manicure that works well for everyday wear.
If you want a little more decoration, add tiny silver dots around the snowflakes. These details create the appearance of falling snow and make the overall design more interesting.
Another beautiful idea is to combine nude nails with white French tips and delicate snowflake artwork. This gives you a manicure that feels modern while still capturing the winter theme.
Nude snowflake nail designs are particularly suitable for people who enjoy minimal nail art but still want something seasonal.
They also work beautifully on short natural nails because the simple patterns do not require much space.
5. French Tip Snowflake Nails
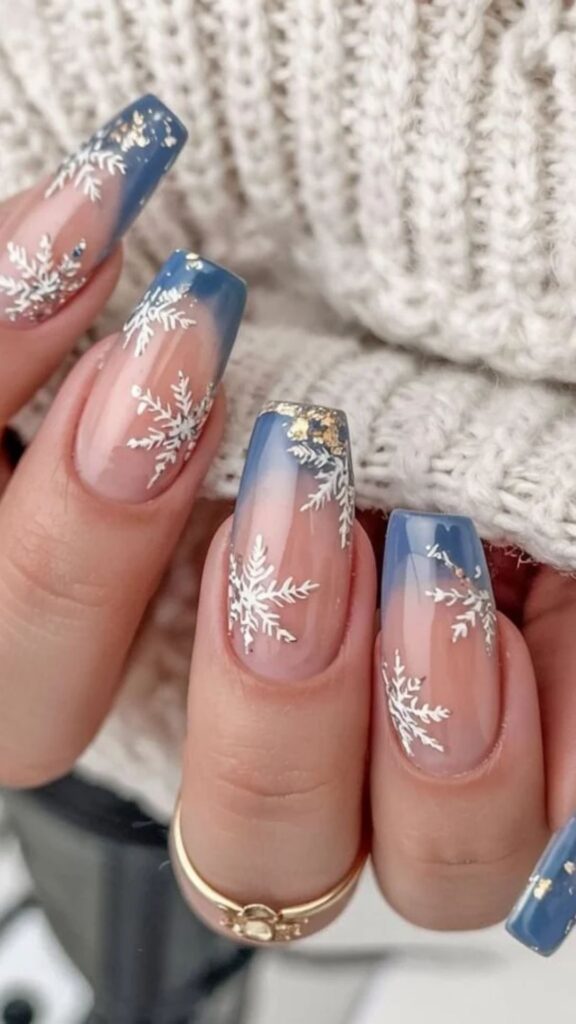
French tip nails are a timeless manicure choice, and adding snowflake artwork gives them a beautiful seasonal update.
Instead of using only traditional white tips, you can experiment with icy blue, silver, glitter, or soft white French tips.
One lovely idea is to create a classic French manicure with a nude or pink base and white tips. Add small snowflake patterns to one or two accent nails for a delicate winter appearance.
You can also choose blue French tips with tiny white snowflakes painted near the edges. This combination creates a playful but elegant manicure.
For something more glamorous, use silver glitter to create the French tips and add a few white snowflakes over a transparent base.
The beauty of French tip snowflake nails is that they combine a familiar manicure style with seasonal details. This makes them suitable for people who do not want their nails to look too heavily decorated.
Ideas to try include:
- Traditional white French tips with white snowflakes.
- Baby blue French tips with silver snowflake details.
- Glitter French tips with delicate white artwork.
- Nude French nails with tiny snowflake accents.
- Silver metallic tips with a glossy transparent base.
French tip snowflake designs look particularly attractive on almond, square, and coffin-shaped nails.
6. Short Snowflake Nail Designs
Source
Having short nails does not mean you have to miss out on beautiful winter nail art. In fact, short snowflake nails can look incredibly stylish when the designs are carefully selected.
The key is to keep the artwork simple and avoid adding too many large decorations. Small snowflake patterns, tiny dots, and delicate lines can make short nails look beautiful without overcrowding the available space.
A pale blue or milky white base is a lovely starting point. You can add one small snowflake to each nail or create a single accent nail with a slightly larger design.
Another option is to paint your nails a soft nude colour and decorate only two nails with white snowflake patterns. This creates a balanced manicure that is suitable for everyday activities.
If you enjoy a little sparkle, add a small amount of silver glitter near the cuticle or along the tips.
Short snowflake nail designs are also practical because they are easier to maintain and less likely to interfere with everyday tasks.
How to make short snowflake nails look beautiful:
- Choose light or neutral background colours.
- Use small snowflake patterns.
- Avoid placing too many decorations on one nail.
- Try minimalist French tips.
- Use fine nail art brushes for precise details.
- Finish with a glossy top coat.
You can achieve a lovely winter manicure even if your natural nails are short.
7. Pink and White Snowflake Nails
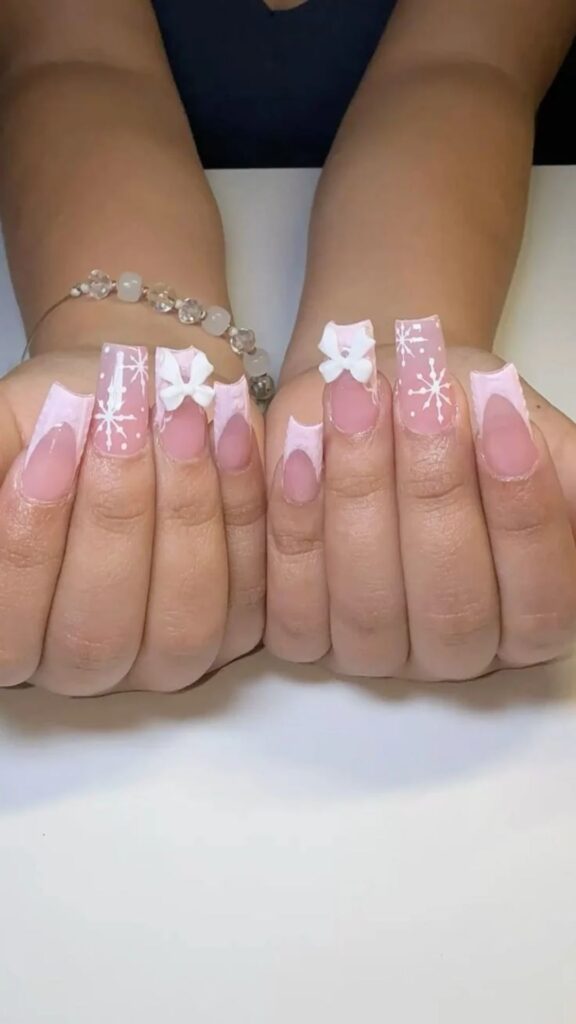
If you enjoy soft, feminine manicures, pink and white snowflake nails are worth trying.
Pink creates a warm and delicate appearance, while white snowflake patterns introduce the beautiful icy feeling associated with winter.
You can choose from several shades of pink, including baby pink, blush pink, pastel pink, and milky rose.
For a simple design, apply a soft pink polish to all your nails and add white snowflake patterns to two accent nails.
If you want something more detailed, combine different pink shades across your nails. You can use a slightly darker pink on some nails and a lighter shade on others.
A little silver glitter can also make this manicure look more festive. Consider adding glitter to one nail while keeping the remaining nails simple.
Another beautiful option is to create an ombre effect using two complementary pink shades. Once the gradient is complete, add delicate white snowflakes over the top.
Pink and white winter nail designs are perfect for anyone who wants a softer alternative to traditional blue and white snowflake nails.
They are also suitable for Christmas celebrations, winter birthdays, and romantic occasions.
8. Black and Silver Snowflake Nails
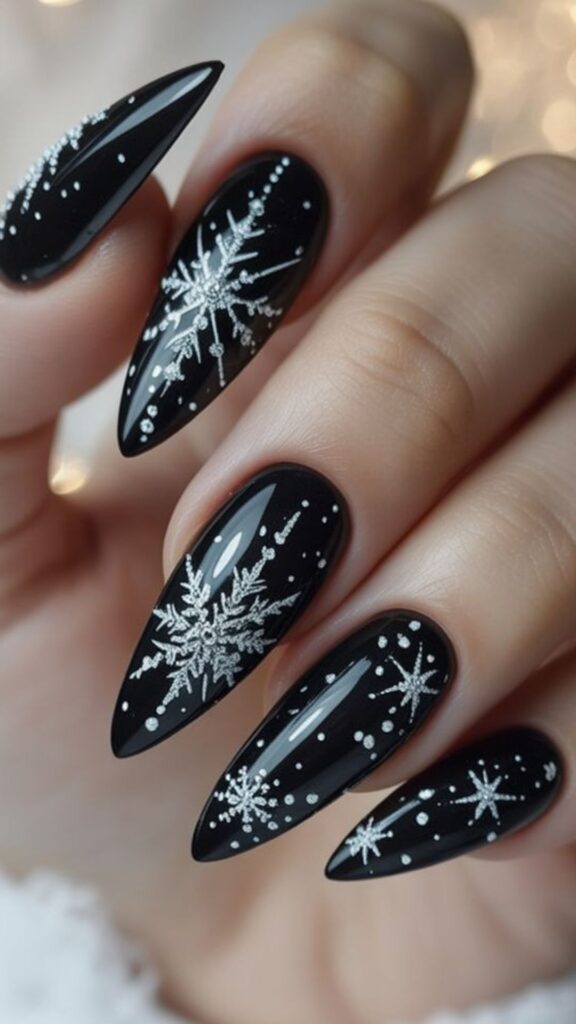
For a dramatic winter manicure, black and silver snowflake nails are an excellent choice.
Black provides a deep, sophisticated background, while silver snowflake patterns create a striking contrast.
This design is ideal for people who prefer darker nail colours and want something different from the usual pale blue and white winter combinations.
Start with a glossy black nail polish and allow it to dry. Then use silver nail art polish to create snowflake patterns on selected nails.
You can make the design more interesting by combining different snowflake sizes. Use one large snowflake on an accent nail and smaller patterns on the remaining nails.
Silver glitter can also be added to one or two nails for extra shine.
If you prefer a less dramatic appearance, consider using a matte black base with glossy silver snowflakes. The contrast between the two finishes creates a beautiful effect.
Ways to style black and silver snowflake nails:
- Glossy black nails with silver snowflakes.
- Matte black nails with metallic snowflake patterns.
- Black French tips with silver glitter.
- Black and silver ombre nails.
- Black accent nails with tiny white snowflakes.
This combination is particularly beautiful for evening events, winter parties, and festive celebrations.
9. Icy Blue Ombre Snowflake Nails
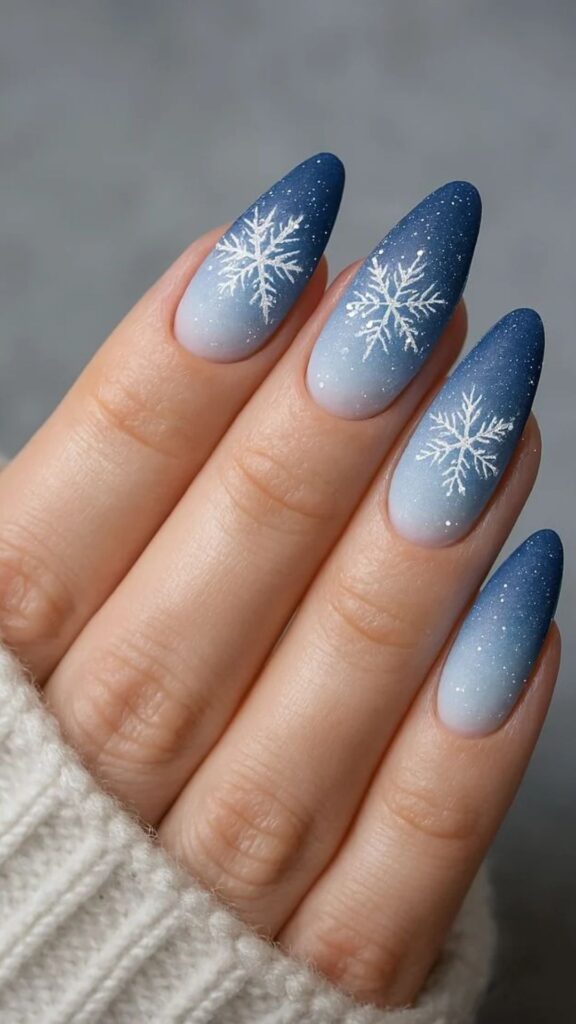
Ombre nail designs are popular because they create a beautiful gradient effect by blending two or more colours.
When combined with snowflake artwork, an icy blue ombre manicure becomes a lovely winter-inspired design.
The most common combination involves blending a pale blue shade with white to create the appearance of a frosty winter sky.
You can also experiment with different shades of blue, such as baby blue, powder blue, and icy blue.
For the snowflake details, choose white nail polish or a white stamping design. Place the snowflakes across selected nails so that they remain visible against the gradient background.
Adding a little silver shimmer can make the manicure look even more beautiful.
One advantage of icy blue ombre snowflake nails is that the gradient creates visual interest even before the artwork is added.
If you want a more noticeable result, use different gradient placements across your nails while maintaining the same colour combination.
This design looks especially lovely on medium and long nails because the extra length provides more room for the gradient and decorative details.
10. Rhinestone Snowflake Nail Designs
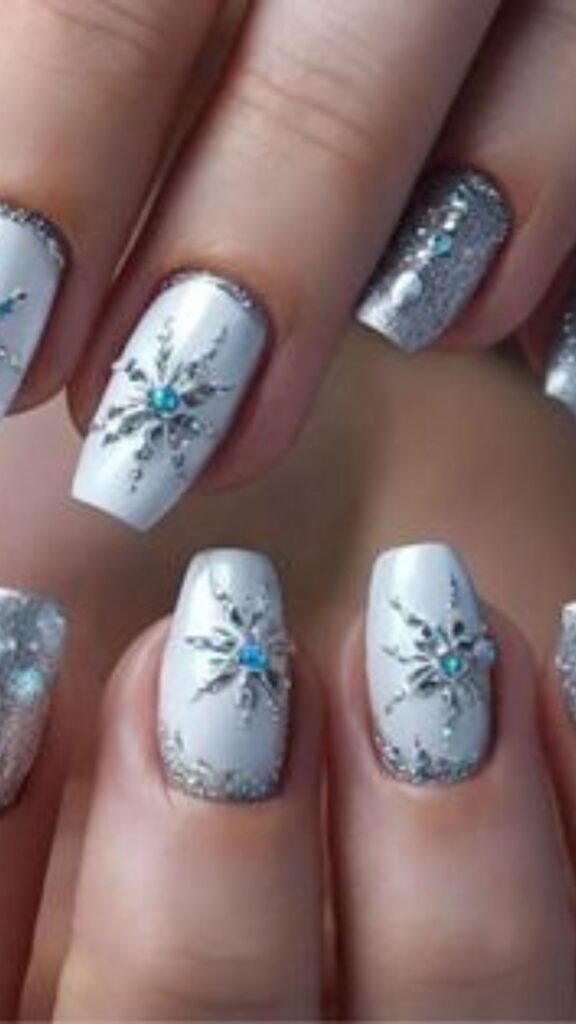
If you enjoy detailed and glamorous manicures, rhinestone snowflake nails are a beautiful option.
This design combines traditional snowflake patterns with small decorative stones to create a sparkling winter manicure.
Rhinestones can be placed around a snowflake design to imitate the appearance of tiny ice crystals. You can also use them at the centre of the snowflakes to create a more decorative finish.
For an elegant look, choose a nude, milky white, or pale blue base colour. Add white snowflake artwork to selected nails and carefully place small silver or clear rhinestones around the patterns.
If you prefer something more glamorous, combine rhinestones with silver glitter and icy blue polish.
However, it is important not to overcrowd the nails with too many decorations. A few carefully placed stones can look more elegant than covering every nail with embellishments.
Rhinestone snowflake nails are especially suitable for holiday parties, Christmas celebrations, winter weddings, and special events.
They are also a lovely choice if you want your manicure to attract attention while maintaining a beautiful seasonal theme.
How to Choose the Best Snowflake Nail Design for Your Nail Shape
Choosing a snowflake nail design is not only about selecting your favourite colours. Your nail shape and length can also influence how the finished manicure looks.
Some designs work particularly well on longer nails because they provide enough space for detailed artwork. Others are better suited to short nails because they use smaller patterns and simpler decorations.
Here are some ideas to help you choose.
Snowflake Nails for Almond-Shaped Nails
Almond nails have a soft, tapered appearance that creates an elegant look.
This nail shape works beautifully with delicate snowflake artwork, especially when combined with nude, pink, or icy blue polish.
You can place one large snowflake on an accent nail and use smaller patterns on the remaining nails.
Silver glitter and French tips are also excellent additions to almond-shaped winter nails.
Snowflake Nails for Square Nails
Square nails have straight edges and a defined shape that makes them suitable for both simple and detailed designs.
White snowflakes against a blue background look particularly beautiful on this nail shape.
You can also experiment with French tips, glitter accents, and minimalist snowflake patterns.
For short square nails, keep the artwork relatively small to avoid making the manicure look crowded.
Snowflake Nails for Coffin-Shaped Nails
Coffin nails provide plenty of space for creative winter nail art.
Their long shape makes them suitable for detailed snowflakes, glitter gradients, rhinestones, and multiple colour combinations.
If you enjoy dramatic manicures, consider using navy blue, silver, and white to create a glamorous winter design.
Snowflake Nails for Round Nails
Round nails have a natural and understated appearance.
Small snowflake patterns work particularly well because they complement the soft shape of the nails.
Choose light pink, nude, white, or pale blue polish for a delicate winter manicure.
You can also add a single snowflake to each nail for a coordinated appearance.
Best Colours for Beautiful Snowflake Nail Designs
The colours you choose can completely change the appearance of your snowflake manicure.
While white is the most recognisable colour for snowflake artwork, there are several other shades that work beautifully for winter nail designs.
White: White is a classic choice for snowflake patterns because it creates a clean, frosty appearance.
Icy blue: This colour gives your manicure a cool winter feeling and pairs beautifully with white snowflakes.
Baby pink: Soft pink creates a delicate and feminine look, especially when combined with white and silver.
Navy blue: Navy is perfect for creating a dramatic background that makes white snowflake patterns stand out.
Silver: Silver adds sparkle and gives your manicure a beautiful icy finish.
Nude: Nude shades are ideal for people who prefer understated winter nail art.
Black: Black creates a bold background that looks beautiful with metallic silver or white snowflakes.
Milky white: This soft shade creates a clean, elegant manicure that works well with minimalist snowflake designs.
When choosing your colours, consider the overall appearance you want. Light colours are perfect for soft and delicate manicures, while darker shades create a more dramatic winter look.
How to Create Snowflake Nail Art at Home
You do not always need to visit a professional nail salon to enjoy beautiful snowflake nail designs. With a few basic nail products and some patience, you can create simple winter nail art at home.
Although detailed snowflakes may look complicated, basic patterns are relatively easy to recreate once you understand how they are formed.
Things You Will Need
Before starting, gather the following nail art supplies:
- Nail polish in your preferred background colour.
- White nail art polish.
- A fine nail art brush.
- A dotting tool.
- Base coat.
- Top coat.
- Silver glitter polish.
- Nail polish remover.
- Cotton pads or lint-free wipes.
You can also use snowflake nail stickers or stamping plates if you find freehand painting difficult.
Step 1: Prepare Your Nails
Start by removing any old nail polish and cleaning your nails.
Trim and shape them according to your preferred style. You can choose square, round, almond, or coffin shapes depending on your natural nails and preferences.
Gently push back your cuticles and lightly buff the nail surface if necessary.
Wash your hands and allow your nails to dry before applying polish.
Step 2: Apply a Base Coat
A base coat helps protect your natural nails and provides a smooth surface for the coloured polish.
Apply a thin, even layer and allow it to dry according to the product instructions.
Avoid applying too much product because thick layers can take longer to dry and may affect the finished appearance.
Step 3: Apply Your Background Colour
Choose a colour that complements your preferred snowflake design.
You can use baby blue, nude, white, pink, navy, or another winter-inspired shade.
Apply one thin coat and allow it to dry before applying a second coat if needed.
For a simple winter manicure, you can also leave some nails transparent or use a milky polish.
Step 4: Draw the Snowflakes
Once your background colour is completely dry, use a fine nail art brush to create your snowflake patterns.
Start by drawing a small cross. Add two diagonal lines that intersect at the centre to create a six-pointed snowflake shape.
You can then add tiny branches to each line to make the design look more detailed.
If freehand painting is difficult, use a dotting tool to create small snowflake-inspired patterns or choose ready-made nail stickers.
Remember that snowflakes do not need to look identical on every nail. Small variations can make your manicure look more natural.
Step 5: Add Decorative Details
Once the snowflakes have dried, consider adding a little silver glitter, tiny dots, or rhinestones.
These details can make your manicure look more polished and festive.
However, keep the decorations balanced. You do not need to add glitter or stones to every nail.
Step 6: Apply a Top Coat
Finish your manicure with a suitable top coat.
This helps protect the nail art and gives the finished design a smooth appearance.
If you used rhinestones, make sure they are properly secured with an appropriate nail adhesive or product designed for nail decorations.
Allow everything to dry completely before using your hands for activities that could damage the manicure.
Tips for Making Your Snowflake Nail Designs Last Longer
Creating beautiful winter nail art is exciting, but keeping it looking fresh is equally important.
With proper nail preparation and maintenance, you can help your snowflake manicure last longer.
Here are some useful tips.
Prepare your nails properly: Always begin with clean, dry nails. Removing oils and old polish helps the new manicure adhere properly.
Use thin layers: Applying several thin coats is generally better than applying one thick coat. Thin layers dry more evenly and help prevent smudging.
Choose quality nail products: Good-quality nail polish, base coats, and top coats can improve the appearance and durability of your manicure.
Seal the edges: When applying top coat, lightly cover the free edges of your nails. This can help reduce premature chipping.
Protect your hands: Wear gloves when washing dishes or using household cleaning products. Frequent exposure to water and chemicals can affect your manicure.
Avoid picking at your polish: If you notice a small chip, resist the temptation to peel off the remaining polish. This can damage the nail surface.
Moisturise your cuticles: Apply cuticle oil regularly to keep the skin around your nails moisturised.
Be careful with decorations: If your manicure includes rhinestones or other embellishments, avoid using your nails to open containers or perform tasks that could pull them loose.
Following these simple steps can help your snowflake nail designs remain beautiful for longer.
Common Mistakes to Avoid When Getting Snowflake Nails
Although snowflake nail art looks beautiful, a few mistakes can affect the final result.
Whether you are doing your nails at home or visiting a nail technician, knowing what to avoid can help you achieve a better manicure.
Adding Too Many Designs
One common mistake is placing too many snowflakes and decorations on every nail.
Although detailed artwork can be attractive, too many patterns may make your manicure look crowded.
Instead, choose a few accent nails and keep the remaining nails relatively simple.
Using Colours That Do Not Complement Each Other
Not every colour combination will create the winter appearance you want.
For a classic look, stick to combinations such as white and blue, silver and nude, or pink and white.
If you prefer experimenting with unusual colours, make sure they work well together.
Making Snowflake Patterns Too Large
Snowflake artwork should complement the shape and length of your nails.
Large patterns may look beautiful on long coffin nails but can overwhelm shorter nail shapes.
Choose a pattern size that suits the available space.
Skipping the Top Coat
A top coat is an important finishing step because it protects the artwork and gives your manicure a smooth finish.
Without it, your snowflake nail designs may become dull or chip more quickly.
Rushing the Drying Process
Applying another layer before the previous one has dried can cause smudging and uneven results.
Give each layer enough time to dry before continuing with the next step.
How to Maintain Healthy Nails During Winter
Beautiful nail art looks even better when your natural nails are properly cared for.
Cold weather, frequent handwashing, and exposure to household products can leave your hands and cuticles feeling dry.
Maintaining a simple nail care routine can help keep your nails looking healthy throughout the winter season.
Start by moisturising your hands regularly with a suitable hand cream. Pay attention to your cuticles because the skin around your nails can become dry during colder weather.
Cuticle oil is another useful addition to your routine. Applying a small amount regularly can help keep the cuticle area soft.
Avoid biting your nails or picking at damaged polish. These habits can weaken the nail surface and make your manicure look untidy.
If you use gel polish or acrylic extensions, make sure they are applied and removed properly. Avoid pulling off artificial nails yourself because doing so can damage your natural nails.
It is also helpful to give your nails occasional breaks from artificial enhancements if they become weak or damaged.
A little regular care can make a noticeable difference in the appearance of your hands and nails.
Frequently Asked Questions About Snowflake Nail Designs
What Are the Best Colours for Snowflake Nail Designs?
White, icy blue, silver, navy blue, nude, and pale pink are among the best colours for snowflake nail designs. These shades create beautiful winter-inspired combinations and work well with different nail shapes and lengths.
Are Snowflake Nails Suitable for Short Nails?
Yes. Snowflake nail designs look beautiful on short nails. You can choose tiny white snowflakes, minimalist patterns, or simple accent nails. Light colours such as nude, baby blue, and milky white can also make short nails look elegant.
Can I Create Snowflake Nail Art at Home?
Yes. You can create simple snowflake nail art at home using a fine nail art brush, white nail polish, a base colour, and a top coat. If you are not confident painting the patterns yourself, snowflake stickers and stamping plates are convenient alternatives.
What Nail Shape Looks Best With Snowflake Designs?
Snowflake nail art looks beautiful on almond, square, coffin, and round nails. Almond nails create an elegant appearance, while coffin nails provide more space for detailed artwork. Short square and round nails are excellent for minimalist snowflake designs.
Are Blue and White Snowflake Nails Good for Christmas?
Absolutely. Blue and white snowflake nails are a beautiful choice for Christmas because they create a frosty winter appearance. You can make the manicure more festive by adding silver glitter or small rhinestones.
How Can I Make My Snowflake Nail Designs Look More Elegant?
Choose a simple colour combination, use delicate snowflake patterns, and avoid overcrowding your nails with decorations. Nude, white, silver, and pale blue are excellent choices for creating an elegant winter manicure.
Can I Combine Snowflakes With French Tip Nails?
Yes. French tips and snowflake artwork complement each other beautifully. You can use traditional white tips, icy blue tips, or silver glitter tips and add small snowflake patterns to one or two accent nails.
How Long Do Snowflake Nail Designs Last?
The lifespan depends on the type of manicure and the products used. Regular nail polish may last several days to around a week, while properly applied gel manicures can last approximately two to three weeks. Proper nail preparation and aftercare can help extend the wear time.
Are Snowflake Nail Designs Suitable for Everyday Wear?
Yes. Simple snowflake nail designs are suitable for everyday wear. Choose a nude, pink, or transparent base with small white snowflake patterns for a subtle seasonal manicure.
How Do I Make Snowflake Nail Art Without a Nail Art Brush?
You can use a toothpick or dotting tool to create simple snowflake patterns. You can also use snowflake nail stickers, stamping plates, or ready-made nail decals if you want a neat design without painting the patterns by hand.
Conclusion on Beautiful Snowflake Nail Designs
Winter is a wonderful opportunity to experiment with beautiful seasonal nail art, and snowflake nail designs are one of the easiest ways to embrace the season.
Whether you prefer classic white snowflakes, sparkling silver details, soft pink combinations, or dramatic black and silver patterns, there are plenty of styles to explore. You can also customise your manicure with glitter, French tips, rhinestones, and different shades of blue to create something that reflects your personal taste.
The 10 snowflake nail designs shared in this guide offer inspiration for different occasions, nail shapes, and personal preferences. You do not need extremely long nails or complicated decorations to achieve a beautiful winter manicure. Sometimes, a simple colour combination and a few delicate snowflake patterns are all you need.
If you enjoy doing your nails at home, start with an easy design and gradually experiment with more detailed artwork as your confidence grows. If you prefer visiting a nail salon, save your favourite inspiration and discuss the colours and patterns with your nail technician.
Whichever design you choose, let your nails reflect the beauty of the winter season. With the right combination of colours, patterns, and finishing touches, you can enjoy a stylish manicure that makes every winter moment feel a little more special.