Valentine’s Day crafts for Adults is a lovely opportunity to get creative and make something beautiful with your own hands. You don’t need to spend a fortune on decorations or gifts to create something that looks stylish and thoughtfully made. Sometimes, a few affordable materials, an interesting idea, and a little patience are enough to transform an ordinary object into something special.
If you enjoy scrolling through Pinterest and saving beautiful DIY projects, you’re in the right place. From delicate clay accessories to charming handmade keepsakes, there are plenty of Valentine’s Day crafts for adults that can bring a little romance and creativity into your life.
What makes aesthetic crafts special is the attention to detail. A simple project can look impressive when you choose complementary colours, interesting textures, and thoughtful finishing touches. You can also personalize each creation to match your home decor, your favourite colours, or the person receiving your handmade gift.
In this collection, you will see nine aesthetic Valentine’s Day crafts for adults that are fun to create and beautiful enough to inspire your next Pinterest-worthy project. These ideas are suitable for different skill levels, so you can choose something simple or challenge yourself with a more detailed design.
I have an article on 20 Room Decoration Ideas for Valentines Day Surprise That you will find Useful.
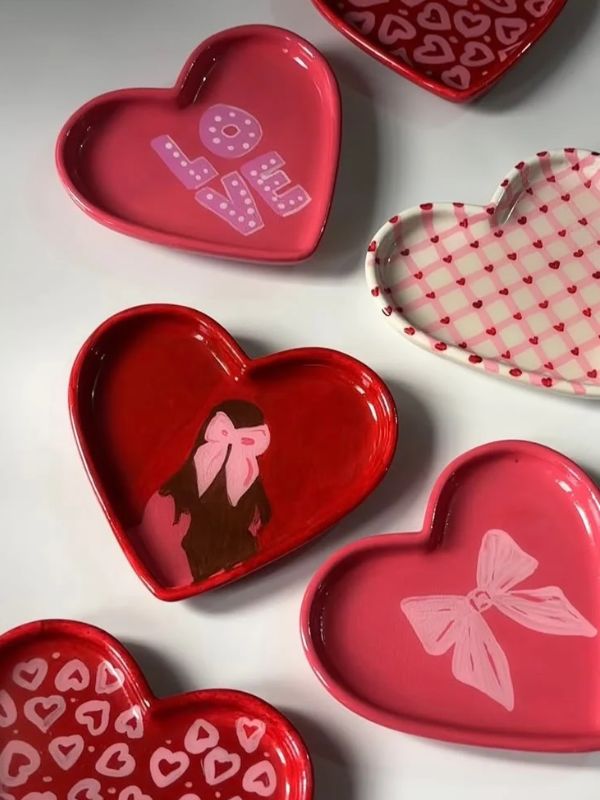
1. Make a Romantic Air-Dry Clay Trinket Dish
An air-dry clay trinket dish is a beautiful little project for anyone who loves handmade accessories and minimalist decor. It can hold rings, earrings, necklaces, or other small treasures, making it useful long after Valentine’s Day has passed.
Unlike complicated pottery projects, air-dry clay doesn’t require a kiln. You can shape it at home and allow it to dry according to the manufacturer’s instructions.
The finished dish can look especially elegant in blush pink, cream, dusty rose, or soft terracotta. For a Pinterest-inspired finish, consider adding delicate scalloped edges, a subtle painted design, or a thin gold-coloured border.
Materials You will Need for this Valentine’s Day Crafts for Adults
- Air-dry clay
- A rolling pin or smooth cylindrical bottle
- Baking parchment or another suitable non-stick work surface
- A small bowl to use as a shaping guide
- A craft knife or clay sculpting tool
- Acrylic paint
- A suitable paintbrush
- Clay sealant recommended for your chosen clay and paint
How to Make It
Step 1: Prepare your clay.
Place a piece of air-dry clay on your work surface. Knead it gently until it feels workable, following the instructions on the packaging.
If the clay begins to dry while you’re working, cover the unused portion so it doesn’t harden prematurely.
Step 2: Roll the clay into a flat sheet.
Use a rolling pin to flatten the clay to an even thickness. Avoid making it too thin, as the finished dish may become fragile.
Aim for a thickness that feels sturdy enough to support small pieces of jewellery.
Step 3: Cut your preferred shape.
You can make a circular, oval, or heart-shaped dish. For a softer aesthetic, try a slightly irregular organic shape rather than aiming for a perfectly symmetrical outline.
Smooth the edges with a little water if your clay instructions permit it.
Step 4: Shape the dish.
Gently place the clay over the outside of an appropriately sized bowl or inside it, depending on the shape you want. Support the clay so it doesn’t develop unwanted folds or cracks.
Allow the piece to dry in the position recommended by the clay manufacturer.
Step 5: Add your decorative details.
Once the dish has dried completely, smooth any rough areas gently with suitable fine sandpaper if the product instructions allow it.
Paint the dish in your chosen colour. You could create a cream dish with tiny pink hearts, a dusty rose dish with a contrasting edge, or a simple white design with a delicate abstract pattern.
Step 6: Seal and finish it.
After the paint has dried, apply a compatible sealant according to its instructions. Ordinary craft sealants may not make a dish waterproof or food-safe.
Use the finished piece for dry jewellery or small accessories.
I have an article on 13 Polymer Clay Crafts That Are Actually Worth Making for Gifts, Decor, and More That will give you more Ideas on making trinket clay dishes.
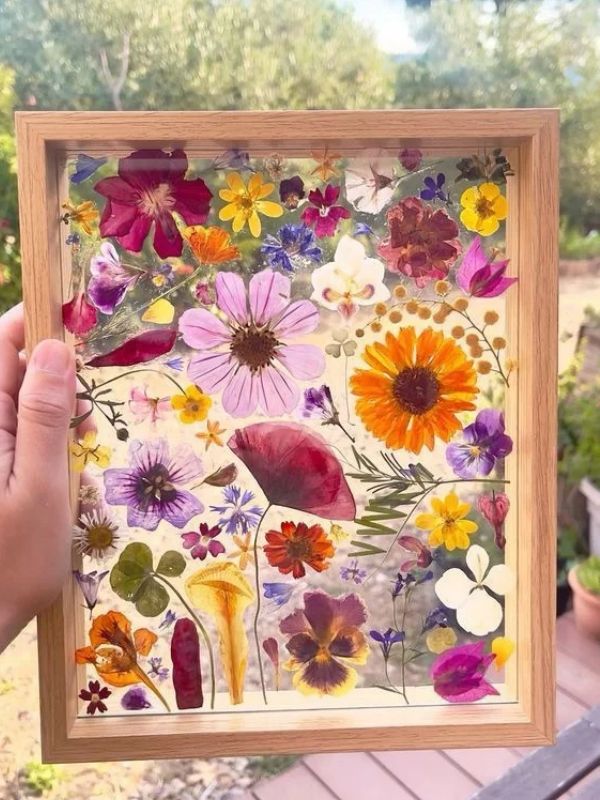
2. Create a Pressed-Flower Glass Frame
Pressed-flower art is a wonderful choice if you love delicate botanical details. The combination of translucent glass and carefully arranged flowers creates an elegant effect that looks beautiful on a desk, bedside table, or shelf.
This project also gives you an opportunity to create something personal. You can select flowers in the recipient’s favourite colours or use blooms that remind you of a special occasion.
For Valentine’s Day, pink, red, white, and purple flowers can create a romantic colour palette. However, a neutral arrangement with cream flowers and green foliage can look just as beautiful.
Materials You will Need
- A double-glass floating frame
- Completely dried and pressed flowers
- Tweezers
- A clean, dry work surface
- Small paper scraps for testing your arrangement
- A soft cloth for cleaning the glass
How to Make It
Step 1: Choose your flowers.
Select flowers and leaves with complementary colours and shapes. Small blooms, delicate petals, and thin foliage often work particularly well because they can fit neatly between the glass panels.
Make sure every flower is completely dry before using it. Moisture trapped inside the frame can cause damage or mould.
Step 2: Plan the arrangement.
Before opening your frame, experiment with the layout on a sheet of paper.
You might arrange the flowers in a loose diagonal line, create a small cluster in one corner, or leave most of the frame empty with just a few delicate stems.
Negative space is important here. You don’t need to fill the entire frame to create a beautiful result.
Step 3: Clean the glass.
Use a soft cloth to remove fingerprints and dust from both glass panels.
Allow the glass to dry completely before arranging the flowers.
Step 4: Arrange the pressed flowers.
Place the flowers carefully on one glass panel using tweezers. Work slowly to avoid breaking fragile petals.
Try combining one slightly larger flower with two or three smaller blooms. Add a thin leaf or stem to guide the eye through the arrangement.
Step 5: Close the frame.
Carefully position the second glass panel according to the frame’s instructions.
Check that the flowers remain in place and that the frame closes securely. Some floating frames may allow delicate materials to move, so adjust the arrangement if necessary.
Step 6: Display your artwork.
Place the frame where natural light can highlight the flower shapes, but avoid prolonged direct sunlight, which may fade the colours.
A small frame can look lovely on a bedside table, while a larger one can become part of a gallery wall.
How to Make Paper Flowers Step by Step: A Simple DIY Tutorial, Is an informational article that will help you more on DIY Flowers for valentines day gifts.
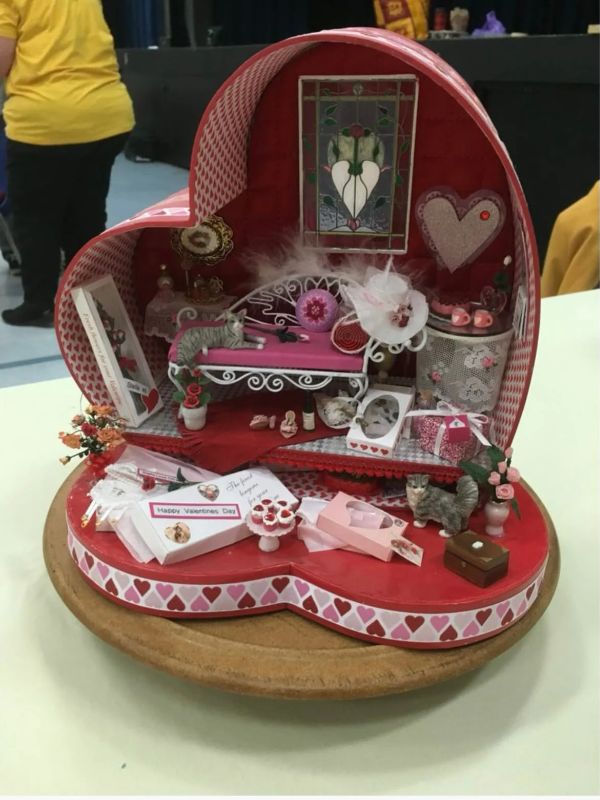
3. Design a Miniature Valentine’s Day Shadow Box
A miniature shadow box is a creative way to turn a small collection of objects into a decorative piece of art.
Instead of making a conventional Valentine’s Day decoration, you’ll build a little scene inside a deep frame. It could represent a romantic garden, a tiny reading corner, a memory from a special trip, or a miniature room decorated with Valentine’s Day details.
This project is particularly appealing if you enjoy arranging small objects and experimenting with colours, layers, and textures.
The finished piece can look like a tiny world behind glass, making it an interesting addition to a bookshelf or desk.
Materials You Will Need
- A deep shadow box frame
- Coloured cardstock
- Scrapbook paper
- Miniature decorative objects
- Small artificial flowers or dried foliage
- Craft glue suitable for your materials
- Scissors
- A ruler
- Optional miniature furniture or decorative accessories
How to Make It
Step 1: Choose a theme.
Decide what you want your miniature scene to represent.
For example, you could create a miniature Valentine’s reading nook with tiny books, a small chair, a floor lamp, and a few decorative details. Another option is a little garden scene with paper flowers, a miniature bench, and tiny heart accents.
Choose one clear theme to prevent the design from looking cluttered.
Step 2: Prepare the background.
Measure the inside back panel of your shadow box and cut cardstock or scrapbook paper to fit.
A pale pink background creates a romantic appearance, while cream, beige, or muted green can produce a more understated look.
Attach the background securely and allow the glue to dry.
Step 3: Create depth with layers.
Cut additional pieces of cardstock to make shelves, walls, or raised decorative elements.
You can attach some pieces directly to the background and position others slightly forward. This creates depth and makes the scene more interesting to look at.
Use foam mounting tape or suitable spacers when you need to raise lightweight decorative pieces.
Step 4: Add your miniature objects.
Arrange your small objects inside the frame before gluing anything down.
Try placing larger pieces toward the back and smaller details toward the front. This helps the miniature scene look balanced.
Avoid filling every empty space. A little breathing room can make the design appear more polished.
Step 5: Add Valentine’s Day details.
You could include tiny paper hearts, miniature envelopes, small flowers, or a little handwritten message.
For a more sophisticated finish, limit yourself to two or three main colours and repeat them throughout the scene.
Step 6: Secure the arrangement.
Once you’re happy with the layout, attach the objects using an adhesive suitable for the materials involved.
Allow everything to dry fully before closing the frame.
This Rhinestone and Bedazzle Crafts You Can Make at Home for Stylish DIY Decor and Gifts is a useful post where you can see more ideas for diy gifts
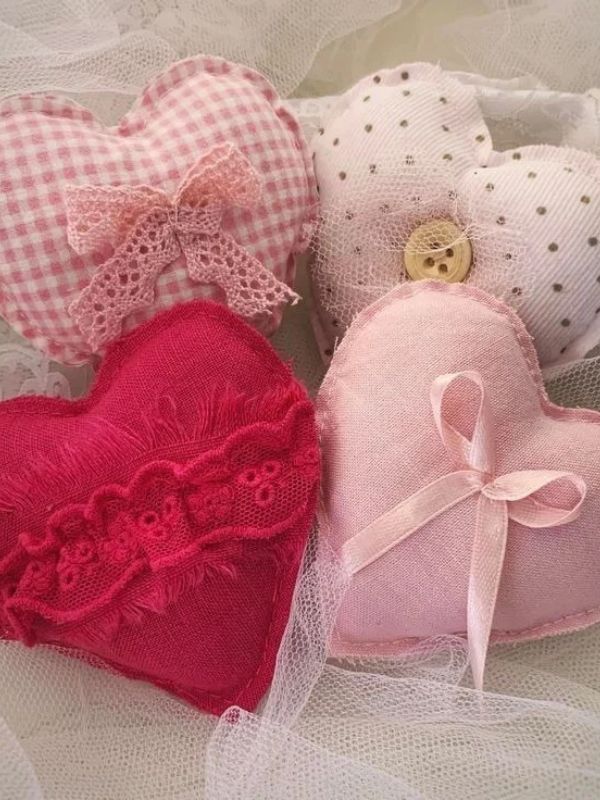
4. Make Decorative Fabric Conversation Hearts
Conversation hearts are a familiar Valentine’s Day motif, but you can give them a softer, more sophisticated appearance by making them from fabric.
These little padded hearts can be used as decorative accents, handmade gifts, or additions to a seasonal display. Choose linen, cotton, felt, or another suitable fabric in complementary colours.
Instead of using the traditional bright candy colours, experiment with dusty pink, soft lavender, cream, sage green, or muted red.
You can also embroider short words onto the hearts to give them a personal touch.
Materials You Will Need
- Fabric in your chosen colours
- Paper for making a heart template
- Fabric scissors
- Sewing needle and thread
- Polyester stuffing
- Embroidery thread
- Fabric marking pen suitable for your material
- Pins or clips
- Optional ribbon
How to Make Them
Step 1: Draw a heart template.
Draw a heart shape on paper and cut it out.
Keep the shape relatively simple, with a rounded top and a clear point at the bottom. A template makes it easier to create several hearts of similar size.
Step 2: Cut your fabric.
Fold your fabric so you can cut two matching pieces for each heart.
You can make every heart the same colour or create a coordinated collection using several shades.
Step 3: Add embroidered lettering.
Before sewing the heart together, embroider a short word or phrase on the front piece.
Ideas include:
- LOVE
- XOXO
- SWEET
- HUGS
- BE MINE
If you’re new to embroidery, use a simple backstitch or running stitch. Keep the lettering small enough to fit comfortably within the heart.
You can also leave the hearts plain for a minimalist appearance.
Step 4: Sew the pieces together.
Place the two fabric pieces together with their right sides facing inward.
Sew around the edges, leaving a small opening for turning and stuffing. Keep your seam allowance consistent and take extra care around the curved sections.
Step 5: Turn and stuff the heart.
Carefully turn the heart right side out through the opening.
Add small amounts of stuffing at a time, making sure the curves are filled without stretching the seams.
A lightly stuffed heart often looks softer and more natural than one packed too tightly.
Step 6: Close the opening.
Use a neat hand stitch to close the remaining gap.
Adjust the stuffing gently to create an even shape.
Step 7: Style your fabric hearts.
Place the finished hearts in a decorative bowl, arrange them on a shelf, or attach small ribbons if you want to hang them.
You could also make a set of three hearts in different sizes for a coordinated display.
How to Make DIY Bag Charms at Home for Beginners, this is another article to get inspirations for valentines day gifts.
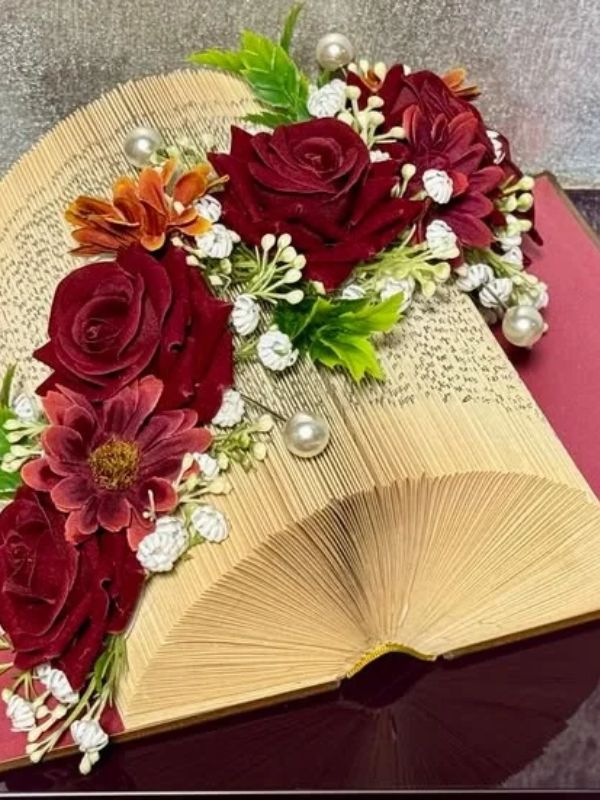
5. Create a Valentine’s Day Book Page Sculpture
If you love books, vintage details, and handmade decorations, a book-page sculpture could be an interesting project to try.
Old book pages can be folded, cut, layered, or shaped into decorative designs. For Valentine’s Day, you might create a freestanding paper heart, a layered heart silhouette, or a small framed composition made from book pages.
The combination of printed text and sculptural paper creates texture without requiring lots of colour.
For a Pinterest-inspired finish, pair the natural tones of book paper with cream cardstock, muted pink accents, or a simple wooden display base.
Use pages from a book you own and are comfortable repurposing, such as a damaged book or one that can no longer be used. You can also use printed text on craft paper to achieve a similar look.
Materials You Will Need
- Old book pages or printed text paper
- Cardstock
- Scissors
- Pencil
- Ruler
- Craft glue
- A heart template
- Optional wooden base or picture frame
How to Make a Layered Paper Heart
Step 1: Prepare the paper.
Choose pages with readable text and colours that work well together.
If the paper is very thin, glue it onto slightly heavier paper before cutting. This can make the finished shapes easier to handle.
Step 2: Draw your design.
Sketch a heart shape on cardstock.
You can create a simple heart silhouette or draw several hearts in gradually decreasing sizes for a layered composition.
Step 3: Cut the paper shapes.
Use your template to cut the required shapes from the book pages.
For a layered design, prepare several hearts of different sizes. Try to keep the edges neat, although small variations can add to the handmade character.
Step 4: Build the layers.
Attach the paper hearts to a cardstock backing, positioning each layer so that the shapes remain visible.
If you prefer a three-dimensional appearance, use small pieces of foam mounting tape between selected layers.
Avoid adding too many layers, as the design may become bulky.
Step 5: Add a finishing detail.
A narrow paper border, a small ribbon, or a subtle painted accent can help finish the composition.
You could also place the artwork inside a simple frame.
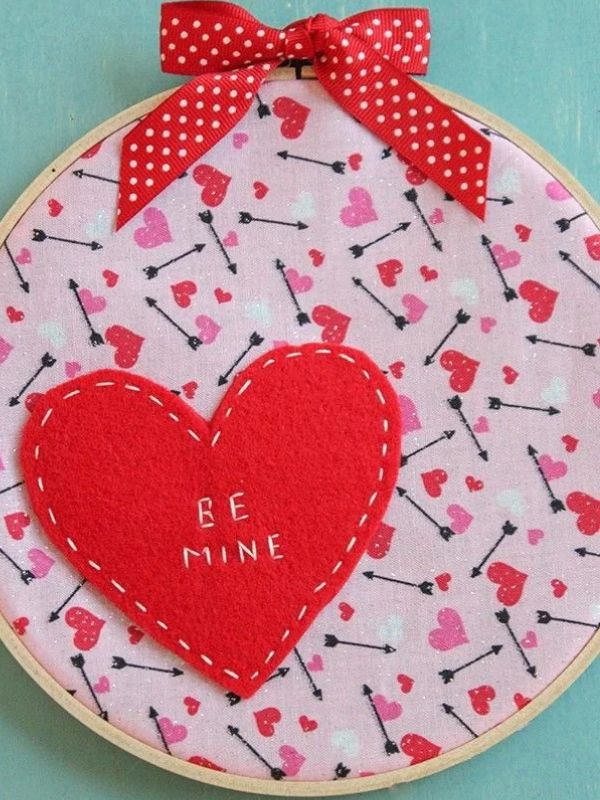
6. Make a Miniature Valentine’s Day Embroidery Hoop
Embroidery hoop art is a lovely way to create a small piece of handmade decor without needing a large workspace.
The combination of fabric, thread, and simple stitching can produce a delicate result that feels personal. You don’t need advanced embroidery skills to make something attractive, either.
For Valentine’s Day, you could stitch a small heart, a tiny flower, a pair of initials, or a short message onto linen or cotton fabric.
The finished hoop can be displayed on a wall, placed on a shelf, or given as a handmade keepsake.
Materials You will Need
- A small embroidery hoop
- Linen or cotton fabric
- Embroidery floss
- Embroidery needle
- Scissors
- Pencil or washable fabric marker
- A simple embroidery pattern
How to Make It
Step 1: Select your design.
Start with a small motif rather than a complicated picture.
A tiny red heart, a pair of intertwined initials, or a few delicate flowers can look beautiful on a neutral background.
Step 2: Prepare the fabric.
Cut a piece of fabric large enough to fit inside the hoop, leaving extra material around the edges.
Place the fabric between the two hoop rings and tighten the screw until the fabric is secure and relatively taut.
Step 3: Transfer your pattern.
Draw the design lightly on the fabric using a suitable marking tool.
Keep the lines simple, especially if this is your first embroidery project.
Step 4: Choose your stitches.
A backstitch works well for outlines and lettering. A satin stitch can fill small shapes, while a French knot can add tiny decorative dots.
If you’re a beginner, practising each stitch on a spare piece of fabric can help you feel more comfortable before starting the final design.
Step 5: Embroider your motif.
Work slowly, keeping the thread tension consistent.
Avoid pulling the thread too tightly, as this can distort the fabric. If you’re using several colours, plan how they will work together before beginning.
Step 6: Finish the hoop.
Once the embroidery is complete, trim any loose threads and check the back for knots that might come undone.
Secure the fabric at the back of the hoop using a suitable finishing method, keeping the fabric neat and evenly tensioned.
Three Design Ideas to Try
Minimalist heart: Stitch a single heart in red or dusty rose on cream fabric.
Tiny floral arrangement: Embroider a small cluster of flowers using muted pink, green, and cream thread.
Personalized initials: Add two initials with a small heart between them for a thoughtful keepsake.
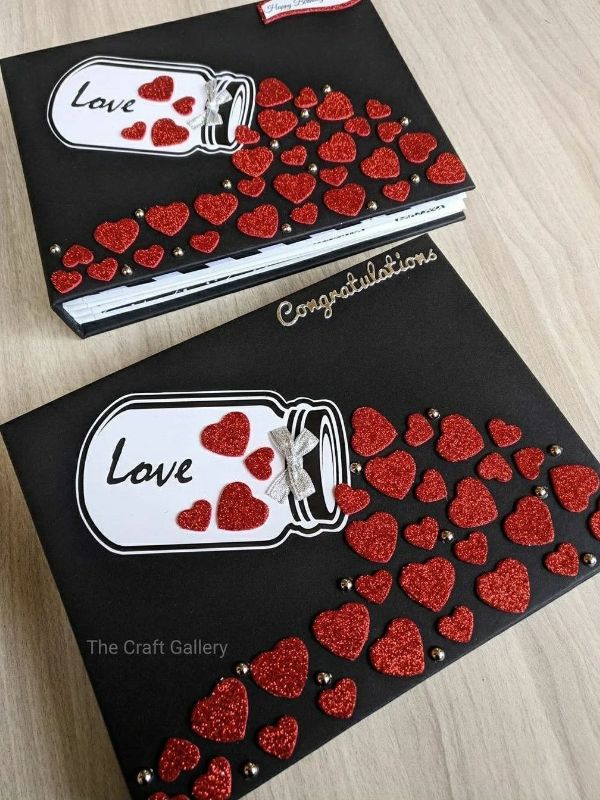
7. Design a Handmade Valentine’s Day Memory Book
Some of the most meaningful Valentine’s Day gifts are the ones that preserve memories.
A handmade memory book gives you a place to collect photographs, handwritten notes, favourite quotations, and little reminders of experiences you have shared with someone special.
Unlike a store-bought card, this project can grow into a personal keepsake that the recipient can revisit for years.
You can make it romantic, playful, nostalgic, or minimalist, depending on the person receiving it.
Materials You Will Need
- A blank scrapbook or notebook
- Printed photographs
- Coloured paper or cardstock
- Pens
- Paper-safe adhesive
- Scissors
- Optional decorative stickers, washi tape, and pressed flowers
How to Make It
Step 1: Choose the memories you want to include.
Gather photographs, ticket stubs, small notes, or other paper items that remind you of meaningful experiences.
You don’t need dozens of items. A few carefully selected memories can make a stronger impression than pages filled with random decorations.
Step 2: Select a colour palette.
Choose two or three main colours for the book.
Cream, muted pink, and brown can create a vintage-inspired appearance. White, blush, and red produce a more traditional Valentine’s Day look.
Use your chosen colours throughout the pages to make the book feel cohesive.
Step 3: Plan the pages.
Before attaching anything, arrange your photographs and paper elements on each page.
You might organize the book chronologically or divide it into themes such as favourite memories, places you’ve visited, funny moments, and hopes for the future.
Step 4: Add photographs and notes.
Attach your photographs with an adhesive suitable for the paper and photo finish.
Leave enough space to write a short caption or memory beside each image. A handwritten sentence explaining why a moment mattered can make the page feel much more personal.
Step 5: Include interactive details.
Create a small folded note, a pocket for a keepsake, or a flap that opens to reveal an additional photograph.
These details add interest without requiring expensive materials.
Step 6: Decorate the pages.
Use washi tape, simple borders, small paper shapes, or a few stickers to complement the photographs.
Try not to cover the entire page with embellishments. The memories should remain the main focus.
Step 7: Finish the cover.
Add a title such as Our Favourite Memories, Little Moments, Big Love, or A Book of Us.
You can decorate the cover with a small photograph, a paper label, or a simple hand-lettered design.
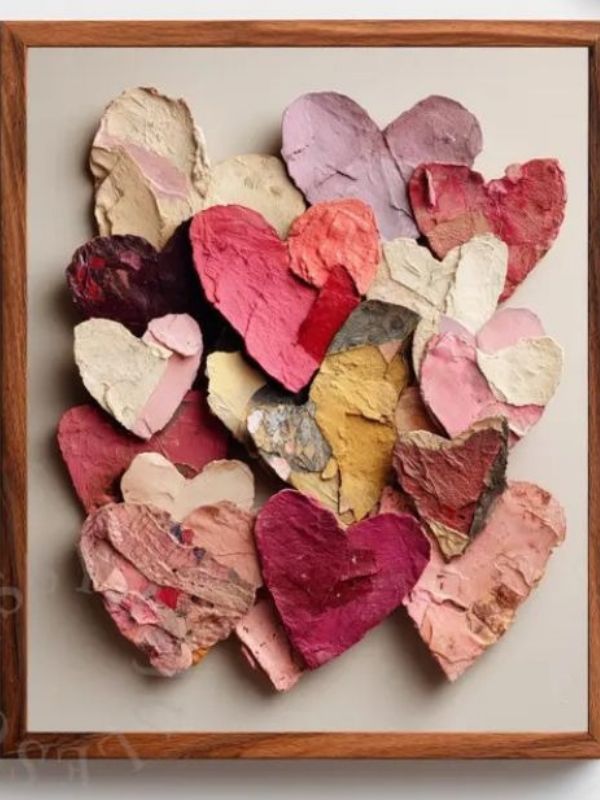
8. Create a Sculptural Paper Heart Wall Art Piece
If you enjoy paper crafts but want something more artistic than a conventional card, try creating three-dimensional heart wall art.
This project uses folded or layered paper to create a raised design that catches the light and adds texture to a plain wall.
The result can look modern and elegant, especially when you use a limited colour palette and a simple frame.
You can make one large statement piece or arrange several smaller hearts in a coordinated display.
Materials You will Need for this Valentine’s Day Crafts for Adults
- Thick cardstock
- A pencil
- A ruler
- A heart template
- Scissors or a suitable craft knife
- A cutting mat if using a craft knife
- Foam mounting tape or suitable adhesive
- A backing board or picture frame
How to Make It
Step 1: Choose the size and layout.
Decide whether you want a single large heart or a collection of smaller shapes.
For a gallery-style arrangement, you could make three hearts in different shades of pink and arrange them vertically.
Step 2: Cut out your shapes.
Use your template to cut matching hearts from cardstock.
Make sure the shapes are cleanly cut, as uneven edges may be noticeable once the pieces are mounted.
Step 3: Add dimension.
One option is to fold each heart gently down the centre to create a raised ridge.
Another method is to layer smaller hearts over larger ones using foam mounting tape. This produces a raised effect without complicated folding.
Test your chosen method with a scrap piece of paper first.
Step 4: Arrange the design.
Place the hearts on your backing board before attaching them.
Experiment with spacing and alignment until the arrangement looks balanced.
You could position the hearts in a loose cluster, a symmetrical pattern, or a gentle diagonal line.
Step 5: Attach the hearts.
Use adhesive that is suitable for your cardstock and backing material.
If you want the hearts to stand away from the background, use foam mounting tape in discreet locations.
Press each piece gently into place and allow the adhesive to set.
Step 6: Frame the artwork.
Place the finished design inside a frame deep enough to accommodate the raised pieces.
If you prefer an unframed look, mount the artwork on a rigid backing board and display it on a shelf or wall using appropriate hanging hardware.
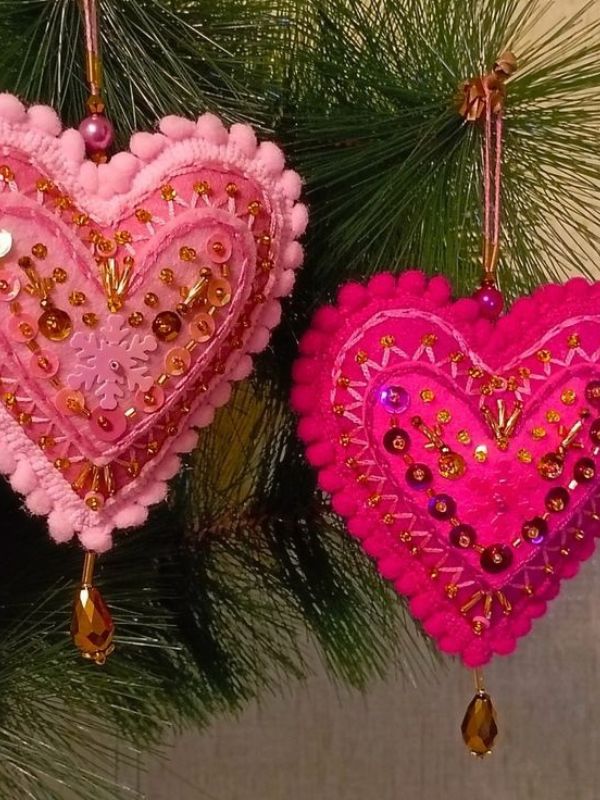
9. Make a Decorative Beaded Heart Ornament
For a craft that combines natural textures with a romantic shape, consider making a beaded heart ornament.
Wooden beads can create a soft, natural appearance, while painted beads allow you to introduce colour. You can make the ornament small enough to hang from a decorative hook or large enough to display as part of a seasonal arrangement.
This project also offers plenty of room for customization. Use natural wood tones for a minimalist look, or combine blush pink and cream beads for a softer Valentine’s Day style.
Materials You Will Need
- Wooden beads in your preferred sizes
- Flexible craft wire or another suitable material for your design
- Wire cutters, if using wire
- Pliers appropriate for the wire
- Ribbon or cord for hanging
- Optional acrylic paint
- A pencil and paper for planning the shape
Choose beads and wire that are compatible in size and strength. If you’re making an ornament that will hang, the structure needs to support the finished piece securely.
How to Make It
Step 1: Sketch your heart shape.
Draw a heart on paper to use as a guide.
Keep the outline fairly simple, with two rounded upper sections and a clearly defined lower point. A very narrow heart may be difficult to form with large beads.
Step 2: Choose your beads.
Arrange the beads by colour and size before assembling the ornament.
For a natural style, use unpainted wooden beads in similar shades. For a romantic design, mix natural beads with a few blush pink or cream ones.
If painting your beads, allow them to dry fully before stringing or assembling them.
Step 3: Prepare the structure.
Use your paper template to estimate the length of wire or cord needed.
The construction method depends on the design. A small ornament can be made by threading beads onto flexible wire and shaping it into a heart, provided the wire is suitable for the bead weight and can hold its shape.
For a softer design, you can thread beads onto sturdy cord and arrange the beaded strand around a separate heart-shaped frame.
Step 4: Add the beads.
Thread the beads onto your chosen material, checking the arrangement against your template as you work.
Alternate bead colours in a deliberate pattern rather than changing colours randomly.
Leave enough room at the ends to secure the structure safely.
Step 5: Shape the heart.
Carefully form the beaded strand into a heart shape.
If you’re using wire, bend it gradually rather than making sharp creases. Secure the ends with an appropriate finishing method, making sure there are no exposed sharp wire tips.
If using a frame, attach the beaded strand securely to the frame at suitable points.
Step 6: Add a hanging loop.
Attach a ribbon or cord to the top of the heart.
Check that the ornament hangs evenly and that the attachment point is secure.
Step 7: Display your ornament.
Hang it from a decorative hook, place it on a small display stand, or incorporate it into a seasonal arrangement.
If the ornament is heavy, choose a hanging method that can safely support its weight.
Tips for Making Your Valentine’s Day Crafts Look Pinterest-Worthy
Choosing a beautiful project is only part of the process. The materials, colour combinations, finishing touches, and way you present the finished piece can make a considerable difference to the final result.
Here are a few practical ways to give your crafts a polished appearance without spending too much.
1. Choose a Consistent Colour Palette
One of the easiest ways to create a coordinated collection is to select your colours before purchasing supplies.
Traditional Valentine’s Day colours include red, pink, and white, but you can explore other combinations.
For example:
- Romantic and soft: Blush pink, cream, and muted red.
- Natural and understated: Beige, ivory, and sage green.
- Vintage-inspired: Dusty rose, brown, and antique cream.
- Modern and dramatic: Burgundy, pale pink, and white.
- Minimalist: White, warm beige, and a single red accent.
You don’t need to use the same colours in every craft. However, repeating one or two shades across your projects can help create a consistent visual style.
2. Pay Attention to the Finishing Details
A handmade project can look unfinished when the edges are rough, the glue is visible, or the paint is uneven.
Take a few extra minutes to inspect your work before displaying it.
For paper crafts, trim loose edges and remove visible pencil marks.fabric projects, check your stitching and trim stray threads. For painted objects, allow each coat to dry before applying another.
Small details may take extra time, but they can improve the overall appearance of your finished piece.
3. Use Texture to Add Visual Interest
Texture can make a simple craft look more interesting without requiring lots of decoration.
Consider combining materials such as:
- Linen and embroidery thread.
- Smooth clay and delicate paint details.
- Pressed flowers and transparent glass.
- Wooden beads and natural ribbon.
- Layered cardstock and foam mounting tape.
- Fabric and simple hand stitching.
Try to choose materials that complement one another rather than combining every texture you can find.
4. Make Small Batches of Coordinated Crafts
If you’re creating several decorations, consider making a small collection rather than producing unrelated items.
For example, you could make a clay trinket dish, a pressed-flower frame, and a miniature shadow box using similar shades of pink and cream.
Displaying them together can create a more coordinated look.
This approach can also be useful if you want to create handmade gifts for several people. You can use the same basic materials while personalizing each finished piece.
5. Work With Your Budget
You don’t need to buy every supply brand new.
Before shopping, check whether you already have cardstock, ribbon, thread, paint, frames, or other suitable materials.
You may be able to repurpose fabric scraps, unused notebooks, leftover beads, and spare decorative objects.
However, avoid choosing materials solely because they’re inexpensive. Make sure they’re appropriate for the project and safe to use.
6. Photograph Your Finished Crafts in Natural Light
If you want to share your projects on Pinterest, presentation matters.
Place the finished craft near a window where the light is bright but indirect. This usually produces softer shadows than direct midday sunlight.
Use a simple background, such as a wooden surface, neutral fabric, or plain tabletop.
Include only a few supporting objects. A pressed-flower frame might look attractive beside a small stack of books, while a clay trinket dish could be photographed with a few pieces of jewellery.
Make sure the craft itself remains the main subject.
7. Give Yourself Enough Time
Some crafts are quick, while others require drying time or several stages of assembly.
Air-dry clay, painted decorations, and glued paper projects may need time to set before they can be handled or displayed.
Read the instructions for each material and plan accordingly. Starting early gives you time to correct mistakes and allows the finished item to dry properly.
How to Choose the Right Valentine’s Day Craft for Your Skill Level
Not every project requires the same amount of time, patience, or experience.
If you’re new to crafting, start with a project that has a straightforward process. As you become more comfortable with cutting, shaping, painting, or stitching, you can try more detailed designs.
| Craft | Skill Level | Main Skill | Good For |
|---|---|---|---|
| Air-dry clay trinket dish | Easy to moderate | Shaping and painting | Jewellery storage and gifts |
| Pressed-flower glass frame | Easy | Arranging and composition | Botanical art |
| Miniature shadow box | Moderate | Layering and assembly | Personalized decor |
| Fabric conversation hearts | Easy to moderate | Basic sewing | Soft decorations |
| Book-page sculpture | Easy to advanced | Cutting, folding, and layering | Paper art |
| Embroidery hoop | Easy to moderate | Basic embroidery | Handmade keepsakes |
| Memory book | Easy | Scrapbooking and layout | Sentimental gifts |
| Sculptural paper heart art | Easy to moderate | Folding and layering | Wall decor |
| Beaded heart ornament | Easy to moderate | Beading and shaping | Seasonal ornaments |
My suggestion: If you want to finish a craft in one afternoon, choose the pressed-flower frame, memory book, or layered paper heart art. If you enjoy more hands-on projects, try the clay trinket dish, embroidery hoop, or beaded ornament.
Remember that drying time can extend the total time needed for some crafts, even when the hands-on work is relatively short.
Frequently Asked Questions on Valentine’s Day Crafts for Adults
1. What Are the Most Aesthetic Valentine’s Day Crafts for Adults?
Some attractive options include pressed-flower glass frames, air-dry clay trinket dishes, miniature shadow boxes, embroidered hoop art, and layered paper sculptures.
These projects allow you to experiment with colours, textures, and decorative details while creating something useful or meaningful.
The most suitable project depends on your personal style and the materials you have available.
2. What Can Adults Make for Valentine’s Day at Home?
Adults can make many different Valentine’s Day projects, including handmade memory books, fabric hearts, decorative paper art, miniature shadow boxes, clay jewellery dishes, and beaded ornaments.
You can select a project based on your experience, available materials, and the amount of time you want to spend crafting.
3. How Can I Make Valentine’s Day Crafts Look Expensive?
Choose materials with complementary colours, keep your design balanced, and pay attention to the finishing details.
Smooth edges, neat stitching, carefully placed decorations, and clean paintwork can improve the appearance of a handmade item.
You can also create a coordinated collection by repeating the same colours and textures across several projects.
4. What Are Some Inexpensive Valentine’s Day Crafts for Adults?
Layered paper heart art, handmade memory books, fabric hearts, and pressed-flower frames can be relatively affordable if you already own some of the materials.
Before purchasing supplies, check what you have at home. Reusing suitable craft materials can reduce costs without limiting your creativity.
The final cost will depend on the size of the project and the quality of the materials you choose.
5. Which Valentine’s Day Crafts Make Thoughtful Handmade Gifts?
A handmade memory book is a good choice for someone who values shared experiences. An embroidered hoop can be personalized with initials or a meaningful design, while a clay trinket dish can be useful for someone who wears jewellery.
Pressed-flower artwork is another option for someone who enjoys botanical decor.
Adding a handwritten note can make a handmade gift feel more personal.
6. Can Beginners Make Aesthetic Valentine’s Day Crafts for Adults?
Yes. Many projects can be adapted for beginners.
Try a simple pressed-flower frame, a basic scrapbook, or layered paper heart art before moving on to more detailed projects.
Following a clear pattern, preparing your materials in advance, and working slowly can make the process easier.
7. What Materials Are Useful for Valentine’s Day DIY Projects?
Useful supplies include cardstock, scissors, craft glue, acrylic paint, embroidery thread, fabric scraps, air-dry clay, beads, decorative paper, and suitable frames.
You won’t need every material for every project. Choose supplies according to the specific craft you plan to make.
8. How Can I Display Handmade Valentine’s Day Decorations?
You can display handmade valentine’s day crafts for adults on shelves, bedside tables, desks, or walls, depending on their size and construction.
A framed piece of pressed-flower art may work well on a shelf, while embroidered hoop art can be displayed on a wall. Small ornaments can be placed on a decorative stand or hung from a suitable hook.
Try grouping a few related pieces together while leaving enough space for each one to stand out.
9. When Should I Start Making Valentine’s Day Crafts for adults ?
Start early enough to allow for purchasing materials, completing the project, and waiting for paint, glue, or clay to dry.
If you’re making a gift that involves several stages, give yourself additional time to correct mistakes or make adjustments.
For a simple paper project, you may need only one afternoon. More detailed embroidery, miniature scenes, or sculptural projects may take several sessions.
Conclusion On Valentine’s Day Crafts for Adults
Creating Valentine’s Day crafts for Adults is an enjoyable way to explore your creativity and make something personal. You can work with paper, fabric, clay, flowers, beads, or photographs to produce decorations and gifts that reflect your own style.
The nine projects in this collection offer different ways to approach Valentine’s Day crafting. Some are simple enough for beginners, while others allow you to experiment with more detailed designs.
You might enjoy shaping a clay trinket dish, arranging pressed flowers between glass panels, building a miniature shadow box, or stitching a small design onto fabric. If you prefer projects that preserve memories, a handmade scrapbook can be particularly meaningful.
You don’t need to complete all nine projects. Choose one that interests you, gather the necessary materials, and take your time with the details.
Sometimes, a small handmade piece can become a favourite decoration or a keepsake that someone holds on to for years.
Which of these aesthetic Valentine’s Day crafts for Adults would you like to try first?