Valentine’s Day is a beautiful opportunity to remind someone how much they mean to you. While store-bought presents can be lovely, a handmade gift carries a different kind of meaning. It shows that you’ve taken time out of your day to create something especially for him, from choosing the materials to adding the little details that make the finished piece unique.
The good news is that you don’t need expensive supplies or advanced crafting skills to create something memorable. A collection of handwritten love notes, a personalized photo frame, or a handmade memory book can become a treasured keepsake when it reflects the moments, jokes, and experiences you share.
If your boyfriend loves sentimental surprises, appreciates practical gifts, or prefers simple gestures over extravagant presents, there are plenty of creative ways to make Valentine’s Day special.
In this guide, you will discover 10 handmade Valentine’s Day gifts for him that combine creativity, thoughtfulness, and a personal touch. Each project includes materials and instructions to help you create something meaningful, even if you’re new to DIY crafts.
I have an article on 9 Aesthetic Valentines Day Crafts for Adults That Look Straight Out of Pinterest that you will love to recreate.
Here Are 10 Different Valentine’s Day Gifts for Him
1. DIY Love Notes in a Jar
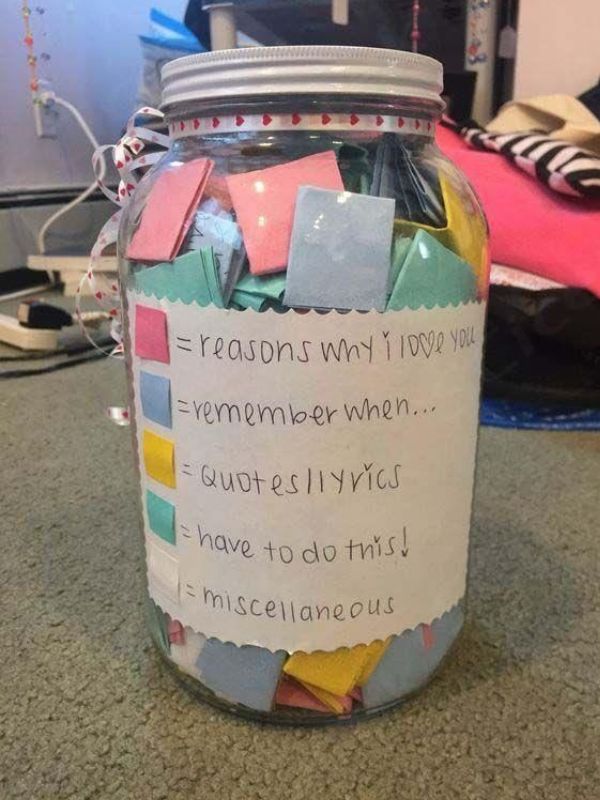
A love notes jar is a sweet and personal Valentine’s Day gift that allows him to revisit your thoughtful messages whenever he needs a little encouragement or a reminder of your love.
The idea is simple: fill a decorated jar with handwritten notes, each containing a reason you love him, a favorite memory, an encouraging message, or something you appreciate about his personality. He can open one whenever he wants to read a message from you.
What makes this gift special is that you can customize every note to reflect your relationship. Instead of relying on generic romantic quotes, include details that only the two of you would understand.
Materials You’ll Need
- A clean glass jar or a decorative container
- Colored paper or cardstock
- Scissors
- Pens or fine-tip markers
- Ribbon or twine
- Decorative stickers or heart-shaped embellishments
- A small gift tag
How to Make It
Step 1: Prepare your notes. Cut the colored paper into small rectangles or strips that are easy to fold. Choose two or three complementary colors to give the notes a coordinated appearance.
Step 2: Write your messages. Fill each paper strip with a different message. You might write about your favorite memory together, a quality you admire about him, something that makes you smile, or a reason you’re grateful to have him in your life.
Step 3: Fold the notes. Fold each message into a small square or roll it into a tiny scroll. You can secure the scrolls with narrow paper bands if you want a neat finish.
Step 4: Decorate the jar. Tie ribbon around the neck of the jar and attach a small tag with a message such as “Reasons I Love You” or “Open Whenever You Need a Smile.”
Step 5: Fill the jar. Place all the notes inside and arrange them loosely so the different colors are visible through the glass.
Step 6: Add a personal finishing touch. Include a short handwritten letter explaining why you made the gift and inviting him to open the notes whenever he wants.
Personalization Idea: Organize the notes into categories using different paper colors. For example, pink notes could contain reasons you love him, blue notes could hold encouraging messages, and yellow notes could contain funny memories.
This is one of the most affordable handmade Valentine’s Day gifts for him, yet it can become one of the most meaningful because every message comes directly from you.
Looking for an inspo for your door? Look at these 7 Creative Valentines Day Wreath Ideas to Make Your Front Door Stand Out
2. Handmade Memory Scrapbook
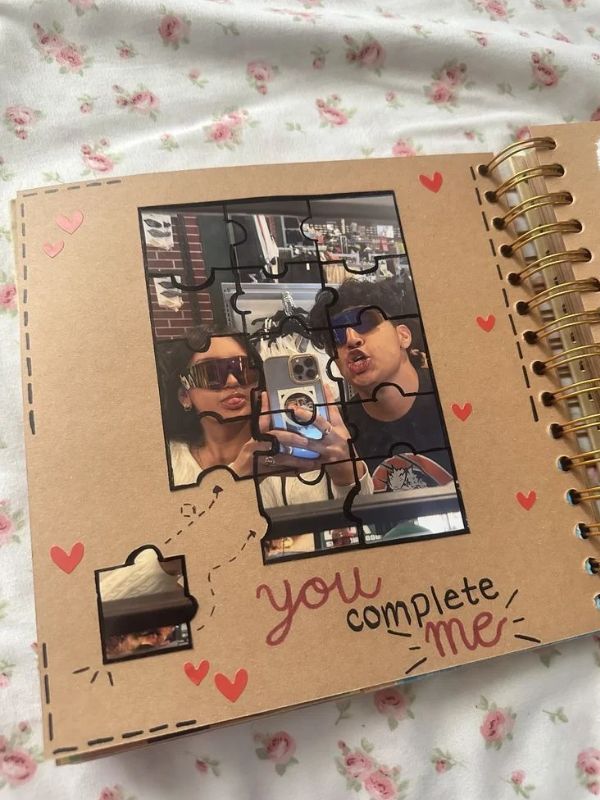
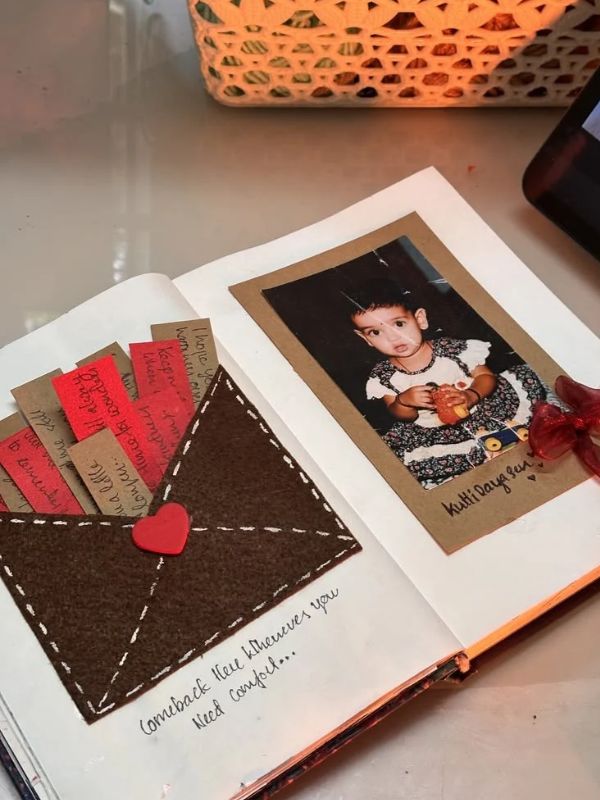
If you and your partner have shared special experiences, a handmade scrapbook is a beautiful way to preserve them. It turns photographs, little keepsakes, and written memories into a physical collection he can look through whenever he wants to revisit your favorite moments.
Unlike a regular photo album, a scrapbook allows you to tell the story behind each photograph. You can add captions, decorate the pages, and include details about what made each experience memorable.
It is especially suitable for couples celebrating their first Valentine’s Day together, a relationship anniversary, or a milestone they’ve reached as a couple.
Materials You’ll Need
- A blank scrapbook or an unlined notebook
- Printed photographs
- Colored cardstock or patterned paper
- Glue sticks or photo-safe adhesive
- Scissors
- Pens and markers
- Washi tape
- Stickers and decorative embellishments
- Small envelopes for handwritten notes
How to Make It
Step 1: Choose your scrapbook. Select a notebook or scrapbook with enough pages for your photographs and written memories. A neutral cover works well if you want to decorate it yourself.
Step 2: Gather your photographs. Choose pictures that capture meaningful moments, such as your first date, a memorable outing, a celebration, or a simple day when you enjoyed spending time together.
Step 3: Plan the page layouts. Arrange the photographs before gluing anything down. Leave space for captions, dates, and small decorative details.
Step 4: Add the stories. Write a short description beside each photograph. Explain what happened, what made the moment special, or what you remember most about that day.
Step 5: Decorate the pages. Use washi tape, paper hearts, small stickers, and handwritten headings to give each page its own character. Keep the decorations balanced so the photographs remain the main focus.
Step 6: Include personal surprises. Add a small envelope containing a love letter, a list of your favorite memories, or a note about something you hope to experience together in the future.
Step 7: Finish the cover. Write a title such as “Our Story,” “Favorite Memories,” or “Little Moments With You.” You can also add his name or the date you started dating.
Personalization Idea: Leave a few blank pages at the back for future memories. This gives the scrapbook room to grow as you continue creating experiences together.
For a polished finish, choose a consistent color palette and use photo-safe adhesive to help protect your pictures. A scrapbook does not need to look professionally printed to be beautiful; the handwritten details are what make it personal.
3. DIY Personalized Photo Frame
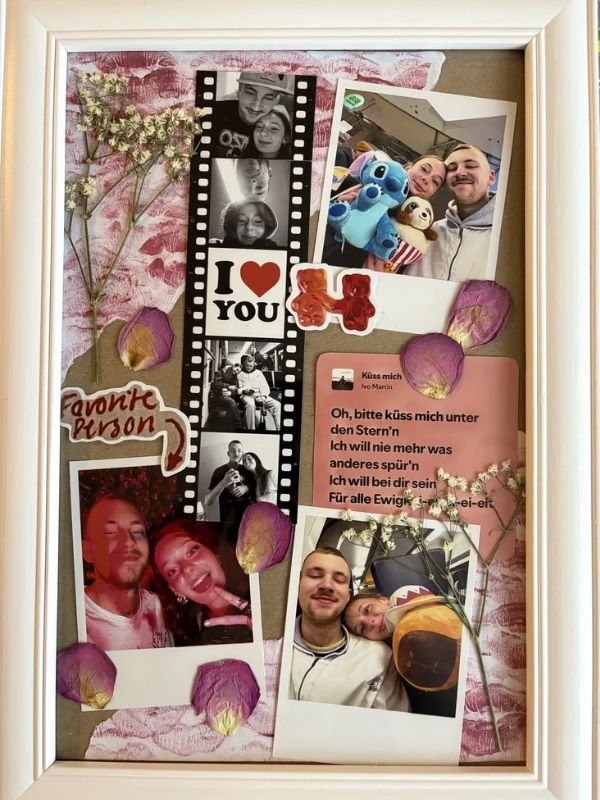
A personalized photo frame is a thoughtful handmade gift that transforms a favorite photograph into a keepsake he can display on his desk, bedside table, or bookshelf.
You can decorate a plain wooden frame to suit his personality. If he enjoys minimal designs, choose neutral colors and simple lettering. If he appreciates playful gifts, add colorful paper shapes, small illustrations, or details connected to a shared memory.
This project is also a good option if you’re looking for a handmade Valentine’s Day gift that can be completed in an afternoon.
Materials You’ll Need
- A plain wooden or cardboard photo frame
- A favorite photograph of the two of you
- Acrylic paint or decorative paper
- Paintbrushes, if using paint
- Craft glue
- Fine-tip markers
- Small decorative embellishments
- Clear protective sealant suitable for the frame material, if needed
How to Make It
Step 1: Select your frame. Choose a frame that fits the photograph you want to display. Wooden frames are sturdy and easy to paint, while thick cardboard frames offer an inexpensive alternative.
Step 2: Prepare the surface. Wipe away dust and allow the frame to dry before decorating it. If the frame has a glossy finish, follow the paint manufacturer’s instructions for preparing the surface.
Step 3: Choose your design. Decide on a style before you begin. You could paint the frame in his favorite color, cover the border with patterned paper, or create a simple design using small hearts and handwritten lettering.
Step 4: Decorate the frame. Apply your chosen paint or paper and allow it to dry completely. Add a short phrase along the border, such as “My Favorite Person,” “Us,” or the date of a meaningful moment.
Step 5: Add the photograph. Place the photograph inside the frame once all the decorations are dry. Make sure the picture sits neatly behind the frame opening.
Step 6: Include a handwritten message. Write a short note on the back explaining why you chose that particular photograph. Mention the memory it represents or what you love about that moment.
Personalization Idea: Choose a photograph from a day that means something to both of you rather than simply selecting the most recent picture. The story behind the image can make the gift more meaningful.
If you want the frame to look more refined, keep the decorations concentrated around the corners or edges instead of covering the entire border. This allows the photograph to stand out.
4. Handmade Coupon Book for Him
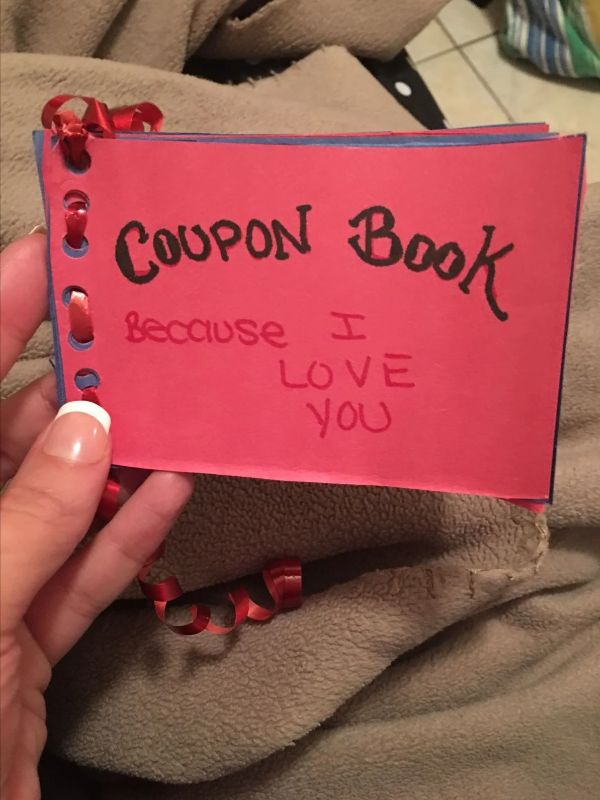
A handmade coupon book is a creative Valentine’s Day gift that turns thoughtful gestures into a collection of little surprises he can enjoy over time.
Each coupon promises a specific activity, favor, or experience. Depending on your relationship and his interests, the coupons might include a homemade dinner, a movie night of his choice, a relaxing evening together, or a day planned around one of his favorite hobbies.
The key is to make the coupons personal and realistic. Choose experiences you would genuinely enjoy sharing and that fit your schedules and budgets.
Materials You’ll Need
- Cardstock or thick colored paper
- Scissors or a paper trimmer
- Pens or markers
- A ruler
- A hole punch
- Ribbon, twine, or a small binder ring
- Stickers or decorative paper, if desired
How to Make It
Step 1: Cut the coupons. Cut the cardstock into equal-sized rectangles. Each rectangle will become one coupon, so make them small enough to fit comfortably into a little booklet.
Step 2: Write your offers. Give each coupon a clear title and a short description. Ideas include “Your Favorite Dinner,” “Movie Night of Your Choice,” “A Weekend Adventure,” and “One Screen-Free Evening Together.”
Step 3: Add the details. If necessary, include any conditions that make the coupon easy to use. For example, a dinner coupon could say that he chooses the meal, while you handle the cooking.
Step 4: Decorate the coupons. Use a consistent color scheme and simple borders. Small hearts, stars, or hand-drawn illustrations can make the booklet attractive without overcrowding the text.
Step 5: Assemble the booklet. Stack the coupons neatly, punch a hole in one corner, and secure them with a binder ring or ribbon.
Step 6: Create a cover. Add a title such as “Little Things for You,” “Your Special Treats,” or “Our Time Together.”
Personalization Idea: Include coupons based on his actual interests. If he loves football, offer to plan a match-night snack spread. If he enjoys trying new restaurants, create a coupon for a date at a place he has wanted to visit.
You can also include a few coupons for ordinary but meaningful gestures, such as a handwritten encouragement note or a day when he gets to choose the activity.
A handmade coupon book works particularly well for couples who value shared experiences. It gives the recipient something to look forward to long after Valentine’s Day has passed.
Check out these 20 Room Decoration Ideas for Valentines Day Surprise
5. DIY Beaded Keychain With His Initials
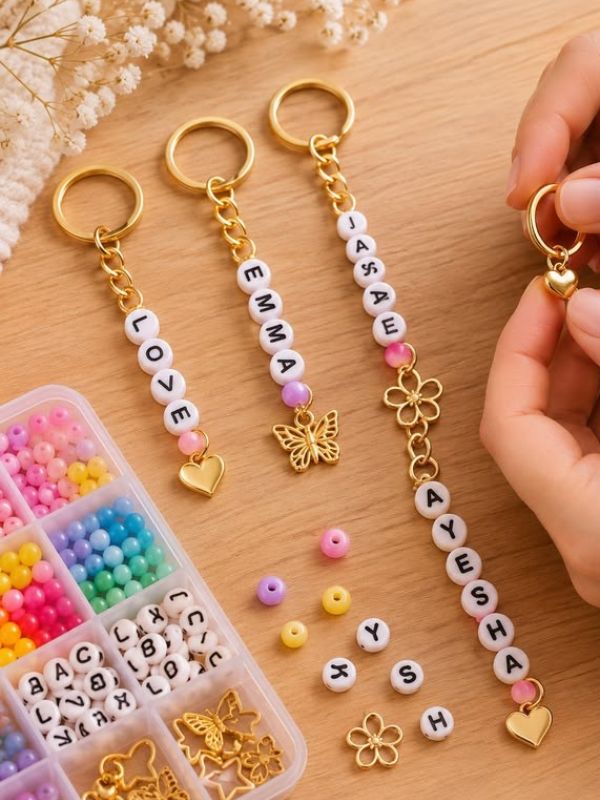
If he prefers practical gifts, a handmade beaded keychain is a lovely option. It is small enough to carry every day, easy to personalize, and suitable for beginners who want to create something useful without spending much on supplies.
You can customize the keychain with his initials, favorite colors, or a combination of beads that reflects his personality. For a simple design, use wooden or neutral-colored beads. For something more playful, combine colorful beads with letter beads and a small decorative charm.
Materials You’ll Need
- A keychain ring or keychain clasp
- Strong beading cord or suitable jewelry wire
- Letter beads
- Wooden, acrylic, or glass beads
- Scissors or wire cutters appropriate for the material
- Jewelry pliers, if required by your chosen findings
- A small decorative charm, optional
How to Make It
Step 1: Choose your color palette. Select two or three colors that work well together. Consider his favorite colors or choose a simple combination, such as black, silver, and white.
Step 2: Arrange the beads. Lay the beads on a flat surface before threading them. Place his initials near the center and arrange the remaining beads evenly on both sides.
Step 3: Measure the cord. Cut a length of cord that allows enough room for the beads and the finishing knot. Leave extra length for attaching the keychain hardware.
Step 4: Thread the beads. Add the beads in your chosen order. Check the arrangement as you go to make sure the initials are facing the correct direction.
Step 5: Secure the keychain. Attach the cord to the keychain ring using a secure knot or the appropriate jewelry finding. Follow the instructions for the specific cord and hardware you’re using.
Step 6: Check the strength. Gently pull the finished keychain to make sure the beads stay in place and the attachment is secure before giving it to him.
Personalization Idea: Add a tiny engraved charm or a bead representing a shared interest. If you prefer a minimalist design, use his initials with just a few coordinating beads.
Because a keychain may be pulled and handled throughout the day, use durable materials and make sure all knots and attachments are secure.
You can package the finished piece in a small gift box or place it inside a handmade paper pouch for a neat presentation.
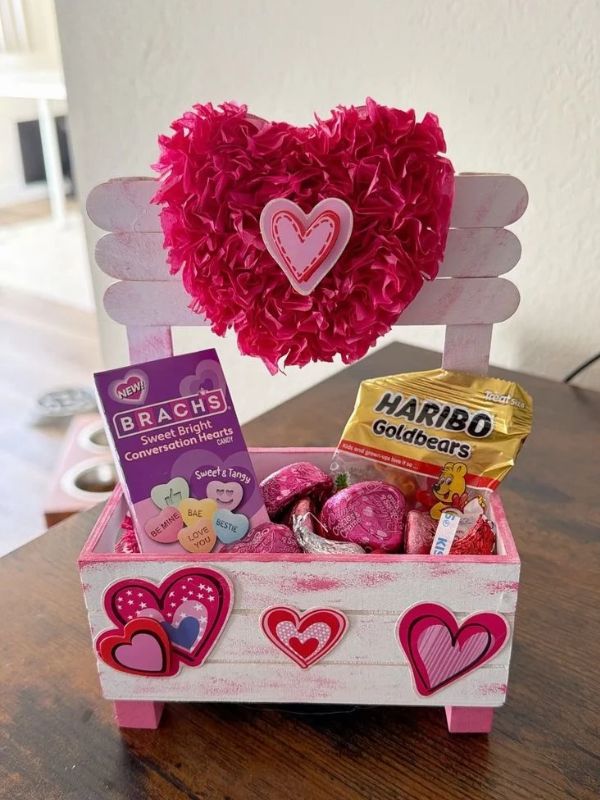
6. DIY Valentine’s Day Treat Box
For someone who enjoys snacks, chocolates, or homemade treats, a personalized Valentine’s Day gift box is a fun way to combine creativity with his favorite things.
Rather than purchasing a ready-made gift basket, decorate a plain box and fill it with a thoughtful selection of treats. You can include homemade cookies, individually wrapped chocolates, his favorite snacks, or a handwritten note.
This gift works especially well when you know his favorite flavors and can tailor the contents to his preferences.
Materials You’ll Need
- A sturdy gift box
- Colored wrapping paper or cardstock
- Ribbon
- Scissors
- Craft glue or double-sided tape
- Decorative stickers or paper hearts
- Tissue paper or food-safe filler
- Individually wrapped treats or homemade snacks
- A small handwritten card
How to Make It
Step 1: Choose your box. Select a box that comfortably fits the treats you want to include. A shallow box is useful for arranging items so everything is visible when he opens it.
Step 2: Decorate the outside. Cover the box with wrapping paper or colored cardstock. Use glue or double-sided tape to secure the paper neatly, trimming away any excess.
Step 3: Add a decorative detail. Tie a ribbon around the box or attach a small tag with a message such as “A Little Box of Your Favorites.”
Step 4: Prepare the inside. Line the box with clean tissue paper or suitable food-safe filler. Arrange the treats so they remain stable when the box is moved.
Step 5: Personalize the contents. Choose snacks he genuinely enjoys. You could include chocolates, cookies, crackers, or other individually wrapped favorites.
Step 6: Add a handwritten card. Write a short message explaining why you selected the treats. A personal note can make even a simple snack box feel special.
Personalization Idea: Give the box a theme based on his interests. A movie-night box could contain popcorn, chocolates, and his favorite snacks, while a coffee-lover’s box could include individually packaged coffee treats and biscuits.
If you’re including homemade food, package it separately from decorative materials and let baked goods cool completely before wrapping them. Check for food allergies and choose appropriate storage for anything perishable.
This is one of the most flexible handmade Valentine’s Day gifts for him because you can adjust the size, contents, and decorations to suit your budget.
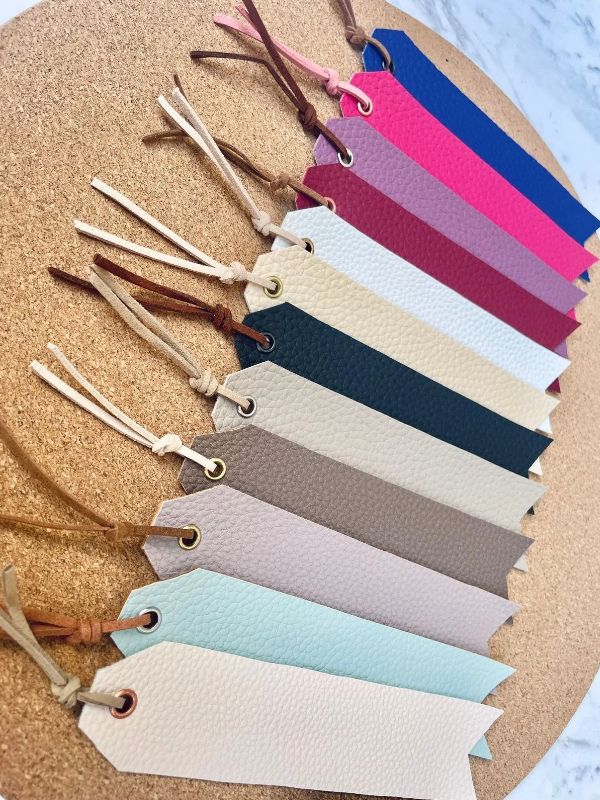
7. Handmade Leather or Faux-Leather Bookmark
If he enjoys reading, a handmade bookmark is a thoughtful gift that combines usefulness with a personal touch. It is especially suitable for someone who reads novels, studies regularly, keeps a journal, or enjoys collecting books.
Leather and faux leather both work well for this project. You can create a clean, minimalist bookmark or decorate it with his initials, a meaningful date, or a short message.
Materials You’ll Need
- A small piece of leather or faux leather
- A ruler
- A pencil or fabric marker suitable for the material
- Scissors or a suitable craft knife
- A hole punch appropriate for the material
- A length of ribbon or a leather cord
- Letter stamps or permanent markers suitable for the surface, optional
- A cutting mat if using a craft knife
How to Make It
Step 1: Measure the bookmark. Mark out a rectangle approximately 2 inches wide and 6 inches long. Adjust the dimensions to suit the books he usually reads.
Step 2: Cut the material. Carefully cut along the marked lines. For a softer appearance, round the corners slightly.
Step 3: Add the personalization. Write his initials, a short message, or a meaningful date on the bookmark. If you’re using letter stamps, test them on a scrap piece first.
Step 4: Make a small hole. Use a suitable hole punch near the top of the bookmark, leaving enough space around the edge to prevent tearing.
Step 5: Attach the ribbon. Thread the ribbon or cord through the hole and secure it with a knot. Trim the ends neatly.
Step 6: Check the finish. Make sure the edges are smooth and the ribbon is firmly attached. Remove any loose fibers or rough pieces before gifting it.
Personalization Idea: Pair the bookmark with a book by his favorite author or a title he’s been meaning to read. You could also write a short message on a separate card explaining why you chose that book for him.
For a more affordable version, use sturdy cardstock instead of leather. Layer two pieces together for added thickness and decorate the front with a minimalist design.
The finished bookmark is small, lightweight, and practical, making it a good option for someone who appreciates gifts he can use regularly.
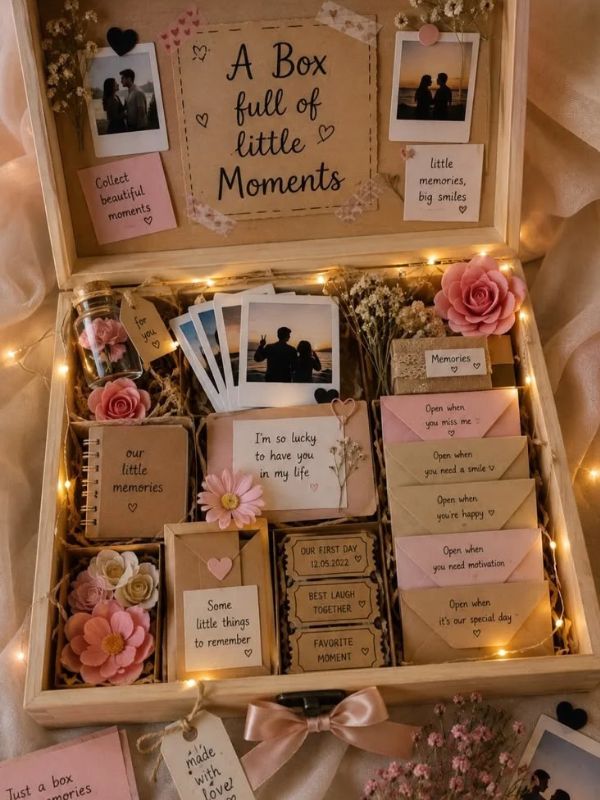
8. DIY Mini Memory Box
A mini memory box is a creative way to collect small objects and written reminders of experiences you’ve shared. Unlike a scrapbook, which focuses on photographs and written pages, a memory box can hold physical keepsakes that tell your story.
You might include ticket stubs, handwritten notes, printed photographs, a small souvenir, or a paper map marking a special destination.
The beauty of this project lies in its flexibility. You can make it romantic and sentimental or keep it simple and understated, depending on his personality.
Materials You’ll Need
- A small wooden, cardboard, or decorative storage box
- Acrylic paint or decorative paper
- Paintbrushes, if using paint
- Craft glue
- Scissors
- Printed photographs
- Small keepsakes
- Colored paper
- Pens or markers
- Ribbon or a gift tag
How to Make It
Step 1: Choose a suitable box. Select a box large enough to hold your keepsakes without making them difficult to arrange. A box with a lid will help keep the contents together.
Step 2: Decorate the exterior. Paint the box or cover it with decorative paper. Choose colors and patterns that reflect his style.
Step 3: Prepare the keepsakes. Gather a few meaningful items from your time together. These might include a ticket stub from an outing, a printed photograph, or a small note recalling a funny experience.
Step 4: Write memory cards. Cut small pieces of paper and write a short description for each item. Explain where it came from or why it matters to you.
Step 5: Arrange the contents. Place the larger items at the bottom and arrange smaller notes and keepsakes around them. Use folded paper dividers or small envelopes to keep everything organized.
Step 6: Decorate the lid. Add a title such as “Our Little Memories” or “Moments Worth Keeping.” Keep the design simple enough that the box can be reused later.
Step 7: Include a personal letter. Place a handwritten letter on top so he sees it first when he opens the box.
Personalization Idea: Include a blank envelope labeled “For Our Next Adventure.” You can fill it with a new photograph, ticket stub, or written memory after your next special outing.
Choose items that are meaningful to both of you rather than filling the box with decorations simply to make it look full. A few carefully selected keepsakes can tell a more personal story than a box packed with unrelated objects.
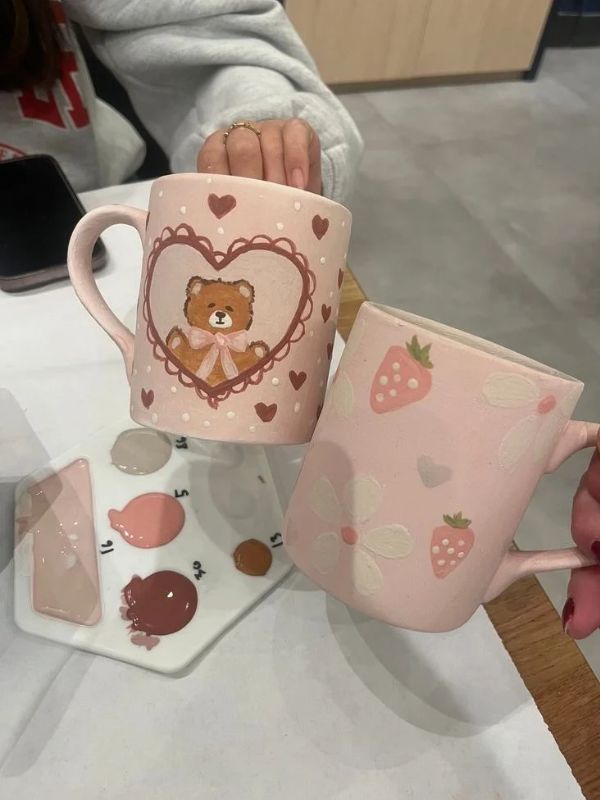
9. DIY Painted Mug for His Favorite Drink
A personalized mug is a useful gift for someone who enjoys coffee, tea, hot chocolate, or another favorite drink. With a plain ceramic mug and the right decorating materials, you can create a design that reflects his interests or includes a small message that reminds him of you.
You can keep the design understated with his initials or create something playful using a favorite phrase, a simple illustration, or a reference to an inside joke.
Materials You’ll Need
- A plain ceramic mug
- Ceramic paint or markers specifically designed for decorating mugs
- A pencil suitable for planning the design, if appropriate
- Paper and a ruler for sketching your layout
- A clean cloth
- An oven, only if required by the product’s curing instructions
How to Make It
Step 1: Select your mug. Choose a plain mug with a smooth surface. A white mug provides a clean background, while a darker mug can work if your decorating product is designed for that surface.
Step 2: Clean the mug. Wash and dry it thoroughly to remove dust, grease, or residue that could interfere with the decoration.
Step 3: Plan your design. Sketch the wording or illustration on paper before applying it to the mug. Keep the design simple and readable.
Step 4: Add the artwork. Use ceramic paint or markers according to the manufacturer’s instructions. You could write his name, draw a small symbol, or add a short phrase that has meaning for both of you.
Step 5: Allow the design to dry. Follow the product’s specified drying time. Some products require additional curing, while others are intended for decorative use only.
Step 6: Cure the design if required. If the product requires oven curing, follow its instructions exactly. Do not assume that all ceramic paints or markers can be baked.
Step 7: Package the mug. Once the decoration has fully set, wrap the mug in protective paper and place it in a sturdy gift box. Add a handwritten card to complete the presentation.
Personalization Idea: Create a mug featuring a phrase he uses often, his initials, or a small illustration connected to a favorite hobby. You could also pair the mug with coffee, tea, or individually wrapped biscuits.
Important tip: Check whether the decorating product is food-safe and suitable for the intended surface. Keep paint away from the drinking rim and inside of the mug unless the manufacturer explicitly confirms that it is safe for those areas. Follow all care instructions, including any restrictions on dishwashers and microwaves.
This project is ideal for someone who appreciates practical gifts with a personal touch. Every time he uses the mug, he’ll have a small reminder of the thought you put into making it.
10. Handmade Valentine’s Day Love Letter Book
Sometimes, the most memorable gift is one that expresses what you feel in words. A handmade love letter book allows you to collect your thoughts, memories, and hopes for the future in a format he can keep and revisit.
Rather than writing one long letter, you can divide the book into short sections. Each page can focus on a different aspect of your relationship, making the gift feel like a collection of personal messages rather than a traditional greeting card.
This is an especially good option if you enjoy writing or want to give him something deeply personal without purchasing expensive materials.
Materials You’ll Need
- Colored cardstock
- Plain paper
- Scissors or a paper trimmer
- A ruler
- Pens or fine-tip markers
- A hole punch
- Ribbon, twine, or a binder ring
- Stickers or decorative paper
- Printed photographs, optional
How to Make It
Step 1: Prepare the pages. Cut the paper and cardstock into equal-sized rectangles. Use the cardstock for the cover and back page, with plain paper for the letters inside.
Step 2: Choose your sections. Plan the messages before you begin writing. You might include your favorite memory together, a quality you admire about him, a moment when he made you laugh, and something you look forward to sharing in the future.
Step 3: Write each letter. Keep the messages personal and specific. Instead of writing only that he makes you happy, describe a moment when his kindness, humor, or support made a difference to you.
Step 4: Decorate the pages. Add small drawings, borders, or printed photographs. Leave enough open space so the writing remains easy to read.
Step 5: Assemble the book. Stack the pages in order, place the cardstock cover on top, and punch two holes along one edge. Tie the pages together with ribbon or secure them using binder rings.
Step 6: Create the cover. Give the book a simple title, such as “Words for You,” “Things I Want You to Know,” or “A Little Book About Us.”
Step 7: Add a final message. Use the last page to write a short note about what you hope the next chapter of your relationship will bring.
Personalization Idea: Include a page titled “Things I Love About You” with specific examples rather than generic compliments. You can also add a page of favorite shared memories or a list of activities you’d love to experience together.
A handmade love letter book doesn’t need elaborate decorations. Neat handwriting, thoughtful words, and a simple layout can make it feel beautiful and complete.
Tips for Making Handmade Valentine’s Day Gifts for Him Look Beautiful
A thoughtful gift becomes even more special when it is presented with care. You don’t need expensive packaging or professional crafting equipment to achieve a polished result. A few simple choices can make your finished project look intentional and well put together.
1. Choose a Design That Matches His Personality
Consider his interests before deciding on colors, patterns, and decorations. Someone who prefers minimalist accessories might appreciate a simple leather bookmark or a neutral-colored keychain, while someone who enjoys colorful handmade items might prefer a decorated memory box.
The goal is to create something that feels personal to him rather than following every traditional Valentine’s Day design trend.
2. Use a Consistent Color Palette
Choose two or three complementary colors and repeat them throughout the project. Red, pink, and white are classic Valentine’s Day choices, but navy, cream, brown, black, and gold can also work beautifully.
Using a consistent palette helps the finished gift look coordinated without requiring many extra decorations.
3. Pay Attention to the Finishing Details
Small details can make a considerable difference. Trim uneven paper edges, remove excess glue, check that knots are secure, and allow paint to dry completely before wrapping your gift.
For projects involving photographs or handwritten notes, take a moment to check the layout before attaching everything permanently.
4. Include a Personal Message
A short handwritten note can make even a simple DIY gift feel more meaningful. Explain why you chose the project, what inspired the design, or what the recipient means to you.
Specific memories and sincere words usually feel more personal than generic romantic phrases.
5. Package the Gift Carefully
You can use a small gift box, tissue paper, ribbon, or a handmade paper sleeve to present your finished project. Choose packaging that protects the item and complements its design.
For fragile gifts such as decorated mugs, use suitable cushioning and a sturdy box. For small gifts such as keychains or bookmarks, a simple paper pouch may be enough.
Frequently Asked Questions
1. What are some easy handmade Valentine’s Day gifts for him?
Some easy options include a love notes jar, a handmade coupon book, a personalized photo frame, a beaded keychain, and a handwritten love letter book. These projects use accessible materials and can be customized to reflect his interests and your relationship.
2. What can I make for my boyfriend for Valentine’s Day?
You can make your boyfriend a scrapbook of shared memories, a personalized mug, a DIY treat box, a mini memory box, or a collection of handwritten love notes. Choose a project that reflects his personality and the kinds of gifts he appreciates.
3. How can I make a handmade Valentine’s Day gift look expensive?
Choose a simple design, use good-quality materials where possible, and pay attention to the finishing details. A coordinated color palette, neat lettering, carefully arranged decorations, and attractive packaging can make an affordable handmade gift look polished.
4. What handmade Valentine’s Day gifts can I make on a budget?
A love notes jar, a paper coupon book, a handwritten love letter book, and a decorated photo frame are all budget-friendly options. You can often make them with materials you already have at home, such as paper, pens, ribbon, and a clean jar.
5. What is a meaningful Valentine’s Day gift for a man who doesn’t like romantic decorations?
Choose something practical or understated, such as a personalized keychain, a leather bookmark, a simple photo frame, or a mug decorated with his initials. You can still make the gift personal without using hearts, pink paper, or elaborate romantic designs.
6. How long does it take to make handmade Valentine’s Day gifts for him?
The time depends on the project and how much detail you want to include. A simple coupon book or love notes jar may take less than an hour, while a scrapbook or memory box can take several hours if you’re gathering photographs, writing personal messages, and decorating multiple pages.
7. Can I make handmade Valentine’s Day gifts for him without crafting experience?
Yes. Many DIY gifts, including love notes jars, coupon books, scrapbooks, and simple keychains, are suitable for beginners. Start with a straightforward design, prepare your materials in advance, and follow the instructions one step at a time.
Conclusion On Valentine’s Day Gifts for Him
The most meaningful handmade Valentine’s Day gifts for him are the ones that reflect the person receiving them. A jar filled with personal messages, a scrapbook of favorite memories, or a simple keychain made in his favorite colors can all become special keepsakes when you put thought into the details.
You don’t need advanced crafting skills or a large budget to create something memorable. Start with an idea that suits his personality, gather your materials, and make the project your own.
This Valentine’s Day, let your gift tell a story. If you choose a practical accessory, a collection of shared memories, or a handwritten book filled with personal messages, the time and care you put into creating it can make the gesture truly special.
So which of these Valentine’s Day Gifts for him, are you trying first? Leave a Comment in the comment section below.