Easy Christmas Crafts for Kids to Make at Home for a Fun and Creative Holiday Season
Christmas is one of the most exciting times of the year, especially for children. From decorating the Christmas tree to wrapping presents, singing Christmas songs and enjoying delicious holiday treats, there are so many activities that make the season special. One wonderful way to make Christmas even more memorable is by introducing children to creative holiday projects. Christmas crafts for kids provide an opportunity for little ones to explore their creativity, develop new skills and create beautiful decorations they can proudly display around the house.
You don’t need expensive supplies or complicated instructions to enjoy Christmas crafting with children. Many easy Christmas crafts can be made using everyday household materials such as paper, cardboard, cotton balls, popsicle sticks, glue, paint and recycled items. With a little imagination, these simple materials can become adorable Christmas trees, handmade ornaments, festive snowmen and beautiful holiday decorations.
Whether you are a parent looking for entertaining activities during the school holidays, a teacher planning classroom Christmas projects or someone searching for fun family activities, there are plenty of creative ideas to try.
The best part about making DIY Christmas crafts is that children can participate regardless of their age or artistic experience. Younger children can enjoy simple activities such as painting paper plates and decorating cotton ball snowmen, while older kids can experiment with more detailed projects that involve cutting, folding and assembling different materials.
In this guide, you will discover 10 easy Christmas crafts for kids to make at home. These projects are affordable, beginner-friendly and perfect for bringing a little extra Christmas magic into your home.
Let’s explore some fun Christmas craft ideas that children will love making!
Why Christmas Crafts Are Great for Kids
Before exploring the different projects, it is worth understanding why Christmas crafting is such a wonderful activity for children.
Crafting is more than simply cutting paper, applying glue or decorating objects. It encourages children to think creatively, solve small problems and express their ideas through different materials.
Here are some benefits of introducing children to Christmas crafts.
Encourages creativity: Children can experiment with colours, patterns, shapes and decorations. They can also make their projects unique by adding personal touches.
Improves fine motor skills: Activities such as cutting paper, painting, folding and attaching small decorations help children develop hand coordination and control.
Creates family memories: Making Christmas decorations together provides an opportunity for parents and children to spend quality time together.
Teaches resourcefulness: Many Christmas crafts can be made using recycled materials and inexpensive household supplies. Children learn that beautiful decorations do not always require expensive purchases.
Keeps children entertained: Christmas crafting is an excellent way to keep children occupied during the holiday season, especially when they are spending more time indoors.
Now, let’s look at some beautiful and easy Christmas crafts that children can make.
1. DIY Paper Christmas Tree Craft
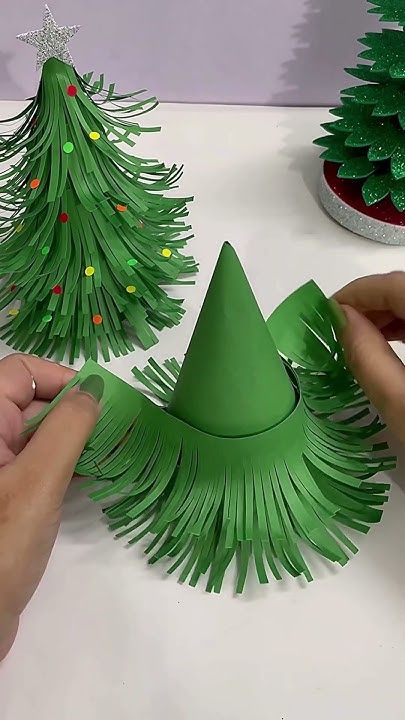
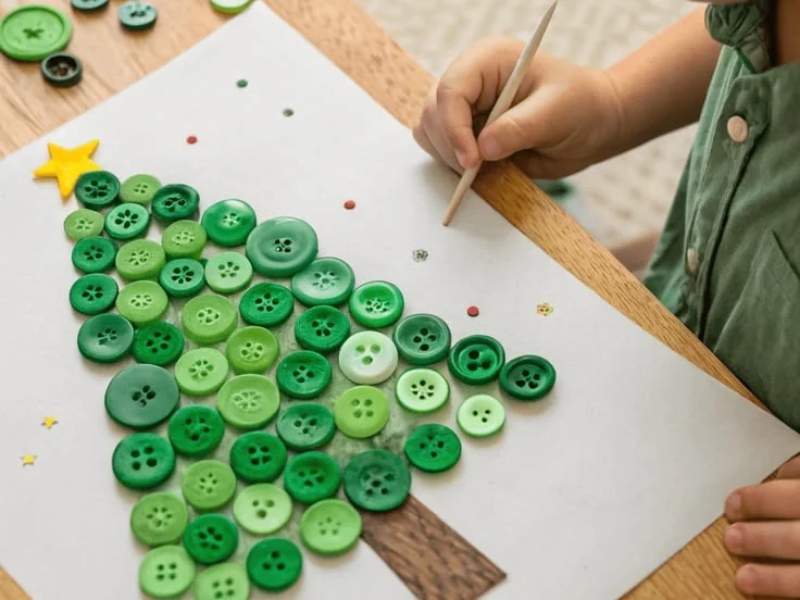
A paper Christmas tree is one of the easiest Christmas crafts for kids to make at home. It requires only a few inexpensive supplies, and children can decorate their trees using their favourite colours and patterns.
This project is particularly suitable for preschoolers and elementary school children because it involves simple cutting, folding and decorating activities.
Paper Christmas trees can be displayed on bedroom walls, classroom noticeboards, shelves or even used as handmade Christmas cards.
Materials Needed
- Green construction paper or cardstock
- Red, yellow and colourful paper
- Child-safe scissors
- Glue stick
- Pencil
- Small decorative stickers
- Glitter glue (optional)
How to Make a Paper Christmas Tree
Start by taking a piece of green construction paper and drawing a large triangle. This will form the main shape of your Christmas tree.
Carefully cut out the triangle using scissors. Younger children may need an adult to help with this step.
Next, cut out a small brown rectangle to create the tree trunk. Glue it underneath the green triangle.
Now comes the fun part: decorating!
Cut small circles, stars, hearts and other shapes from colourful paper. Allow children to choose their favourite colours and arrange the decorations across the tree.
Glue the shapes onto the green paper to create colourful Christmas ornaments.
Finally, cut out a yellow star and attach it to the top of the tree.
Allow the glue to dry before displaying the finished craft.
Creative Ways to Personalise It
Children can make several paper Christmas trees in different sizes and colours. They can also use cotton balls to create a snowy appearance or add small pieces of wrapping paper for extra decoration.
For a classroom activity, let every child create a paper tree and combine the finished projects into a beautiful Christmas display.
2. Popsicle Stick Christmas Tree Ornaments
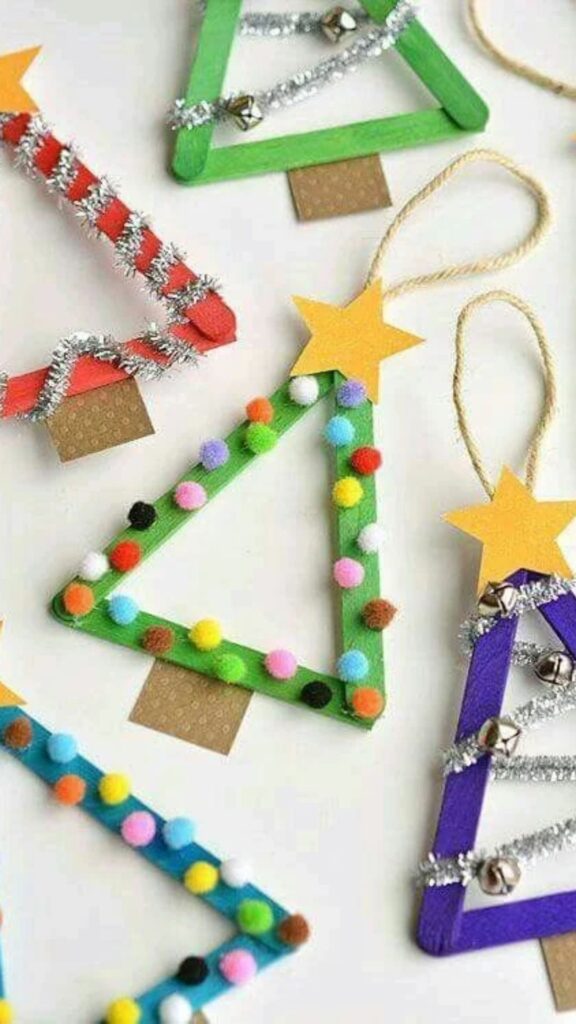
If you are searching for simple Christmas crafts for kids that can also become beautiful tree decorations, popsicle stick Christmas trees are an excellent option.
These handmade ornaments are easy to assemble and allow children to experiment with different colours, textures and decorative materials.
They are also a wonderful way to introduce children to recycling and creative reuse.
Materials Needed
- Three or four popsicle sticks
- Green paint
- Paintbrush
- Glue
- Small colourful pom-poms
- Decorative buttons
- Yellow paper
- Ribbon or string
How to Make Popsicle Stick Christmas Trees
Begin by arranging three popsicle sticks into a triangle shape. Glue the ends together and allow them to dry.
Once the glue has set, paint the sticks green. You can use different shades of green to create a more interesting appearance.
Cut a small piece of brown paper and attach it to the bottom of the triangle to represent the tree trunk.
Now decorate the tree using colourful pom-poms, buttons or small paper circles.
Add a yellow paper star to the top of the tree.
To turn the project into a Christmas tree ornament, attach a small piece of ribbon or string to the back.
Allow everything to dry completely before hanging it on the Christmas tree.
Why Kids Will Love This Craft
Children enjoy this project because they can decorate their trees however they want. Some may prefer colourful decorations, while others might choose a simple green-and-gold design.
You can also encourage children to write their names and the year on the back of each ornament. This makes the decorations lovely keepsakes that families can bring out every Christmas.
Safety tip: Adults should handle hot glue guns if they are needed. For younger children, ordinary craft glue is a better option.
3. Paper Plate Christmas Santa Craft
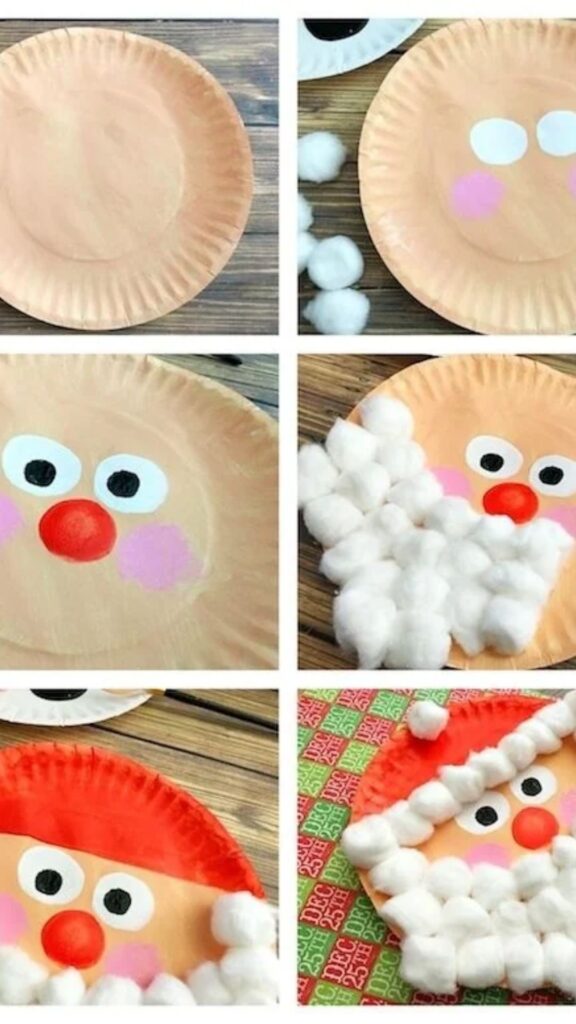
Santa Claus is one of the most recognisable symbols of Christmas, making this project a fun addition to your collection of Christmas crafts for kids.
A paper plate Santa is inexpensive, easy to make and perfect for children who enjoy painting and decorating.
The finished craft can be displayed on doors, bedroom walls or classroom boards.
Materials Needed
- White paper plate
- Red construction paper
- White cotton balls
- Skin-tone paint or coloured paper
- Googly eyes
- Red paper
- Glue
- Scissors
- Black marker
How to Make a Paper Plate Santa
Start by painting the centre of a white paper plate using a skin-tone colour. Allow it to dry completely.
If you prefer not to use paint, you can cut out a circle of skin-tone construction paper and glue it onto the centre of the plate.
Next, cut out a large red triangle or curved hat shape from red construction paper.
Attach the hat to the upper edge of the paper plate.
Use cotton balls to create Santa’s fluffy hat trim. Glue a line of cotton balls along the bottom of the hat and add another cotton ball to its tip.
Now attach two googly eyes to the face.
Cut a small red circle for Santa’s nose and glue it below the eyes.
For the beard, attach several white cotton balls around the lower part of the face. Arrange them to create a full, fluffy beard.
Use a black marker to add any remaining facial details.
Allow the project to dry before displaying it.
Decorating Ideas
Children can make their Santa crafts look different by changing the beard shape, hat size and facial expressions.
For an extra creative activity, encourage them to make a collection of Christmas characters, including Santa Claus, Mrs Claus and little elves.
4. DIY Cotton Ball Snowman Craft
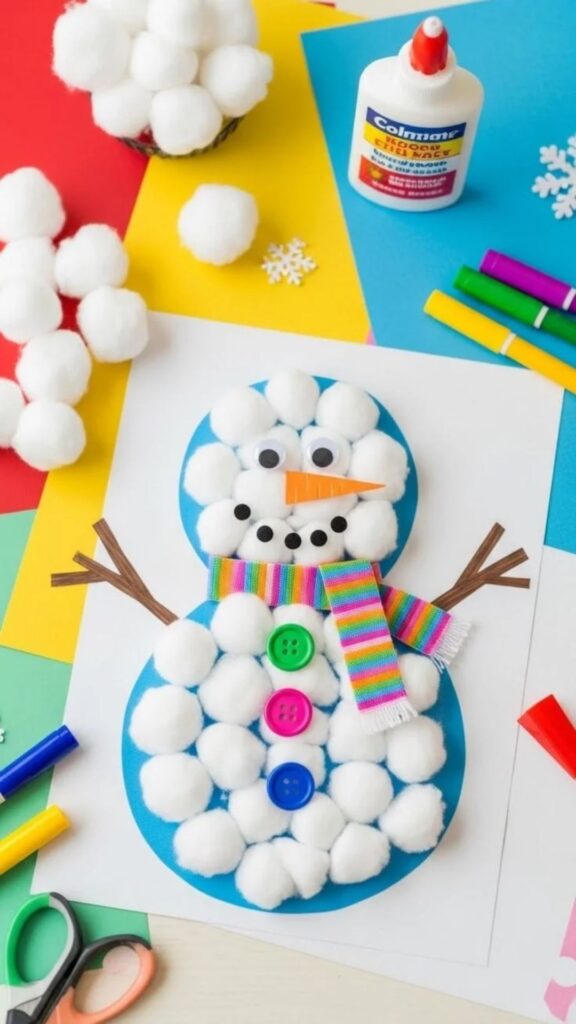
A cotton ball snowman is another adorable Christmas craft that children can make using simple household materials.
Although snow is not part of Christmas everywhere, snowmen remain popular holiday decorations. This project allows children to create their own little winter characters without needing real snow.
It is particularly suitable for younger children because most of the activity involves gluing and arranging materials.
Materials Needed
- Blue construction paper
- White cotton balls
- Orange construction paper
- Black paper or buttons
- Glue
- Googly eyes
- Small pieces of colourful fabric
- Child-safe scissors
How to Make a Cotton Ball Snowman
Take a piece of blue construction paper and place it on a flat working surface.
Draw three circles of different sizes to create the snowman’s body.
The largest circle should be at the bottom, followed by a medium-sized circle and a smaller circle at the top.
Apply glue inside the circles.
Allow children to fill each circle with white cotton balls until the blue paper underneath is mostly covered.
Next, cut a small orange triangle from construction paper to create the snowman’s nose.
Attach two googly eyes above the nose.
Use small black paper circles or buttons to create the snowman’s mouth.
To make the snowman more interesting, add a colourful scarf using a strip of fabric or construction paper.
You can also create a small black hat using construction paper.
Once everything is attached, leave the craft to dry.
Ways to Make It More Creative
Children can add small paper snowflakes around their snowman to create a winter scene.
They can also use colourful paper to create mittens, boots and other accessories.
For a fun classroom activity, each child can create a snowman with a different facial expression.
5. Handprint Christmas Wreath Craft
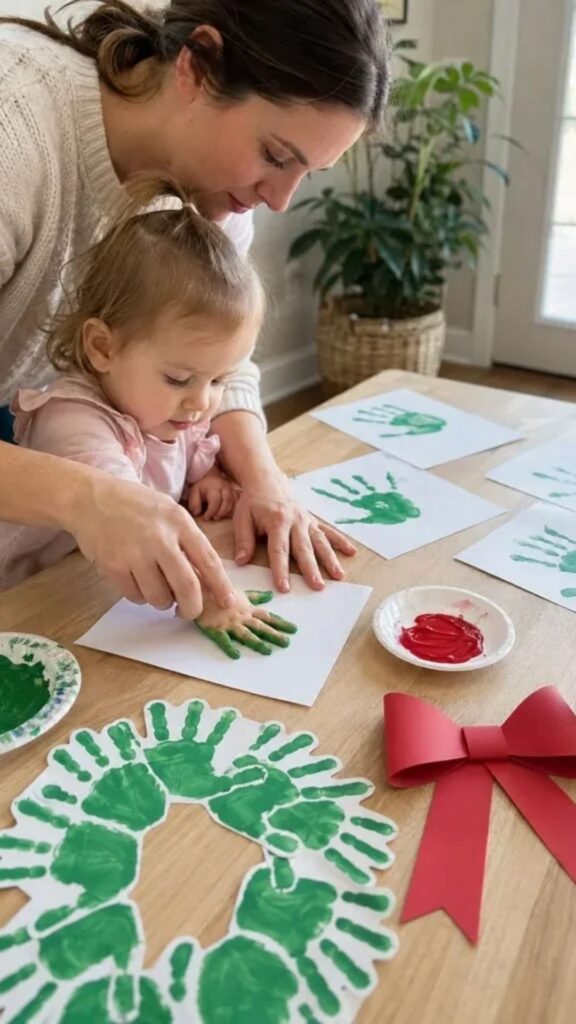
Handprint Christmas wreaths are among the most meaningful handmade Christmas decorations children can create.
This craft uses children’s handprints to form a festive wreath. It is simple, colourful and can become a special keepsake for parents and grandparents.
Because the project uses handprints, children can also practise tracing, painting and arranging shapes.
Materials Needed
- Green construction paper
- Red construction paper
- Pencil
- Child-safe scissors
- Glue
- Red ribbon
- Green paint (optional)
- Small decorative stickers
How to Make a Handprint Christmas Wreath
Start by placing a child’s hand on a piece of green construction paper.
Trace around the hand using a pencil.
Repeat the process several times until you have enough handprint shapes to create a wreath.
Carefully cut out all the handprints.
Arrange them in a circular shape, overlapping the wrist sections slightly to create a full wreath.
Once you are happy with the arrangement, glue the pieces together.
Next, cut out small red circles from construction paper. These will represent Christmas berries.
Attach the circles around the wreath.
You can also make a large red bow using red paper or ribbon and glue it to the bottom or top of the wreath.
Allow the glue to dry.
Your handmade Christmas wreath is now ready to display!
Personalising the Wreath
For a more meaningful decoration, write the child’s name and the year on the back.
Parents can keep these wreaths as Christmas memories and compare how their children’s handprints change as they grow.
This is also a lovely Christmas craft idea for preschool classrooms and family gatherings.
6. Toilet Paper Roll Christmas Reindeer
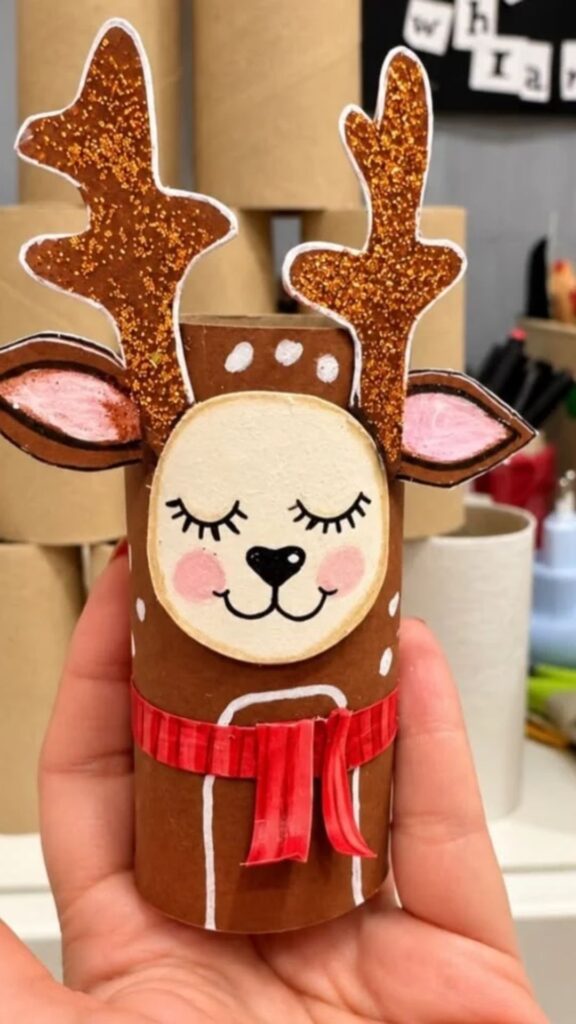
Recycling household materials is a great way to make affordable Christmas crafts for kids.
Instead of throwing away empty toilet paper rolls, turn them into adorable Christmas reindeer.
This project is easy to customise and gives children an opportunity to work with different textures and shapes.
Materials Needed
- Empty toilet paper rolls
- Brown construction paper or brown paint
- Red pom-poms
- Googly eyes
- Brown pipe cleaners
- Glue
- Scissors
- Black marker
How to Make a Toilet Paper Roll Reindeer
Begin by covering an empty toilet paper roll with brown construction paper.
You can also paint the roll brown if you prefer.
Allow the paint to dry before moving to the next step.
Next, attach two googly eyes to the upper front section of the roll.
Glue a red pom-pom below the eyes to create the reindeer’s nose.
If you don’t have red pom-poms, you can use a small red paper circle instead.
Now create the antlers.
Take two brown pipe cleaners and shape them into antlers. Attach them to the top of the toilet paper roll.
You can also cut antler shapes from brown construction paper if you don’t have pipe cleaners.
Finally, use a black marker to draw a small smile.
Allow the glue to dry completely.
Extra Decorating Ideas
Children can make an entire collection of reindeer using different nose colours and facial expressions.
They can also add small paper scarves or decorative buttons.
Arrange several finished reindeer together to create a cute Christmas display on a shelf or table.
Safety tip: Adults should help younger children with cutting and shaping pipe cleaners. Keep small decorations away from children who may put them in their mouths.
Read our posts on these
11 Easy New Year’s Eve Crafts for Families to Keep Kids Entertained During Home Celebrations
Easy Thanksgiving Crafts for Toddlers to Make at Home for a Fun and Creative Holiday
7. DIY Christmas Paper Snowflakes
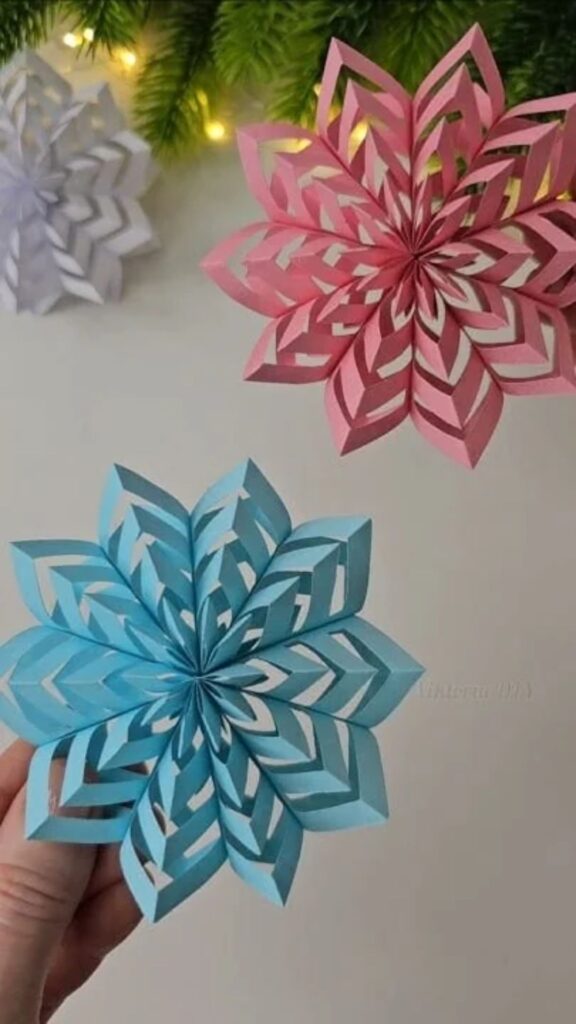
Paper snowflakes are classic Christmas decorations that never go out of style.
They are simple to make, inexpensive and perfect for decorating windows, walls, Christmas trees and classroom spaces.
The best thing about paper snowflakes is that every finished design looks different.
Children can experiment with different folding techniques and cutting patterns to create beautiful snowflake shapes.
Materials Needed
- White paper
- Child-safe scissors
- Pencil
- Glue (optional)
- Glitter glue (optional)
- String or thread
How to Make Paper Snowflakes
Begin with a square piece of white paper.
If your paper is rectangular, fold one corner diagonally until it lines up with the opposite edge. Cut away the extra strip to create a square.
Fold the square diagonally to create a triangle.
Fold the triangle again to make a smaller triangle.
Depending on the child’s age and cutting ability, you can fold it one more time.
Now use a pencil to draw small shapes along the folded edges.
These shapes can include triangles, circles and curves.
Carefully cut along the marked areas.
Avoid cutting completely through every folded edge because this may cause the snowflake to fall apart.
Once the cutting is complete, gently unfold the paper.
You will reveal a beautiful snowflake design!
Repeat the process using different folding patterns to create several unique snowflakes.
How to Use the Finished Snowflakes
Paper snowflakes can be attached to windows using removable tape.
They can also be hung from the ceiling using string or arranged on a Christmas display wall.
For a little extra sparkle, children can decorate the snowflakes with glitter glue.
This is one of the best easy Christmas crafts for kids because it requires very few materials and encourages creativity.
8. Christmas Paper Chain Garland
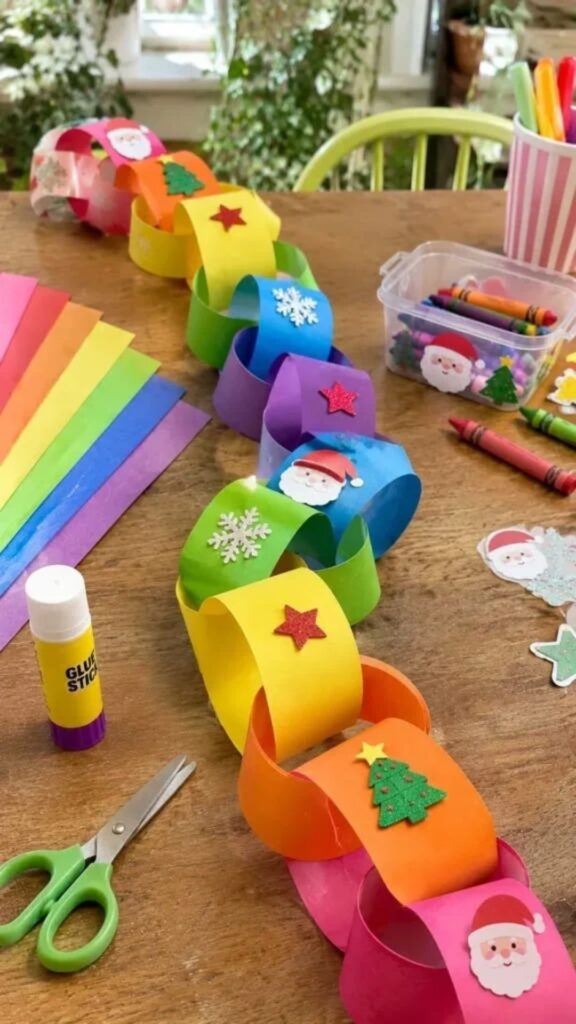
A Christmas paper chain garland is a simple decoration that children can make to add colour and excitement to their holiday celebrations.
It is particularly suitable for group activities because several children can work together to create one long Christmas decoration.
You can hang the finished garland around a Christmas tree, across a doorway or along a staircase railing.
Materials Needed
- Red construction paper
- Green construction paper
- White construction paper
- Child-safe scissors
- Glue stick or tape
- Ruler
- Pencil
How to Make a Christmas Paper Chain Garland
Start by cutting your construction paper into long, narrow strips.
Each strip should be approximately 2 centimetres wide and 15 to 20 centimetres long.
You can adjust the measurements depending on how large you want the paper chains to be.
Take one strip and bend it into a circle.
Overlap the two ends slightly and secure them using glue or tape.
Take another strip of a different colour and pass it through the first circle.
Join the ends of the second strip to create another circle.
Continue adding strips, alternating between red, green and white paper.
As you repeat the process, the paper chain will become longer.
Once you reach your preferred length, allow the glue to dry.
Your Christmas paper chain garland is ready!
Creative Variations
Children can use gold, silver and other festive colours to create different designs.
They can also decorate individual paper strips with small stars, drawings or stickers before connecting them.
For a classroom project, assign different colours to different groups of children and combine their paper chains into one large Christmas garland.
9. DIY Christmas Card Craft for Kids
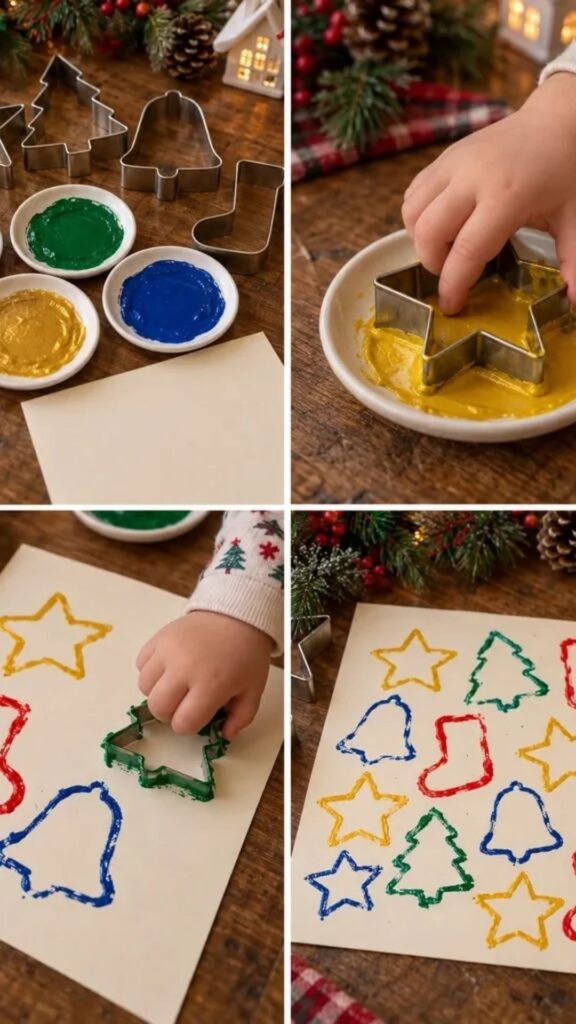
Handmade Christmas cards are a wonderful way for children to share holiday wishes with friends, family members and teachers.
Unlike store-bought cards, DIY Christmas cards can be personalised with drawings, messages and decorations.
This project is also an excellent opportunity to encourage children to practise writing and express their creativity.
Materials Needed
- Coloured cardstock
- White construction paper
- Red and green paper
- Glue stick
- Child-safe scissors
- Markers or crayons
- Stickers
- Cotton balls
- Glitter glue (optional)
How to Make a Handmade Christmas Card
Start by folding a piece of cardstock in half to create the card.
Choose a design for the front.
You could make a Christmas tree, Santa Claus, snowman, reindeer or a simple collection of festive stars.
For a Christmas tree card, cut out a green triangle and glue it to the front of the folded cardstock.
Cut small circles from colourful paper and attach them to the tree as ornaments.
Add a yellow star to the top.
You can also use small pieces of ribbon or cotton balls to decorate the design.
Once the front decoration is complete, open the card.
Ask the child to write a short Christmas message inside.
Younger children can draw pictures or dictate their message to an adult.
Allow the card to dry before giving it to someone special.
Christmas Card Message Ideas
Children can use simple messages such as:
- Merry Christmas!
- Wishing you a joyful holiday season.
- Have a wonderful Christmas!
- Sending you love and happiness this Christmas.
- May your Christmas be filled with smiles and beautiful memories.
Encourage children to create different cards for family members and friends.
10. DIY Christmas Paper Angel Craft
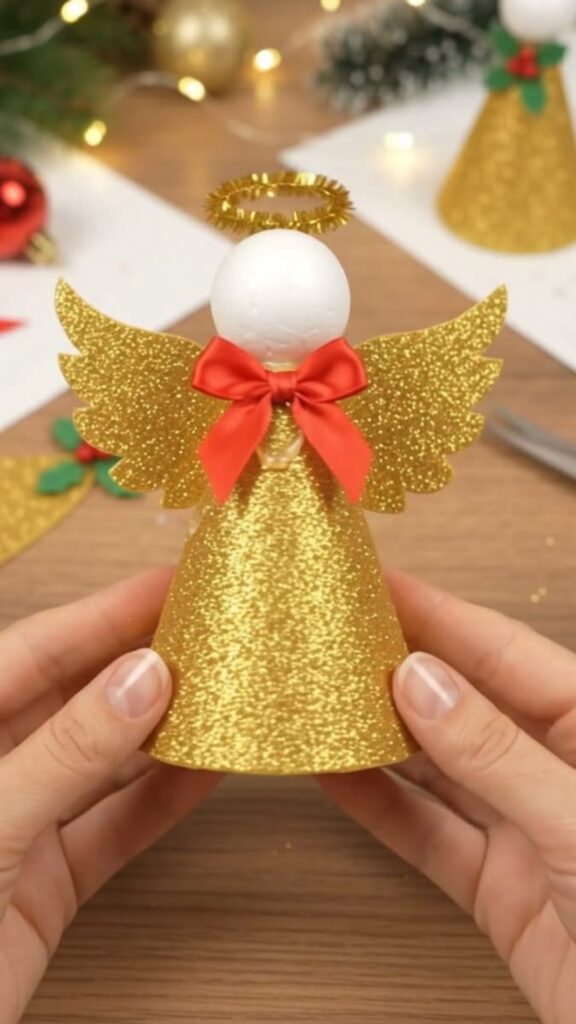
A paper angel is a beautiful Christmas craft that children can make using basic art supplies.
Angels are often associated with Christmas decorations, and their simple shapes make them suitable for a variety of creative projects.
This craft can be displayed on a Christmas tree, attached to a greeting card or used as part of a holiday decoration.
Materials Needed
- White construction paper
- Gold or yellow paper
- Pencil
- Child-safe scissors
- Glue
- Markers
- Ribbon or string
- Decorative stickers
How to Make a Paper Christmas Angel
Start by drawing a simple angel body on white construction paper.
The body can have a triangular shape with a small circle at the top for the head.
Carefully cut out the shape.
Next, draw two wings on another piece of white paper.
Cut them out and attach one to each side of the angel’s body.
Now create a halo using gold or yellow paper.
Cut out a small circle or ring and glue it above the angel’s head.
Use markers to draw the angel’s eyes, mouth and other facial details.
You can also add small decorative patterns to the dress using colourful markers or stickers.
To turn the angel into a Christmas tree ornament, attach a small piece of ribbon or string to the back.
Allow the glue to dry before displaying it.
Ways to Make the Angel More Beautiful
Children can use gold glitter glue to decorate the wings and dress.
They can also create different angel designs using coloured paper and additional decorations.
For a group activity, encourage each child to make an angel with a unique outfit and hairstyle.
Tips for Organising a Fun Christmas Craft Day for Kids
Making Christmas crafts with children can be a wonderful experience, but having a little preparation makes the activity easier and more enjoyable.
Whether you are planning a family crafting afternoon or organising a Christmas activity for a classroom, these tips can help everything run smoothly.
Prepare the Materials Before Starting
Gather all the necessary supplies before introducing the projects.
Place materials such as paper, glue, scissors, cotton balls, paint and decorative items in separate containers.
This helps children find what they need without interrupting the activity.
It also makes the crafting area more organised.
Choose Crafts Based on Age
Not every Christmas craft is suitable for every age group.
Younger children may enjoy simple activities involving painting, gluing and arranging large decorative shapes.
Older children can try more detailed projects that require cutting, folding and assembling different materials.
Choose activities that match the children’s abilities so they can enjoy the process without becoming frustrated.
Allow Children to Be Creative
One of the most important things to remember when making Christmas crafts with kids is that the finished projects do not need to look perfect.
Children should be allowed to choose their colours, decorations and designs.
For example, a Christmas tree does not always have to be green. A child might prefer a pink, blue or rainbow-coloured tree.
Encourage these creative decisions instead of expecting every project to look the same.
Use Affordable and Recycled Materials
You don’t need to spend a lot of money to organise a successful Christmas craft day.
Look around your home for materials that can be reused.
Empty cardboard boxes, toilet paper rolls, old magazines, leftover wrapping paper and cardboard packaging can all become useful craft supplies.
Using recycled materials also teaches children the importance of reducing waste.
Keep the Crafting Area Safe
Safety should always be considered when children are making DIY Christmas decorations.
Use child-safe scissors and non-toxic glue whenever possible.
Adults should supervise activities involving scissors, small decorations and other potentially hazardous materials.
Avoid using sharp tools or hot glue guns around young children.
Keep small craft materials away from toddlers who may accidentally swallow them.
Also, protect your working surface with old newspapers or a washable table covering, especially when painting or using glitter.
Display the Finished Christmas Crafts
Children feel proud when they see their creations displayed around the house.
Create a special Christmas craft corner where they can showcase their finished projects.
You can hang paper snowflakes near windows, arrange handmade ornaments on the Christmas tree and display Christmas cards on a shelf.
Taking photographs of the finished crafts is another wonderful way to preserve holiday memories.
Frequently Asked Questions About Christmas Crafts for Kids
What Are the Easiest Christmas Crafts for Kids to Make?
Some of the easiest Christmas crafts for kids include paper Christmas trees, cotton ball snowmen, paper snowflakes, popsicle stick ornaments and handmade Christmas cards.
These projects require basic materials and simple instructions, making them suitable for beginners.
What Materials Do Children Need for Christmas Crafts?
Children can make many Christmas crafts using affordable materials such as construction paper, cardboard, popsicle sticks, cotton balls, glue, paint, markers, ribbons, buttons and recycled household items.
You don’t need expensive craft supplies to create beautiful holiday decorations.
What Christmas Crafts Can Preschoolers Make?
Preschoolers can enjoy simple Christmas activities such as decorating paper Christmas trees, making cotton ball snowmen, creating handprint wreaths and painting paper plates.
These activities allow younger children to explore colours, shapes and textures while developing their fine motor skills.
Adults should assist with cutting and supervise the use of small decorative materials.
How Can I Keep Kids Entertained During Christmas Holidays?
Christmas crafting is an excellent way to keep children entertained during the holiday season.
You can organise a Christmas craft afternoon where children make decorations, greeting cards and handmade ornaments.
Other activities include decorating gingerbread houses, reading Christmas stories, singing holiday songs and making simple Christmas treats with adult supervision.
Are DIY Christmas Crafts Expensive to Make?
No. Many DIY Christmas crafts are inexpensive because they use everyday materials.
Paper, cardboard, empty toilet paper rolls, cotton balls and leftover ribbons can be transformed into beautiful Christmas decorations.
You can also reuse materials from previous craft projects to reduce costs.
How Can I Make Christmas Crafts More Educational?
You can introduce simple learning activities while children are crafting.
For example, ask them to count the ornaments they attach to a Christmas tree, identify different colours or practise recognising shapes.
Older children can practise measuring paper strips, following instructions and writing Christmas messages on handmade cards.
This makes Christmas crafting both entertaining and educational.
What Are Some Christmas Crafts Kids Can Make as Gifts?
Children can make handmade Christmas cards, popsicle stick ornaments, paper angels, decorated Christmas wreaths and personalised decorations as gifts.
These handmade items are thoughtful because they allow children to share something they created themselves.
Conclusion
Making Christmas decorations with children is a wonderful way to enjoy the holiday season while encouraging creativity and family bonding. You don’t need complicated instructions or expensive supplies to create beautiful decorations. With simple materials such as paper, cardboard, popsicle sticks, cotton balls and glue, children can make all kinds of festive projects.
From DIY paper Christmas trees and popsicle stick ornaments to adorable snowmen, handmade cards and paper angels, these 10 easy Christmas crafts for kids provide plenty of inspiration for a fun holiday crafting session.
Remember that the most important part of Christmas crafting is not how perfect the finished decorations look. It is the creativity, excitement and special memories children experience while making them.
So, gather your craft supplies, invite the little ones to participate and spend some quality time creating beautiful handmade Christmas decorations together. These simple projects might become some of your family’s favourite holiday traditions for years to come.